Sunday, April 29, 2018

Soup's Up!

That's the easy part done.
"Cookie" originally had a ladle but it broke prior to me painting him in 2008 as an Oberhilse field hospital orderly. No matter his glare will stir the soup!
The new infantry recruits have their basic uniforms and will hopefully get fleshed out and given kit tomorrow. One little problem cropped up though. I sat down at the table to visualize how the extra units would fit in. That's when I remembered that the table is only 14 squares wide. With an empty one on each end, each of the 4 German players will only have a frontage of 3 squares  on which to deploy their proposed 7 companies and supporting artillery. That sounds like wall to wall troops to me and won't do.

Now that I think about it, that and the look were the reasons that I had been contemplating using stronger individual companies that would be a bit harder to eliminate as opposed to more small companies. Technically that doesn't actually require more figures but 4 men in a 5" square does look pretty thin, and since the extras are here, 6 figures will look better!

"Hey Cookie, see all those new recruits over there? They look hungry!"
Oh, I forgot to add, the soup cart isn't just a pretty toy. As long as it is undisturbed and on table, a "support" stand allows a player to try to recover one hit each turn. If attacked it is removed and counts as a unit lost for army morale. 

Friday, April 27, 2018

Reinforcements Are Approaching the Front


  • There's no way around it. I've been fiddling with the damned rules as a way of trying to avoid the fact that for a good 8 player game with the best, simplest, most effective version of my rules, I am going to need more men!


Hans, we better get the cooking cart painted up and get some soup on!
Not all that many more thankfully and the source is close at hand.
Here they come!
Instead of each of 3 German players having a full strength battalion of 4 companies, they will each have  a half strength regiment of 6 companies plus a machine gun company supported by a battery.

I'm also going to finally paint up the Zinnbrigade field kitchen I bought a decade ago to use as a  support token.

Rumour has it that a few companies of La Légion may show up in time to swell the ranks of the allied defenders as well.


Monday, April 23, 2018

The Great Machine Gun Compromise

The Machine Gun is an iconic weapon for 1914. They were also an iconic toy soldier figure for most of the 20th Century so I needed to include MG models and have them be different from other infantry.

The Belmont Arms Factory fills another order.
My game is designed at a fairly abstract intermediate level with a grid square's worth of troops representing a company of between 100 to 200 men.  The basic infantry organization for the British and French armies consisted of 4 companies of infantry and a pair of machine guns. The German infantry battalions were also 4 companies but they had no integral machine guns, instead there was a 6 machine gun company grouped with 3 battalions to form a Regiment. The ratio of machine guns to men was the same but in one case the machine guns were concentrated and the other they were dispersed.

At first glance it seems easy enough, an old school set of rules would just mirror the organization and let players place their machine guns where they thought best. A modern set of mid level rules or a board game would just "factor them in". When trying to write a simple, mid-level gridded game with a certain sort of toy soldier feel to it however, its a bit harder.

I need to see the machine guns and have them be different but I can't really have a pair of machine guns holding the frontage of a company of infantry without any infantry support. My compromise was to include an MG in one of the infantry companies and give it more firepower when stationary but not be able to move and fire.

When I turned to the Germans I have been torn between two options. The simplest and most Toy Soldierly option would be to use the same rules for both sides and assume that all of the MG sections have been distributed in support of individual battalions, something that was done at least occasionally.  The other would be to stick to the book and have pure MG companies and no mixed companies for the Germans. In a multiplayer game this means that some German players will not get to use MG's when they play the game. More than that, I need to tweak the rules so that the all MG companies and the mixed companies have strengths and weaknesses.

Having failed to come to a definite conclusion, I had decided to dodge the issue by doing the German MG's in pairs and doing an extra pair of infantry stands to go with each. That way I will have 3 options:
1. Field 2 stand MG companies if I can get the rules balance right or
2. Field 2 game unit MG units each with an MG and a stand of infantry, just like the British and French ones. The assumption would be that they have been assigned infantry supports and the effect would be that all MG stands would have the same effect, just the distribution would change.
3. Issue one MG to each German battalion so that all players would get at least 1 MG unit and both sides would fight the same way, like Red and Blue armies.

So far I'm leaning to Option 2 but once I finish these 2 MG stands with crew and infantry supports, all options will be available on any given day.

Friday, April 20, 2018

Plans and Contact

"They" do say that the one never survives the other for long.

The first of several gratuitous shots of Toy Soldiers in battle.
I did play the game in the teaser shots with a handful of 6 figure units on each side. Of course, I tweaked the rules to suit having fewer but larger units. The resulting game was pretty good with an 11th hour victory but I was too busy playing to remember to take pictures. Worse, it brought my mind back to my uncertainties about  certain aspects of the then current version of my Tin Army/Square Brigadier rules which I've been honing for my WW1 game.

There was only one real option then, reset and play a game with my standard organization and rules. The shorter ranges and so on of an 1870's game would have some effect on the feel but already armies were fighting primarily with firing lines and supports so the game mechanics would remain relevant.

Game 2. Back to normal, let the game begin again! 
The resulting half a game was OK BUT all of my concerns showed up. Basically rules that were supposed to help bring out the feel of units having trouble advancing under fire while making the players feel like they were in charge and not just trying to survive the dice were driving the game off track. I realized part way through that as a player my attention was focused on company commander decisions, not Brigadier/Force Commander ones and that the rules supposedly designed to encourage typical brigade formations and tactics were resulting in some very questionable game tactics.

Gratuitous shot from game 2 or maybe 3...

I knew the basics of the rules were sound  so it had to be the combined effect of misdirected intent and the particular implementation of various sub-rules that I have been fiddling with. Several hours later I had a revised version of the rules, sufficiently more Tin Army than Square Brigadier and for the same reason that the two both exist.

In essence the re-revised rules removed various low level tactical choices such as "go pinned or suck it up and press on" from the player and automated them, leaving the player to fight his whole force rather than focusing too much on individual units in isolation. I also followed the old Tin Army versions and again removed the old Square Brigadier rally rules while at the same time stopping the risk of a unit being quickly swept away by long range fire. (Close range fighting, say under 150 yards, is as deadly as ever.) This is enhanced by the retention of a modified support rule to reflect the stress placed on the value of support in so many low level battle accounts.

As hoped, the third game flowed better, the armies maintained battalion formations because they worked, not because they had to. As player I had fewer unit level decisions to make and this kept my eye on the over all battle while keeping me constantly scared!

Game 3.  From tied but on the cusp of a US victory on turn 12 of 15 to sudden US collapse followed by a Canadian victory on turn 14. 

Of course, whether this is all in my head or not will have to wait for the next multi-player game.


d

Wednesday, April 18, 2018

Another day, Another River Crossing

At last, the books for my wife's grooming shop are done and our tax stuff (technical term there) submitted with 2 weeks to go!  Time to play.
I still have some figure painting, terrain construction and play testing to do for  Huzzah but I just wanted to play a simple game, no strings attached. So, I broke open One Hour  Wargames and selected a River Crossing scenario that I don't remember playing. (Note: I may have played it but since I don't remember without checking its close enough.)  Then I turned to my shelves to pick a period and armies: 54mm traditional toy soldiers or 40mm semi-flat 18th C?

Or maybe one game of each.......
Somewhere in the Red River Valley. 
Well, its all set up but... I'm out of time! Tomorrow then.

Sunday, April 15, 2018

Veterans Clash in the Valley

Wargame Armies and projects come and the go but sometimes they come back!  So it was with Paul's 25mm Minifig ECW army  which he painted in the 1970's. As it happens, they not only came back to him after the demise of our friend Joseph a few years ago, but they came with extra units from various sources including a contingent of Scots both painted and unpainted.

When the quarterly public Table Top Gaming day came up in Kingston in the Annapolis Valley, Paul volunteered to get them table ready if I provided rules and a scenario. Jeff with his much more recent 28mm ECW hordes, which he uses with either Baroque or Victory Without Quarter, was unavailable so I decided to write a one page, quick play set suitable for the occasion.

After much sorting and rebasing to a common standard, Paul was able to field 11 regiments of Pike and Shot, each 18 strong, 1 unit of 12 highlanders, 9 squadrons of cavalry including 1 of cuirassiers, 2 of Scots and 2 of dragoons, each 6 strong, and 6 guns. I still had one unit of Scots pike, 2 of highlanders and a squadron of cavalry. Paul had 2 mounted Generals and I had 2 left over cavalrymen which were quickly promoted. Another commander per army would have been useful.

Given the mix of troops available I decided to go with a scenario inspired by some of Montrose's victories and secretly added 2 more units of medieval Highlanders without mentioning it to Paul.

The Covenanters rush onto the table hoping to sweep away the tiny holding force before it could be reinforced.
In order to set the scene properly I found myself obliged to brief Paul and Martin with what they were supposed to believe  which is that their rapid approach march had surprised the enemy and that they would be reinforced  as the game went on so speed was of the essence. Their deployment was an area 1 foot deep and two feet wide centred on the road.

The truth, of course, was that those reinforcements were already on table, lurking in ambush on the flanks.

Paul puts on his Battle Face.
It took a little longer than I had hoped for us to get sorted out and started but eventually we got there. 

Paul commanded the left of the  Covenant force with the bulk of the infantry and artillery while Martin took the left with most of the cavalry.


Brent, not worried at all by the apparent 3:1 odds.
Brent was given command of the on table portion of the Royalists. While I had the luxury of beginning as a non-playing GM, at least until some of Martin's Dragoons stumbled into a stray unit of Highlanders lurking in some woods.

The red dots mark 'out of command' units that must make an initiative roll before moving.
Since Martin decided to send his cavalry sweeping around the flank, it didn't take long to find the lurking Highlanders. I figured that would give the whole thing away but apparently it didn't. It did slow down that flank though and twice the Highlanders managed to catch a unit in flank as it tried to march past the wood. 

The Scots cavalry get impatient
As Brent watched the flood of cavalry approaching his sole unit, he decided to launch a preemptive strike. He had a theoretical shock bonus on the initial round but the dice were not kind to him.


Confusion reigns!
One of my units of Highlanders had been inspired to support our cavalry by charging into the flank of another enemy cavalry unit and they fared much better. Luckily, the Dragoons resisted the urge to intervene (failed initiative) while the Highlanders swiftly fell back to cover and resumed sniping.
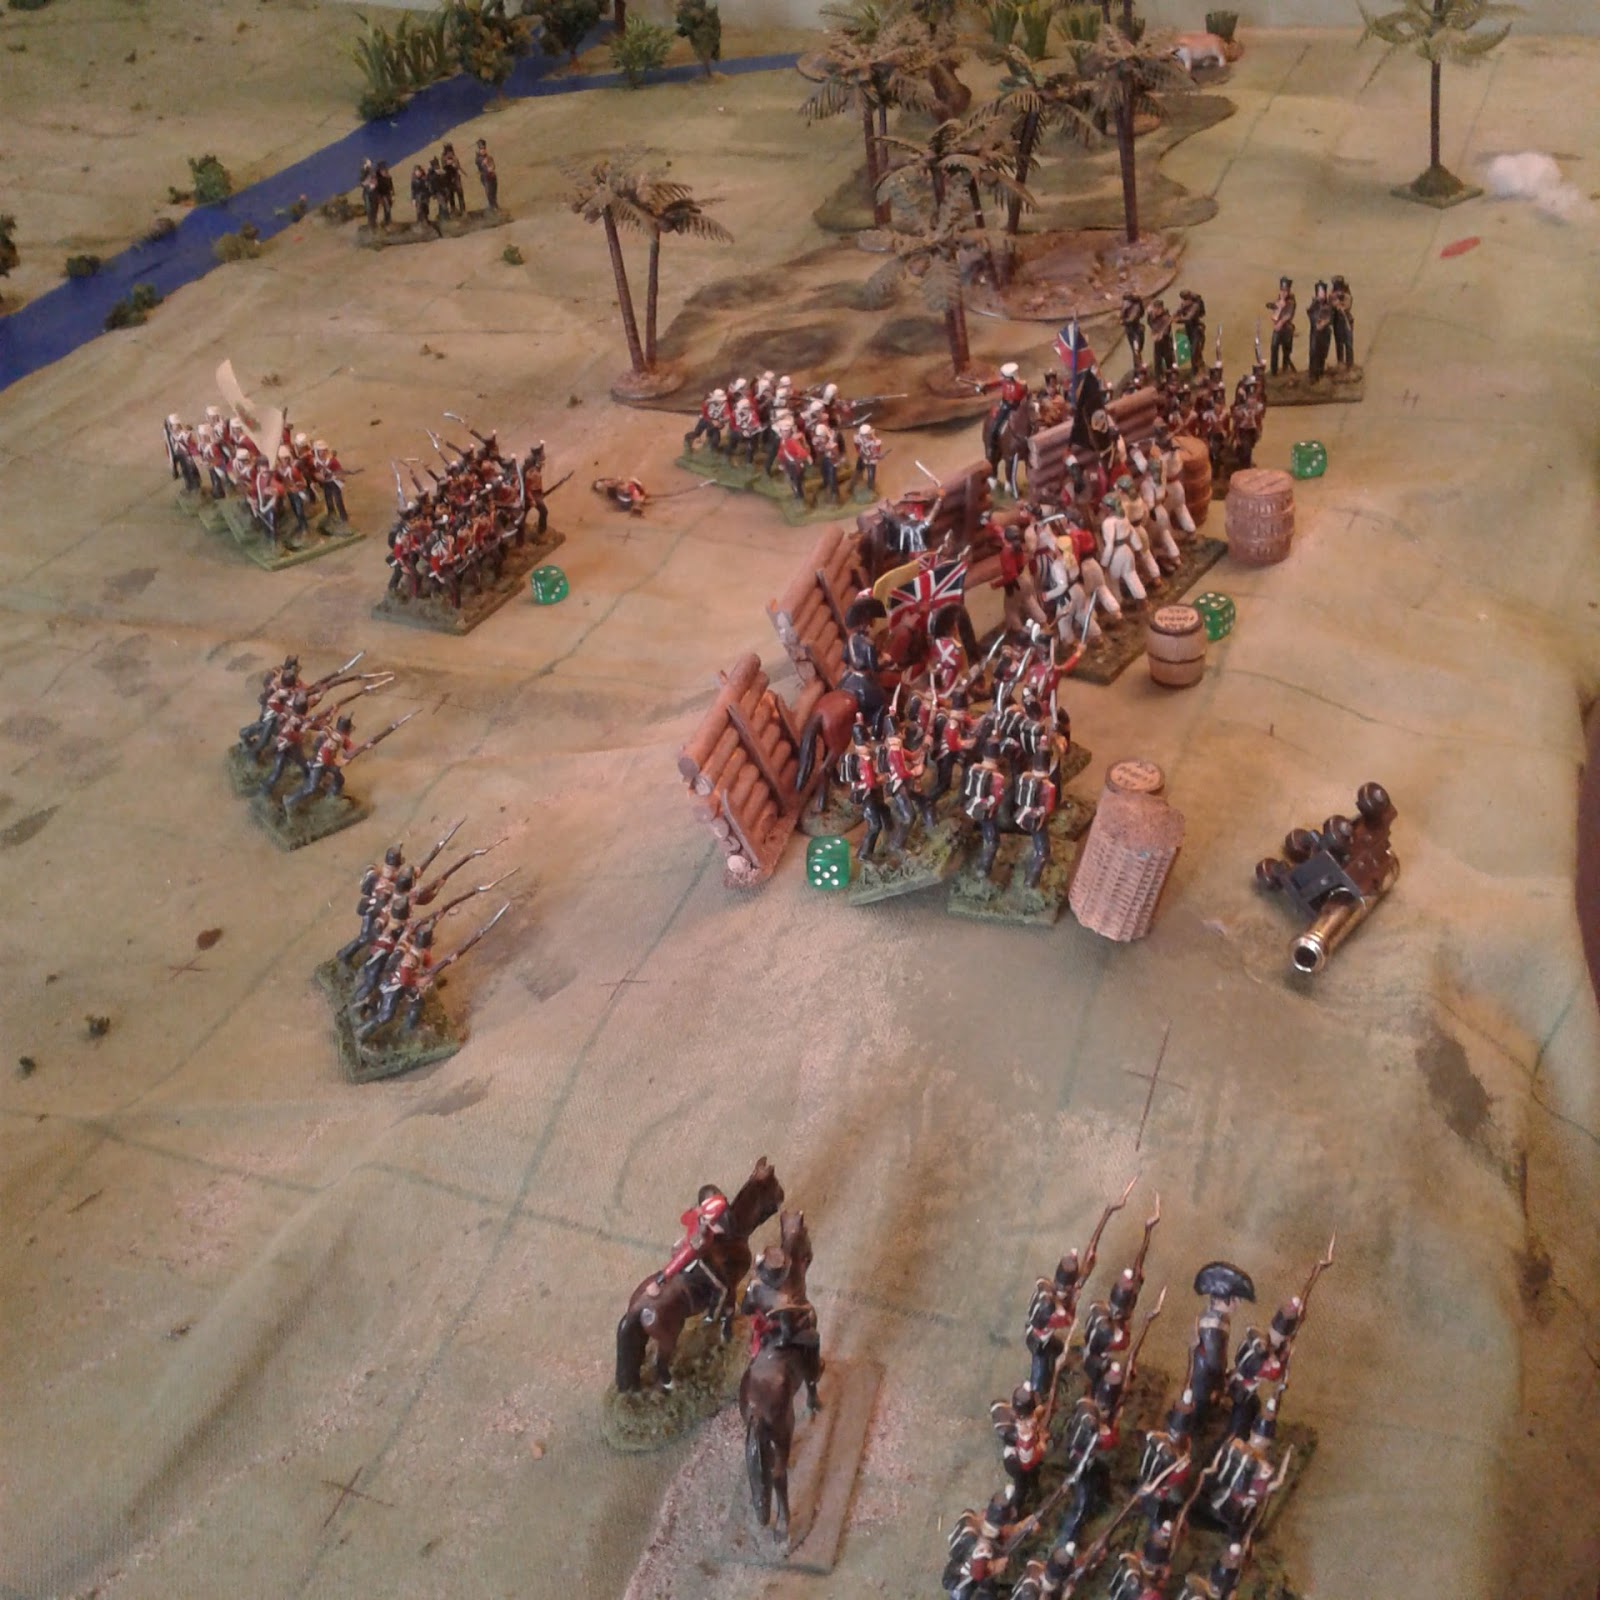
The battle rages across the table. 
On the other side of the field I watched the enemy continue to rush everyone forward without throwing out a flank guard. I'm still not sure why I initially flung only one unit of Highlanders into the open flank but it was very nearly a disastrous decision. Luck was with me however and eventually the enemy broke, leaving my two units to spend most of the rest of the game trying to rally sufficiently to resume the attack. 
The Crunch approaches!
Thus far the Royalist forces had given slightly better than they had taken but the day was yet young and the Covenant forces had pressed on, sublimely indifferent to the any threat to their flanks. Now they were about to assail the main position with more than 2:1 odds, infantry in front and cavalry to the flank.  The battle was a long way from decided.

ALAS! At this point in the game, Brent had to leave and the cameraman got involved in heavy hand to hand fighting all along the line.

In short the assaults on the ridge were held, both against the infantry to the front and the cavalry to the flank. Casualties were heavy on both sides though and the Royalist infantry were very glad to see their cavalry reserve rolling up over the hill on their left flank and into the flank  of the attacking enemy supported by a final swarm of Highlanders.

My old Valdurian Horse still has it!
When the end came, it came swiftly.  The sole unit of Covenant Horse on their right had been prepared for an attack over the hill and put up a fight but were eventually swarmed by Highlanders as well as the cavalry.

The pikemen in the centre however had been hotly engaged in a firefight to the front when the Royalist cavalry not only hit them in flank but rolled up on the dice and went through them like a hot knife. As the Royalist foot  began to advance down off the hill, the whole Covenant centre started to break.

The left wing  Covenant foot attempted to turn and move to reinforce the centre but the Dragoons again refused to come forward and cover their open flank and again my Highlanders could not restrain themselves.

The whole army dissolved in rout.
Late in the day the Covenant right and centre broke and the battle was suddenly over. The Royalist army had suffered terribly though and one more turn might have seen them break before the flank attack could have the desired effect.
So ended the first wargame for Paul's revived Minifig ECW armies but it won't be the last.

It took us about a little over an hour to  get organized, chat about this and that, set up the table and sort the troops. The game itself took about three hours to play about 10 of 15 possible turns and was close and hard fought. As a bonus we just may have enticed a suitable recruit to join us in a future game or two.

All in all a Saturday well spent!

Saturday, April 14, 2018

Post-game Teaser

Just back from the game in Kingston, NS.
 For now I'll just say it was an enjoyable day out and a close game.

Friday, April 13, 2018

Whiling Away a Rainy Day

It was a dark and stormy morning with lots of wind and rain and no electricity. By 8 am all was back to normal but the mood was set and I did not feel like doing housework, or bookwork or even working on stuff for Huzzah!. I cleared my table and was on the point of flipping open OHW  and grabbing some 54mm toy soldiers when it occurred to me that I could fudge a test game of the new one page ECW rules using my 16th C lads.

The Scots prepare to defend against a horde of invading foreigners, doubtless in English pay. 
 The Scots ended up with 2 units of cavalry, 2 of pike and shot, 2 of highlanders and a heavy gun. The "English" brought a unit of Cuirassiers, 1 of cavalry, 1 of Dragoons, 3 pike and shot and a light gun. The invaders only had a slight advantage in "power" if not numbers  so the onus to attack was placed on them. If the game was a tie the Scots would win.
The English Dragoons pushed forward to "amuse" the Highlanders and attacked with the Cuirassiers while the rest marched forward at best speed. 
The Scots horse were tougher than they looked and the opposing cavalry destroyed each other as fighting units. In the centre the opposing infantry are pushing their pikes and the Highlanders on the left have decided that they can take the enemy pike now that the artillery and Scots musketeers have filled them full of 6's. 


The last few Highlanders on the left have fallen back to let the Scots pike take over but the central block of Scots have broken for the rear. Its time for a final, deciding cavalry brawl with both Generals in the front rank while the Highlanders on the right are bored with this futile shooting business. 

The Dragoons have scattered but the Scots General is down, his cavalry broken and his artillery captured.
"Back tae the hills"!
I found a couple of minor oopsies which I have fixed: Heavy guns were supposed to have +1 per die for superior firepower, not +1 die, isolated units were supposed to dice to see if they could move and there were originally 4 dice per unit in melee to heighten tension so I have restored that.

All in all though, it worked as intended. As with all one page set of rules, there were lots of bits of detail and flavour missing but I think the essentials worked and they should be easy to pick up. Tomorrows game will see about twice the number of units and 2-4 players. Bring it on.

Monday, April 9, 2018

"By the sea we will gather for the fight"

This coming Saturday is the next Table Top Games Day in Kentville and Paul is busy refurbishing a host of old Minifig ECW figures.

I've pledged a scenario and a set of quick play, easy to pickup, rules but I figured I should wake up my own contingent of Minifig Scots.

Serving since the mid 1970's under a Macfarlane battle flag with officers in my first ever attempt at painting a Macfarlane tartan.
(I'd never seen the real thing at the time) 
The pikemen, archers and a few of the cavalry date from my college days, some of the very few, new, chunky style, Minifigs I ever bought. When the style changed, I changed to Garrison! The musketeers and lancers conversions from my revival of this forces in 2010/11. (check the ECW label for more). The Highland contingent  has been swollen by a contingent from the collection of the late John C Robertson sent along by Tim (see Megablitz blog)

The whole contingent, such as it is.
They're only outnumbered 10:1, shouldn't be a problem.
The one page rules can be found here (click) but be warned, Saturday's game will be their first play test.

For those who are wondering about the post title (I know, I know, not strictly relevant but...):


Friday, April 6, 2018

Meanwhile, behind the scenes

Sometimes even being retired doesn't provide enough time. However work goes on behind the scenes.

"The Plowman homeward plods his weary way." 
(leaving the fields 1/2 plowed, the lazy sod!)
I had been pondering an expedition to find a new piece of cloth for a wargame battlemat for Huzzah! but its just not going to happen. This old rag will have to do despite being a foot short and having a few  slips of the pen from when I quickly drew on a 5" test grid a few years ago.

The initial plan for Huzzah! had been to be just drop sand roads and woods templates onto the table as part of set up but that's a nuisance to get right in a hurry at a Con. An easy, fast, setup alternative that I've used a few times in the last 20 years is to paint the scenario terrain onto the mat and just plonk down trees, houses, etc onto the marked template on the day. That work is now in progress.

Early days yet, but in my head, it already reminds me of the play mats in the old  Marx Mini-Masterpiece Boxed Sets.


Tuesday, April 3, 2018

SPECIAL EDITION: THE FOX IS IN THE HENNS


Report on the  Expedition to Greater Henn Island

During the two years that followed the Air, Land and Sea Expedition up the Neverwaussie River, the North-East of Atlantica had been very quiet and coastal trade had flourished. Recently, however, there had been increasing reports of criminal attacks on shipping and coastal settlements in the area and Her Majesty ordered her government to deal with the matter.  Intelligence  reports indicated that an abandoned town on Greater Henn Island had been reoccupied and was being used as a base for the Brethren of the Coast. An expedition was hastily assembled and dispatched by sea.
The Brethren  lurking in ambush in a patch of jungle.
By the time our force of 6 battalions of infantry including 2 companies of light infantry, 2 companies of Victoria Rifles, a Naval 18 pounder and the Faraway Trading Company Rocket Battery had landed, the morning was well advanced.

Having scouted the enemy positions which appeared  to consist primarily of an earth and wood redoubt on a low hill,  General Turner sent Brigadier Stoneforte with the Rifles, Green Tigers and Buffs across a ford on our left while  Brigadier Spye with two battalions of the Brooklyn Fusiliers was to cross a bridge near the ruined town. The Naval artillery and Rocket battery were to deploy in the middle and pound the redoubt to rubble. The Royal Fusiliers formed our reserve.

A balloon's eye view of the battlefield.
As the Fusiliers approached the abandoned town they were met by a deadly volley of musketry. It soon became clear that the Brethren had allies! The presence of White coated regulars pointed to support from the neighbouring Kingdom of Kyuquat but even more alarming was the presence of a body of determined men in a ragtag assortment of Oberhilsian uniforms.

Our first attack was repulsed but the men rallied handily and the bridge was soon taken. A gruelling street fight followed and it took most of the day to clear the town and move forward to assault the redoubt.

On our left flank, the Rifles pressed forward to engage enemy snipers in a patch of jungle while the main columns marched rapidly to assail the redoubt.  Suddenly a band of ragged pirates armed with cutlasses, axes and clubs burst out of the jungle  onto the flank of the lead column. Taken by surprise the Tigers broke and ran, a sight even more surprising than the appearance of the enemy. They bolted back through the Buffs and swept them away as well. 
In the foreground, street fighting rages but in the distance the red columns have skirted the wood and are approaching the redoubt.
With their usual elan, the Rocket Troop galloped forward and deployed. Soon rockets were wooshing up into the air making a tremendous display of modern warfare as their smoke trails wove intricate patterns in the sky. The answering roar from the redoubt showed that the enemy had dismounted some of their heaviest naval guns to arm the redoubt and they knew the range! It seems they also had a furnance and a red hot shot landing square on an ammunition cart caused a huge explosion. The surviving members of the rocket battery were obliged to fall back until a new supply of rockets could be landed. The Naval gunners dragged their guns forward and took up the duel. They were alone and in the open but they knew their business and soon silenced the pirate battery. 
The final assault
At last, the town and jungle had been cleared, the Buffs and Tigers rallied and all was ready for the final assault. A bugle rang out and from both flanks our soldiers rushed forward with a cheer, bayonets gleaming as the last rays of the setting sun hit them.

The last handful of Oberhilse volunteers put up a tough fight but they were too few and soon swept aside. The main body of Brethren fought fiercely but even they started to waver but that old Black Fox  was there and held them to their work. Our men had to fall back briefly and when they renewed the assault, the enemy had gone. 

Darkness comes fast in these parts once the sun drops below the horizon and to chase these devils into the jungle in the dark is madness.  We'll probably never know why they stood to meet us or why they fought so hard to hold us there. Was this only a rearguard to cover the evacuation of stores and treasure? or perhaps to give a larger allied force time to manoeuvre?

In any event, we collected our dead and wounded and retired to the fleet while we tried to convince ourselves that this was a victory because we had eventually taken the ground and driven them off. In truth though, it felt more like they had left of their own free will when their job was done. 

Monday, April 2, 2018

Diversion

I'm not used to being this focused on one period and one scenario and I felt like it was time for a break. Something quick and simple and different, then I could get back to "work".

I had a vague image in my head of a mid-18thC NQSYW petite guerre scenario, an ambush perhaps,  but since I wanted something quick and easy I turned to Thomas's One Hour Wargames.
The Wolf Regiment and Freedom Legion Volunteers prepare to defend the ruins of a once busy town.

OK, this wasn't what I had in mind but when I flipped the book open I found myself looking at the last scenario. This is an example of a Last Stand and one of the few scenarios in the book that I hadn't tried yet.


I could tell you how the game went but I believe that a reporter from the Newport Noodle was present with the Red Queen's troops so we can expect the Noodle to publish a report ere long.

Sunday, April 1, 2018

Hotchkisses

Another hurdle overcome, sort of.
The Zouaves and Chasseurs now have an MG each.

I thought making Maxims was stretching my scratch building skills until I turned to the French army's Hotchkiss machne guns.
Thank you  whoever I borrowed this picture of a Hotchkiss from. 
Rather than a big fat water filled sleeve with a  big breech section and tripod,  the air cooled Hotchkiss has a thin barrel with another thin cylinder (gas?) underneath, with a big complex base connecting the gun to a tripod.

The tricky bit was the thinness of the barrel and other cylinder and the scarcity of materials, tools and techniques on hand for me to work with. After rejecting various fiddly possibilities which, in the unlikely event that they were successful,  would have been very fragile on the table, I finally remembered that I still had some sprues of 1/35th WWII bits in the cupboard including some air cooled German light machine guns and some ammo boxes. 
A very crude portrayal of the pedestal and there are no fins but....
Oddly, despite being 1/35 item used with 1/43rd-ish figures, they look a bit too short and thin to my eye but they'll do.

The Zouaves are now ready for battle.