Friday, April 29, 2016

The end of the Pass

I didn't plan on finishing this game today but I sat down beside the game with my mid-morning coffee and somehow, by the time the last sip of cold coffee was gone, the game was over. (and my chores were late..)
Mid game. General Milne's redcoats have cleared the heights against light resistance following the unexpected rout of the new battalion of Irish volunteers. The battle is far from over though and the veteran General Zinn has called up his reserves and formed a new line across the mouth of the valley.
The rules played out well again with no new tweaking required and took about 1/2 the time of the larger game (with smaller figures). I had both sides use the same programmed orders for continuity but allowed Red to reroll for level of aggression and this time was allowed to attack before all troops were deployed. The initial attack went better than last time, possibly due in part to the reduced number of units which made each encounter more important. The wheels almost came off though when the Oerberg Volunteers were destroyed in a fierce 2 round melee and the Irish who were in reserve had to take a rally test due to disorder from artillery fire. With a +l for Brigadier attached but -2 for being part of a Brigade that had lost 1/2 of its units they needed 2 or better to pass. They rolled a 1 and routed. Oops! With the Western flank being slowly forced back by a combination of artillery, infantry and the threat of cavalry charges, the whole Eastern flank and centre was now held by 1 battery of guns. Time to call up the reserve of Blue Guards and Dragoons.

There was a break in the action as Faraway's redcoats struggled to advance and reform prior to a final assault on Oberhilse's new line. Since the moves and ranges were slightly longer and the forces smaller, I had only set a turn limit of 12 turns. There was no time to waste.

At last, after a brief bombardment the assault went in. The Tigers and Buffs vs the disordered Blue Guards, 2 Volunteer units against Blue's battered regular brigade, the Victoria Rifles against the gun and the Kapelle Mounted Rifles against the 3rd unit of Oberhilse regulars.  The Blue Guards held against twice their numbers and the Mounted Rifles drove back the battered and disordered 2nd Infantry and then rode them down during the pursuit. On the hill though, 3 Oberhilse units rolled 9 dice and scored seven 5's and 6's while taking 1 hit in exchange! Faraway was repulsed all along the line! On their half of the turn the Blue Dragoons counter attacked hitting the Lancer's and routing them, pursuing into the Victoria Rifles and dispersing them before they could rally!

There was one turn left and Red had only 1 infantry unit that was not disordered. The Belmont Rifles were sent forward in a Hail Mary assault on the battered 1st Infantry while the quickly rallied York Volunteers and a battery opened up on the Blue Dragoons, who only had 1 hit left. It was a long shot that any of the Blue units would be destroyed and if Blue only lost 1 unit he would still be able to hold his ground and win the game. It was Red's turn to roll high though, the Volunteers rallied and scored a 5 while the battery rolled a 6, enough to inflict the necessary hit on the cavalry. It was down to the Belmont lads and they came through 2 hits on 3 dice and the veteran 1st Infantry was swept away bringing General Zinn's command to over 50% units lost and forcing him to concede and  retreat. The pass was clear!

It doesn't get much closer than that!
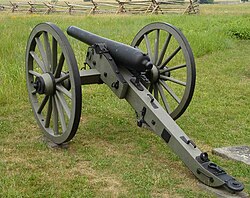
Game's End. Last Turn. Red manages a last minute rally and a Hail Mary charge to win the day. 

Thankfully the result of these two games is that both the 1/72nd ACW and 40mm Atlantic games are confirmed as "on track" and I can continue puttering on them as I feel like it, a few figures here and there, some basing and repairs to be done, some odds and sods and interesting bits to add as it pleases me.

It did occur to me though that while the 40mm troops work OK off grid, they didn't benefit from it since the little units look very Game-ish rather than dioramic anyway. Several times as I searched for the measuring stick and tried to manoeuvre around vague terrain   I found myself wishing I had decided to just use the grid. To that end I will persevere with completing grid friendly terrain so that I can quickly lay out an attractive game and get playing. That'll be a better use of my time than doubling the size of the armies.

I did notice one minor issue though and not for the first time. When I decided to drop the Orders dice concept I fell back on the old roll if beyond command radius method (Probably inspired by Koenigkreig originally but dating back to the original Colonial version of With MacDuff to the Frontier). It works OK except that its a nuisance, it rarely makes a difference, doesn't model how things actually work and I keep forgetting about it anyway. I don't  want to go back to Orders dice or adopt every turn activation style command rolls such as the F&IW version of MacDuff used.

I'm currently contemplating two options. One is to cut back on Commanders and just use them for boosting morale and combat, leaving it to the chance deck to interfere with player's plans. The other is to go for some sort of Brigade/Detached unit Orders rule as in Attack X or Defend Y with a definition of what is allowed or forced under each order and a die roll to accept a change of orders. Needs some thought then maybe some testing.

Thursday, April 28, 2016

Still Playing Around

Not much hobby time this week but I'm still here. I haven't gotten far but I have started to replay the scenario as part of my effort to find a place and purpose for the 40mm mid 19thC lads.   
Trying out one new proposal: 12 x 40mm infantry or 6 cavalry in a single rank.
One of my ideas was to 'zoom in" with the big figures using units with a larger foot print and thus longer moves and ranges with fewer units on the table. I have been renovating these units into 12 figure units deployed 2 deep to fit a 4" grid. My pre-existing units though varied from 12 to 24 figures so I fudged 18 figure units and deployed one per scenario rather than the 2 units per scenario unit which I did with the 1/72nd ACW armies.  It looked ok but I had to borrow troops from earlier and later periods such as the War of 1812. I have no interest in adding another 200 or more figures, especially not to play quick games.

OK I was once influenced by George Jefferys'  scale arguments and played WRG's 1685-1845 rules which had 1 rank battalions. I deployed my currently planned 12 figure units in a single rank. It still looked fairly good but I had trouble fitting 6 battalions on the table. I decided to just try what I have been preparing for the grid but off grid.

and the current planned standard: 12 x40mm figures in 2 ranks or 4 cavalry in 1.
This doesn't look quite as good as either of the other options but the basic forces are almost done, its easily and quickly deployed or put away and the small number of units should keep the games short. The game is barely under way. By Saturday I'll have a better idea if I need to rethink or push on.

(Note: For this game I am using a 3" length rather than 60mm. The visible grid is 4" which would have been a good "length" now that I think of it....)


Sunday, April 24, 2016

Hearts of Tin in the Valley

Terrain. 
The first big battle of the day came when I started to lay out terrain. The scenario that I had chosen involves an attack to clear a pass. Inevitably this means a lot of hills. Since I wanted to try out the proposed new revision of Hearts of Tin which was not designed for a grid I figured that I would build the hills from boards and books and throw a cloth over it all in the Old Way. Unfortunately, it seems that I only have 2 non-gridded cloths left and neither the one with a largish river nor the one with roads criss-crossing the table in every direction except up the valley would do for this scenario. Even the variety of gridded cloths was useless due to shape, size, colour etc. I ended up building the hills out of painted boards as best I might. The result was similar enough to the map to serve although the hills were not as high as I would have liked.

Something to add to the lengthy toodoo list, make more hills, and more fences and base the bloody trees in a way that stops them from falling over when I walk past!.  The squares I just ignored.

Having taken some 50 photos using various settings and angles, I somehow seem to have erased all pictures from the first 5 turns while selecting the ones to upload. Oops. Still the troops have deployed and the attack has just begun.
Armies and Battleplans.

Having decided to defend with the Rebs and to use Grant's Programmed Instructions for both sides, I set to. The attacking Yankees went first. I selected the list with maximum artillery so as to get all six of the renovated Yankee artillery on the table. This gave me an attacking force of 4 brigades each of 3 regiments of infantry and a battery of artillery plus an independent cavalry regiment and 2 more batteries from the Corps reserve. All these troops had to march on via the road then deploy. The programmed instructions were to completely deploy and then launch strong attacks up either flank through the broken and difficult terrain while covering the centre with light troops. Since I had none of these I covered it with cavalry and artillery. The instructions further indicated that no pockets of resistance were to be bypassed. The mission was to make the valley safe for the passage of the army and transport by nightfall which I decided was my usual 15 turns. 

With that settled I proceeded to the Confederate force of  10 regiments of infantry divided into 3 Brigades, an independent cavalry regiment and 4 batteries of artillery. The orders I rolled up were to deploy in depth with 1/3 in the forward middle supported by 1/3 in the rear middle and a final 1/3 in reserve out of sight where the pass opens out. I decided to deploy 1 brigade on the hills on either side with the 3rd in reserve. I deployed cavalry and guns in the open ground and deployed the infantry in depth each with 2 regiments up front and 1 in support 1 zone back. Three guns went in the middle zone while the cavalry deployed as far down the road as allowed. The orders were to delay then fall back, pulling back any units that were threatened with being cut off. A final stand by all troops was to be made across the end of the pass. 

With Generalship settled, I paid attention to the rules and played it through to see what would happen.  
Several turns later the Blue machine is lurching forward with various minor setbacks and slowly taking ground despite mounting losses. The day is 1/2 spent though and the valley less than 1/2 cleared.
The Battle.

Card decks are fickle creatures and at first the Yankees went first every turn and received several favourable Chance Events, extra moves, recovered losses etc. Dice are also fickle and the combat rolls heavily favoured the Rebs as did the terrain.  I was beginning to wonder if it would even be close as every attack was repulsed across the table. After a brief respite and some heavy bombarding, a second push started to have an effect and the front line Reb units were either forced back by attacks or were pulled back to avoid being cut off. 

There was a brief respite while the Yankees reformed their infantry in the woods and brought up their guns which were now out of range. Across the field, the Reb reserves were put on table and moved forward. By turn 9 the final defence line was under attack. The Yankees had more troops but not a lot more and they had suffered perhaps twice the casualties that they had inflicted  despite the bombardments.    
End of the Line. Rebel counter attacks have thrown back the Federal Big Push and the light is fading.

The relentless pressure finally started to pay off though and both cards and dice evened out.  General Kinch was forced to send Reb infantry  forward in limited counter attacks to hold the final line intact. Finally on turn 11 the 3 remaining Yankee Brigades launched all out assaults across the table. Casualties were horrific and in several spots opposing units were locked in melee.  On Turn 12 the Rebs grabbed the initiative and launched desperate counter attacks which paid off. On the far or West side, the Yankees were driven back into the woods with no units being in any shape to renew the assault. On the near or East side, there still remained one slight bulge with 2 combat ready regiments and their guns dominated the center. On their half of turn 12 they would have to rally leaving them 2 turns to break the Reb army. I called the game. 

Today though, I thought better of it and since it was a test of the rules, I played out the last 2 1/2 turns. It increased the Confederate losses but neither army broke and the pass was not opened. I had been right. Too little, too late.


After thoughts.

Since this was an accelerated version of Hearts of Tin and what I consider  a medium size game, I was slightly disappointed that the game still took about 3 hours of actual playing time to finish. Three hours is a very reasonable length for a full game but barely 1/2 the total figures were deployed. (For the curious that's 34 units in all on table or roughly 500 figures inc command, disorder markers, etc.)

More importantly, despite the changes that meant that combat and losses were by unit rather than by stand, it still felt like a Hearts of Tin game, just better. I've been doing a lot of thinking over the last 2 years about uncertainty versus achieving average results. The game excitement increases with unpredictability of combat results but to my surprise, I have been finding that the over all look and results also seem to be closer to my ideal. Not sure how to explain it other than to suggest that my average expectations had been wrong and that my reduction in attention paid to "how" in favour of "what" is the right track for me.

The game also played through with many badly battered units with heavy losses, but only a handful outright destroyed although both armies were on the verge of having units break and run. This also seems right to me.

Here is a link (click) to a Google docs file which  is essentially a quick reference/back of postcard summary of the  basic ACW rules as played. This is what I will again be using for ACW and mid-19th C Atlantica games. Its going to take a while to get a full  20 odd page version of the rules including design notes and sample unit stats done up and more games will need to be played before then and in earlier periods as well.

For those wondering what this all means for my gridded games, I'm not sure yet. At the very least I'll be keeping the option for small quick gridded games but I will also be playing more games that don't use a grid.

In turn 12, General Featherstone leads his butternut Mississipi veterans forward in a fierce counter attack that would drive the Yankees back into the woods but leave his brave boys exposed to the concentrated power of 4 enemy batteries should the battle continue. An excess of zeal perhaps when delay was what was called for and a small retreat might have been wiser.

Saturday, April 23, 2016

Thunder in the Valley.

Ahhh. That's what I've been mumbling to myself about. Took me about 3 hours to play not counting breaks but it felt like a "real" wargame instead of a quick fix. There is a season for each.
Skirmishing gives way to all out assault.
Battle report tomorrow.

Friday, April 22, 2016

Spring in the Valley

At last!  There is strong hope for a solo game this weekend.

Scenario 3 in Grant"s Programmed Scenarios.  


But I'm over due for bed. More tomorrow.

Monday, April 18, 2016

Spring Planning

Another mini-project not quite finished. In order to match the existing figures I just need to apply sawdust and glue to the bases and paint. That of course involves locating where the cookie tin full of sawdust hid during the latest furniture shuffle.......could be a while. Painted bases will serve till then so I put them away.
Six guns a side with 6 more in the box and a number of crew painted or unpainted waiting for me to decide that I have room for more.
Spring has arrived in Nova Scotia, earlier than many years but no earlier than expected, just warmer and drier. On Sunday I spent most of my intended game time outside raking and burning (and thinking). I am slowly making progress on reducing and consolidating to fit into my physical and mental space. As usual more doing and less day dreaming would help clear things away of course. 

I am still stuck with one thorny problem that appears beyond my ability to resolve without a violation of my plan one way or the other.  The goal has long been to avoid essential (vs technical) duplication as much as possible while not getting rid of things I want to keep and not trying to force myself to play games and paint figures that I don't want to. To this end, I have been trying to find another use for my mid 19thC 40mm toy soldiers or else a different way to use the 1/72nd ACW troops since both collections are organized at the same level for the same era of weapons and tactics. 

Technically I could argue that its not duplication since the 40's have been painted for a fictional rather than historical setting and the 1/72nd armies can field more figures on the same size table but for all practical purposes either collection could be used to fight any given scenario if uniform details are ignored and so do form an essential duplication. My attempts to avoid this over the last 5 years have included trying to bump one or the other up to army level games or down to near skirmish levels, trying to force the 40's to go backwards or forwards in time to smoothbore rifle or breechloader tactics or to at least have one be a portable cardtable game and the other a full table game. None of these worked for me so I am at the point of acceptance. 

One set of rules for rifled musket era warfare with traditional OS battalion/regiment sized units, 2 scales, 2 different campaign settings; one historical, one fictional. I'm also going to drop the idea of doing the War of 1812 a 3rd time and will just roll the Shako types in as 1850's troops in the old uniforms. One set of fictional 19th C 40mm troops, and one of historical 1/72nd figures for the era, one set of rules, much simpler. So be it.  
A shot of a few of the metal figures that were mixed in with the Airfix ones in the donation.
Now to figure out when to squeeze in a game so I can see if the new batteries are up to snuff.

Saturday, April 16, 2016

Saturday In The Park

In the fall of 2012 I was the grateful recipient of several boxes of painted 1/72nd ACW troops (98% Airfix) including more than enough of the artillery that I was desperate for. I managed to reorganize and rebase most of the infantry along with my most of my own into a single system but that's as far as I got. Some of the cavalry and guns have made occasional  adhoc appearances on the table now and again but the artillery in particular has been in need of some sorting, basing and repainting.

I was at loose ends today and being unable to decide on what to play. In the end I decided to finally turn my attention to the ACW artillery park instead.

(Click here for a series of 1/72nd ACW posts and battle reports)
Early afternoon break time. Progress, but...not done yet!
First off, to all those nay sayers (PSR is a wonderful and useful site but every now and then .......) the artillery piece is a pretty fair model of a 3" ordinance rifle and better than most of the plastic 1/72nd ACW guns that are available.

3" Rifle From wiki.
The donation included 7 limbers, a number of crewmen and 17 guns inc 1 metal Parrot.  That's more guns and fewer limbers than I needed, especially since I already had 4 guns. This is what come of the old 2 guns, 1 limber sets that 1/72nd manufactures like. The bulk of these figures like my own are 30 - 40 years old or older and some of the plastic has gotten brittle so I now have several damaged battery markers and some artillery crew casualties. That leaves me with enough gunners to man 12 guns, 6 per side with a few guns left over for future use. I also have 6 good limbers, 3 for each side or 1 per 2 guns.

If I were to field 2 gun batteries as originally envisaged then I could give each battery a limber to mark when it was in travel mode or to show the vehicle park and ammunition wagons behind the guns when deployed. However, I have been using 1 gun for a battery and already they take up as much room as 2 Confederate batteries. I could call the 2 gun units artillery battalions and lose some of the flexibility in order to get a meaningful distribution of limbers. Still thinking on that.

Apart from numbers, the guns and limbers were painted in various shades of brown with gold barrels and light grey iron fittings with a noticeable amount of flaking, especially on the horses. So the main task this afternoon has been repainting the limbers and most of the guns in a rather too green dark olive with black iron fittings. About 1/2 the guns have been repainted black as rifles while I have left a few as bronze Napoleons to flush out my handful of actual smoothbore guns. I've also glued the limbers onto bases in an attempt to keep horses and limbers together in one place.

As received in 2012
At this point the guns are ready to play and the limbers nearly so apart from some flocking to match my crews. The 2 new crews per side and the outriders need some work though. I hate to touch up the old figures but the Union gunners are done in a dark bluegrey jacket and grey pants while a number of Reb gunners represent the Lousianna Washington battery in their dark blue jackets but with red kepis. I'll keep them as is but need to touch up enough other gunners to make them more easily identified as Union or Confederate during deployment and pick up. Realistic battlefield confusion is one thing, game room confusion is another thing and one I can live without. Hopefully I can get that done tomorrow morning and still play a game.

Sunday, April 10, 2016

Fast and Furious Fifties

Boy, simpler is sure harder than complex when it comes to rules.

Nonetheless, I persevered. My first effort was to revisit the  20th C version of the Square Brigadier complete with Orders dice. I added a village for the blocking force to take cover in and scattered a few other bits around the table. The game was pretty good despite me losing but it wan't quite right and it reminded me that I have come to dislike the Orders dice concept. Back to the drawing board.

Near the end of Game 3. The Lilliputian  dice were HOT! on the first few turns and I despaired for Roscia but it all came right in the end. The Roscian Commander managed to sneak off with 2 decimated infantry companies, a damaged Centurion and an HQ. (It said units, not viable units...) The Heavy Weapons company is contemplating blowing up the BAT and making a run for it. The Green force also took a beating near the end and has lost 3 of its infantry units and the Pershing is 1 hit away from destruction. 2 out of 3 for Roscia.
The final game was a nip and tuck affair with a heart pounding, nail biting end. I'm ready for Minicampaign game 2 now. The  product of today's fevered brain is attached below.
______________________________________________________
Fast and Furious Fifties
A simple wargame for Mid-20th C toy soldiers
10 Apr 2016

All measurement is in multiples of a convenient standard length. If using a grid then it is numbers of grid squares or hexes. If not using a grid then roughly equal to the frontage of an average unit. Basic units are "companies" of Infantry, Heavy Weapons or Tanks and Headquarters (HQ). 
  1. Sequence of play. Assign red to one side, black to the other. Draw one card per turn. That colour goes first that turn.
    1. Movement. The active Player moves units.
    2. Defensive Fire. The inactive player may shoot with his units. 
    3. Close Assaults The active player now resolves shooting by his units which are adjacent to the enemy but only by those which are adjacent. If the defender is eliminated or retreats then a unit which attacked this turn may occupy the ground..
  2. Movement
    1. Isolated Units. Units which are not within 9 of the HQ are considered isolated and must roll 4,5 or 6 on 1 die in order to move. 
    2. Maximum Moves. Infantry: 2, Heavy Weapons and HQ: 2 in the open, 1 in bad going. Tanks:3 in the open, 1 in bad going.  
    3. Attacking. A unit that moves adjacent to an enemy must stop and resolve close combat. 
    4. Heavy Weapons. A heavy weapons unit which moves must be marked as being packed. It may not fire during its next defensive fire phase. 
    5. Roads. A unit moving by road may add 1 area but may not move adjacent to known enemy 
  3. Shooting.  
    1. Line of Sight. Infantry and tanks must have line of sight and line of fire to target. Heavy Weapons must have LOS from themselves or from friendly unit that does not move. Units may turn as required to shoot without penalty.
    2. Engaged. If a unit began its move adjacent to enemy it may only shoot at or be shot at by adjacent units. If a unit is adjacent to more than 1 enemy then it must split its dice.
    3. Dice@Range: Infantry 3d@1, 2d@3, Tanks 3d@3, 2d@6, Heavy Weapons 3d@6, HQ 2d@1.
    4. Difficult Targets -1d vs cover or if Infantry or Heavy Weapons vs tanks unless adjacent. 
    5. Pinned. -1 die if pinned.
    6. Effect. Each 5 or 6 is a hit.
    7. Driven Back. A tank unit which is hit by enemy shooting may cancel 1 hit each turn by retreating a full move and becoming pinned.
    8. Hitting the Dirt. An infantry, heavy weapons or HQ unit which is not adjacent to an enemy may cancel 1 hit each turn by going pinned.
  4. Morale. Units have a base strength which is reduced by 1 for each hit which is not cancelled. When strength reaches 0 the unit is removed. 
    1. Base Strength. Infantry can take 4 hits, other units take 3 hits.
    2. Quality. Elite Units take 1 extra hit, Poor units take 1 less.
    3. Pinned.  Pinned units lose 1 die when shooting and may not move except to retreat. The pin may be removed at the end of their movement phase.

Saturday, April 9, 2016

Get'em up!

Well, one never quite knows what to expect. Last Sunday, a few hours after playing the first game of a 3 part miniseries using the new Elastolins, I was struck down by a nasty flu bug or similar. By Wednesday I managed to scribble a quick game report (click here to see the report or go to the Gathering of Hosts blog) but that's been it for hobby stuff for the week.

Today I finally felt up to playing something small, simple and seated. Seemed like a good time to break out my old card table set up and some little figures as well as being an appropriate time to give One Hour Wargames another try.  But which period?

A Roscian column makes it way down the road : 4 infantry platoons lead followed by the Battalion (recoiless) AT gun and a Centurion. Their mission is to press on and exit at least 3 units by Turn 15. If not slowed by the enemy the column could accomplish this in  3 turns. Some veteran gamers may recognize the infantry portion of A company. 
(Some veteran 20mm gamers may recognize the make of the infantry portion of the 1st platoon.)

It has been on my mind that after investing time and money in my 'game in a box' 1/72 modern (well they were contemporary when first produced) troops two years ago, they haven't been out since.  Fair enough, I've never tried the OHW WWII rules and these lads are just barely post WWII. Just the thing for today.  I decided to start one of Thomas'  suggested mini-campaigns. I rolled Scenario 6, selected 2 armies and then tried to figure out the best way to fit the game onto my 36"x30" board. The simplest way would have been to fudge the 6" so I decided to mark off an area of 27"x 27" ( or 9x9 3" squares) and reduce all measurements by 3/4. This  gave me a border around the edge to hold off table troops and gaming paraphernalia. I made a quick measuring stick marked with ranges and movement since my brain was still too fuzzy to calculate such things on the fly.

I rolled up 2 armies and, after consulting the curiously jumbled boxes, determined that the Green, or Lilliputian, Army would defend. This army once had a slightly different name but I was having trouble remembering it and since the infantry are largely CtoA copies of the old Britain's Lilliput version of the Herald Khaki infantry I decided that it will work fine. The meant that I would attack with my Roscian or Khaki Army.
At the end of turn 1 the column has taken significant casualties while deploying to attack a blocking force of 2 Green Infantry platoons. Green reinforcements have also shown up, a Pershing, a mortar, and 2 more infantry platoons.  By turn 2 almost every unit is firing with superb fire control, massing their fire for optimum effect. Units started disappearing ....fast!  (Note, the last row of squares is not in play)
Once again it took considerably longer to set up the game than to play it but from the time I decided that I wanted to play something through finding stuff and dragging it downstairs to finishing the game, it did take just under an hour. The Lilliputians did manage to put up enough resistance to slow the Lilliputian advance by 2 turns but it was all over by the 1/2 way mark of the 5th turn as the Roscians exited the board.

Lower die rolls all around would have helped prolong the game but that's dice for you. Having to defend with modern troops in the open, the only real hope for the Green army was the support of their deadly mortar platoon which came into action on Turn 2 and played a roll in all 3 destroyed Khaki units.   At least, not including the initial battleplan, there were actually 2 points in the game when I had to make a decision about moving or shooting. Once for each side.  The rest of the game was win the firefight or die.    If I should replay the game I'll probably let the blocking force infantry entrench.

By turn 3 the Green infantry blocking force had been eliminated and the Pershing was out of range of living targets so it rolled forward  despite having already taken heavy damage. On Turn 4 it took the  combined fire of the BAT and Centurion and the road was open.  The mortar, still firing for all it was worth, took out the BAT  but there was nothing to stop the Centurion and the 2 remaining Khaki Infantry from exiting the board. 

The temptation is strong to add some terrain, switch rules, then play it again. Maybe tomorrow.

Sunday, April 3, 2016

One quiet Sunday in 5th Century Gaul

I tried, I really tried. I poked, I thought, I rolled some dice and shuffled some figures about, I calculated, I postulated, but......, I just couldn't get my head around me setting up and playing a traditional ancients game this weekend.  Play I wanted to though so.... somewhere in Gaul a detachment of Roman frontier infantry found themselves rousted from their nice warm quarters and marched off to a bridge which stood in between the walled city of Nulpartium and a Gathering Horde of Barbarians.

A Horde of Huns approaches at a mad gallop.
Elastolin 4cm Huns.
 
Since I was thinking about rules anyway and Rob and I still haven't had time to discuss more detail on what is wanted for the planned co-hosted fantasy massed battle game tentatively scheduled for Fall In, I opened the box. Recent games crossed with this week's putterings led me to make one big change and some small ones. The big change was to go back to a more Featherstonian play sequence with initiative then A moves, B moves, both shoot and both melee. The small change was largely a matter of adjusting combat details to make them less fussy after the last set of games. The updated minimalist rules summary can be found here. (click)

More Elastolin 4cm figures, Romans this time. Both pictures are a mix of my existing collection and some of the new-to-me veterans. Any multiple bases are temporary.
Still stymied by the continuing fuzzies but looks like some of the battle shots may be better.


That's it for today. A brief battle report of the overall best Gathering of Hosts game yet will appear on the Gathering of Hosts blog tomorrow. Then, win or lose, the Huns will move on to the siege of Nulpartium.

Friday, April 1, 2016

Fierce but not very big or bloody

Apart from various distractions like leading yet another Martian host to defeat, being under the weather and reading Simon's Battle of the Catalaunian Fields (highly recommended btw, he's done a good job of sorting through the vague and conflicting evidence and assembling the most credible version yet of the campaign and battle, even if he did miss those fireball catapults -  see the Osprey site click), I made time to ponder not just rules but what sort of game I wanted to play. I just haven't reached a firm conclusion yet or cleared the table so I can play.

The first hurdle is to decide on what levels of action I wish to portray: battles or skirmishes? (Skirmish in the traditional military sense not modern wargame speak). In very rough terms, assuming roughly balanced numbers and no additions from the unpainted pool, I can field around 60 infantry, 24 archers and 24 cavalry per side. If I want to portray armies of 10 or 20 thousand men that puts me around 1 figure = 100 to 200 men or in other words, roughly DBA levels of representation. For a rearguard skirmish or similar that could go down to 10 or 20 men per figure while a real old school or toy soldier approach would ignore scales but maybe use only 1/2 the figures for the skirmish saving the rest for the big battle.  

Apart from scale there is the practical question of how many units and what size units. The Big Battle approach with so few figures suggests a Morschauser or DBA approach where each stand of 2 cavalry or 4 infantry was a unit with perhaps  3 dozen units grouped into "commands" or "wings".  Of course at the moment the figures are not on multifigure bases and most won't be going that route, at least not permanently. Luckily the light plastic figures work well with magnets. Still, I think I will take advantage of the horde of single figures and the shipping time for base bottoms and leave this as a future possibility.  

The lower level game would probably benefit from a smaller number of larger units but the diversity of the collection would make it difficult to go to much larger than 6 cavalry or archers and 12 infantry. This size unit would give me 4 cavalry, 2 archer and 5 infantry units per side.  If this is the maximum then some skirmish scenarios might call for barely 1/2 this number which means the units better have some longevity if the games are to have any interest.  

My current informal organization is in the middle with 4 cavalry or archers and 8 infantry which would render the troops into armies of 6 cavalry, 3 archer and 7 infantry units. This would favour a middle ground approach with a skirmish scenario having perhaps 6 to 8 units and a battle the full 15 units. The approach seems like such a sensible compromise that I am leery of adopting it! The final decision will have to take account of the exact number of each type of figure and it may well be that the rules will have to work with variable sizes of units.

Any of these options could make use of the Comitatus rules but since I enjoy tinkering with rules ideas I am working on an updated version of the Stout Hearts set I started on 2 years ago and then let slide. With a bit of luck a trial game will be played on Saturday or Sunday with just a few basic charts and ideas.

Currently it appears most likely that in the long run Prince Michael and friends will stay in King Arthur's Britain while the Huns/Tartars, Turks and some of the mounted knights will join the late 15thC/early16thC figures in a medieval fantasy setting. Still sometimes a game changes everything.