 |
| Yes I admit it, I can be a bit hard on books but to be fair after all the wargames we've played together over the decades, I'm not really in much better shape. |
and inspired by Kev's comment, if this had been 1970.....

|
| Yes I admit it, I can be a bit hard on books but to be fair after all the wargames we've played together over the decades, I'm not really in much better shape. |
 Born and raised in the suburbs of Montreal 7 decades ago. Began playing with toy soldiers at 5 years. Started painting & converting at about 12 yrs and wargaming about 15 yrs. Never really stopped.
5 years in the Black Watch of Canada Cadets, 5 years at the Collège militaire royal de Saint-Jean followed by 4 in the navy. 25 years with CPC in IT simultaneous with 23 years running a boarding kennel. Inherited my love of toy soldiers from my mother's father. Married with a pack of litle Italian Greyhounds and a cat. Prematurely retired and enjoying leisure to game, maintaining our 170 yr old farmhouse and just living.
Born and raised in the suburbs of Montreal 7 decades ago. Began playing with toy soldiers at 5 years. Started painting & converting at about 12 yrs and wargaming about 15 yrs. Never really stopped.
5 years in the Black Watch of Canada Cadets, 5 years at the Collège militaire royal de Saint-Jean followed by 4 in the navy. 25 years with CPC in IT simultaneous with 23 years running a boarding kennel. Inherited my love of toy soldiers from my mother's father. Married with a pack of litle Italian Greyhounds and a cat. Prematurely retired and enjoying leisure to game, maintaining our 170 yr old farmhouse and just living.
 |
| Heavily engaged |
 |
| Early on in the game the Rebs have their work cut out just to contain the Yanks. |
 |
| A mid-game shot of the battle raging across the whole table. |
 |
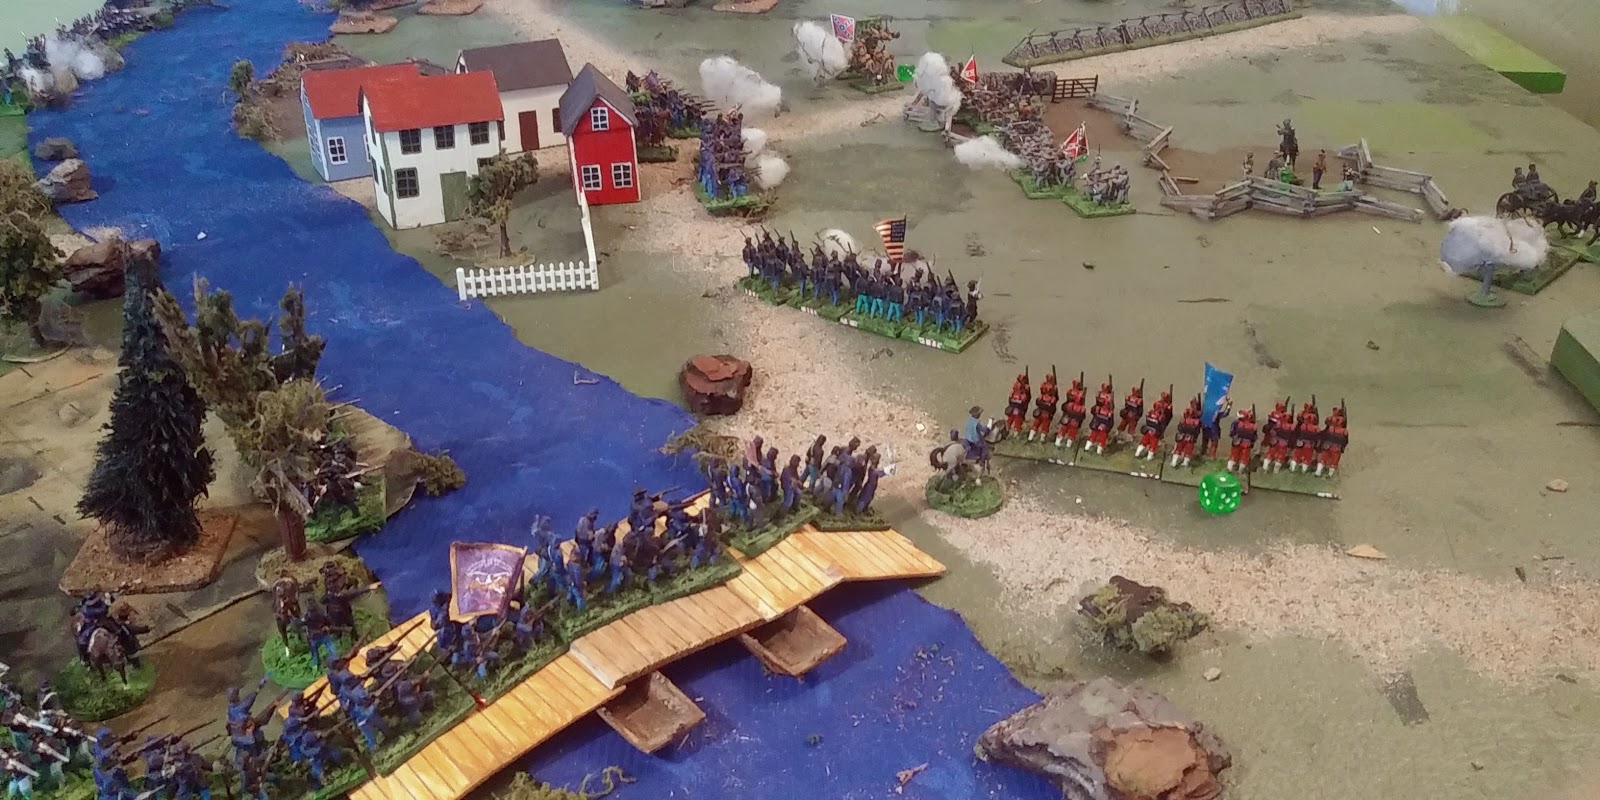
| The Reb right crushed the Yankee left and drove it through the town while their left pressed in trying to capture the bridge and cut off the bulk of the Federal forces. It almost worked! |
 |
| The Yankees held the Reb attack on their left though while the Zouaves broke the tentative link between the Reb Centre and Left, capturing two batteries and flanking the reb infantry line. The fire support of two batteries on the Yankee was crucial to their success. The battle was over. |
Born and raised in the suburbs of Montreal 7 decades ago. Began playing with toy soldiers at 5 years. Started painting & converting at about 12 yrs and wargaming about 15 yrs. Never really stopped.
5 years in the Black Watch of Canada Cadets, 5 years at the Collège militaire royal de Saint-Jean followed by 4 in the navy. 25 years with CPC in IT simultaneous with 23 years running a boarding kennel. Inherited my love of toy soldiers from my mother's father. Married with a pack of litle Italian Greyhounds and a cat. Prematurely retired and enjoying leisure to game, maintaining our 170 yr old farmhouse and just living.
 |
| Once more across the Neverwaussie River. |
Born and raised in the suburbs of Montreal 7 decades ago. Began playing with toy soldiers at 5 years. Started painting & converting at about 12 yrs and wargaming about 15 yrs. Never really stopped.
5 years in the Black Watch of Canada Cadets, 5 years at the Collège militaire royal de Saint-Jean followed by 4 in the navy. 25 years with CPC in IT simultaneous with 23 years running a boarding kennel. Inherited my love of toy soldiers from my mother's father. Married with a pack of litle Italian Greyhounds and a cat. Prematurely retired and enjoying leisure to game, maintaining our 170 yr old farmhouse and just living.
 |
| The opening game of last Fall's Celebration Mini-campaign (click). (There are 11 posts but they appear in reverse order so please scroll down to start at the beginning. |
Born and raised in the suburbs of Montreal 7 decades ago. Began playing with toy soldiers at 5 years. Started painting & converting at about 12 yrs and wargaming about 15 yrs. Never really stopped.
5 years in the Black Watch of Canada Cadets, 5 years at the Collège militaire royal de Saint-Jean followed by 4 in the navy. 25 years with CPC in IT simultaneous with 23 years running a boarding kennel. Inherited my love of toy soldiers from my mother's father. Married with a pack of litle Italian Greyhounds and a cat. Prematurely retired and enjoying leisure to game, maintaining our 170 yr old farmhouse and just living.
 |
| The first game of the minicampaign is almost ready to start. (A close look at the picture will show just how serious this will be.) |
Born and raised in the suburbs of Montreal 7 decades ago. Began playing with toy soldiers at 5 years. Started painting & converting at about 12 yrs and wargaming about 15 yrs. Never really stopped.
5 years in the Black Watch of Canada Cadets, 5 years at the Collège militaire royal de Saint-Jean followed by 4 in the navy. 25 years with CPC in IT simultaneous with 23 years running a boarding kennel. Inherited my love of toy soldiers from my mother's father. Married with a pack of litle Italian Greyhounds and a cat. Prematurely retired and enjoying leisure to game, maintaining our 170 yr old farmhouse and just living.
 |
| Turn 6. All troops are on table. The opposing infantry are bickering over the woods. |
 |
| Blue has been pushed back but the tricksy government forces prefer running away to dying for the autocrats while the Rebels seem to preferring dieing for The Cause. |
 |
| The brakes are on! The Rebels are exhausted but they hold the ridge and the enemy has been teetering on the edge of exhaustion for some time now. If they would JUST die instead of falling back! |
 |
| An exhausted Red clings to the ridge. Blue pours in fire and sends troops to infiltrate onto the hill hoping to be able to grab a toehold and drive the Rebels off with fire. Of course, Rebs just, don't, retreat!! Eventually the Green Helmets are driven off or killed and their force is also exhausted. The Rebels have a few units on the ridge either out of range or line of sight and are happy to wait out 2 turns for the official victory. |
Born and raised in the suburbs of Montreal 7 decades ago. Began playing with toy soldiers at 5 years. Started painting & converting at about 12 yrs and wargaming about 15 yrs. Never really stopped.
5 years in the Black Watch of Canada Cadets, 5 years at the Collège militaire royal de Saint-Jean followed by 4 in the navy. 25 years with CPC in IT simultaneous with 23 years running a boarding kennel. Inherited my love of toy soldiers from my mother's father. Married with a pack of litle Italian Greyhounds and a cat. Prematurely retired and enjoying leisure to game, maintaining our 170 yr old farmhouse and just living.
 |
| Turn 8: British reinforcements (104th New Brunswick Regt and Canadian Fencibles) and the rallied 89th Foot counterattacked and retook the ridge. |
 |
| Turn 9 saw both sides regrouping on one flank while the long range firefight continued on the other. |
 |
| Turn 10: The British left starts to crumble while the American left rallies and starts to prepare for a renewed assault. |
 |
| Turn 12. The British left has crumpled after heavy casualties and the British no longer have enough infantry for a solid line. The artillery is cut off and fights to the last, pouring grape into the flank of a rash American attempt to bypass it. |
 |
| Turn 14. The light is fading as a last ditch American assault goes in. Both sides are teetering on the edge of army morale collapse. The British General was shot while trying to steady the 104th and the British are praying for a 2nd Joker to rob the enemy of their last chance. |
 |
| Turn 15. The British get the next best thing, some free rally rolls and first move. Their shooting nearly does it but the American General rallies the Lafayette County Volunteers and leads them onto the ridge and their bravery is rewarded with favourable dice. A tied melee sees night fall with the hill still in contention. It could SO easily have gone to either side at various points but no, it ended in a draw, much like the battle the "Melee" scenario was inspired by. |
Born and raised in the suburbs of Montreal 7 decades ago. Began playing with toy soldiers at 5 years. Started painting & converting at about 12 yrs and wargaming about 15 yrs. Never really stopped.
5 years in the Black Watch of Canada Cadets, 5 years at the Collège militaire royal de Saint-Jean followed by 4 in the navy. 25 years with CPC in IT simultaneous with 23 years running a boarding kennel. Inherited my love of toy soldiers from my mother's father. Married with a pack of litle Italian Greyhounds and a cat. Prematurely retired and enjoying leisure to game, maintaining our 170 yr old farmhouse and just living.


 Born and raised in the suburbs of Montreal 7 decades ago. Began playing with toy soldiers at 5 years. Started painting & converting at about 12 yrs and wargaming about 15 yrs. Never really stopped.
5 years in the Black Watch of Canada Cadets, 5 years at the Collège militaire royal de Saint-Jean followed by 4 in the navy. 25 years with CPC in IT simultaneous with 23 years running a boarding kennel. Inherited my love of toy soldiers from my mother's father. Married with a pack of litle Italian Greyhounds and a cat. Prematurely retired and enjoying leisure to game, maintaining our 170 yr old farmhouse and just living.
Born and raised in the suburbs of Montreal 7 decades ago. Began playing with toy soldiers at 5 years. Started painting & converting at about 12 yrs and wargaming about 15 yrs. Never really stopped.
5 years in the Black Watch of Canada Cadets, 5 years at the Collège militaire royal de Saint-Jean followed by 4 in the navy. 25 years with CPC in IT simultaneous with 23 years running a boarding kennel. Inherited my love of toy soldiers from my mother's father. Married with a pack of litle Italian Greyhounds and a cat. Prematurely retired and enjoying leisure to game, maintaining our 170 yr old farmhouse and just living.
 |
| Sep 2013: Rob's view of a Rough Wooing game on my table 2,000 km away. |
 |
| 40mm Scruby War of 1812 US and British infantry with an Irregular General and my own original homecast Riflemen and Infantry officers. |
Born and raised in the suburbs of Montreal 7 decades ago. Began playing with toy soldiers at 5 years. Started painting & converting at about 12 yrs and wargaming about 15 yrs. Never really stopped.
5 years in the Black Watch of Canada Cadets, 5 years at the Collège militaire royal de Saint-Jean followed by 4 in the navy. 25 years with CPC in IT simultaneous with 23 years running a boarding kennel. Inherited my love of toy soldiers from my mother's father. Married with a pack of litle Italian Greyhounds and a cat. Prematurely retired and enjoying leisure to game, maintaining our 170 yr old farmhouse and just living.
 |
| Lots more colour and detail to add in the months ahead as well as terrain modules. |
Born and raised in the suburbs of Montreal 7 decades ago. Began playing with toy soldiers at 5 years. Started painting & converting at about 12 yrs and wargaming about 15 yrs. Never really stopped.
5 years in the Black Watch of Canada Cadets, 5 years at the Collège militaire royal de Saint-Jean followed by 4 in the navy. 25 years with CPC in IT simultaneous with 23 years running a boarding kennel. Inherited my love of toy soldiers from my mother's father. Married with a pack of litle Italian Greyhounds and a cat. Prematurely retired and enjoying leisure to game, maintaining our 170 yr old farmhouse and just living.


 |
Born and raised in the suburbs of Montreal 7 decades ago. Began playing with toy soldiers at 5 years. Started painting & converting at about 12 yrs and wargaming about 15 yrs. Never really stopped.
5 years in the Black Watch of Canada Cadets, 5 years at the Collège militaire royal de Saint-Jean followed by 4 in the navy. 25 years with CPC in IT simultaneous with 23 years running a boarding kennel. Inherited my love of toy soldiers from my mother's father. Married with a pack of litle Italian Greyhounds and a cat. Prematurely retired and enjoying leisure to game, maintaining our 170 yr old farmhouse and just living.

 |
| 4'x4' or 9x9 5" squares with a narrow border |
Born and raised in the suburbs of Montreal 7 decades ago. Began playing with toy soldiers at 5 years. Started painting & converting at about 12 yrs and wargaming about 15 yrs. Never really stopped.
5 years in the Black Watch of Canada Cadets, 5 years at the Collège militaire royal de Saint-Jean followed by 4 in the navy. 25 years with CPC in IT simultaneous with 23 years running a boarding kennel. Inherited my love of toy soldiers from my mother's father. Married with a pack of litle Italian Greyhounds and a cat. Prematurely retired and enjoying leisure to game, maintaining our 170 yr old farmhouse and just living.


 Born and raised in the suburbs of Montreal 7 decades ago. Began playing with toy soldiers at 5 years. Started painting & converting at about 12 yrs and wargaming about 15 yrs. Never really stopped.
5 years in the Black Watch of Canada Cadets, 5 years at the Collège militaire royal de Saint-Jean followed by 4 in the navy. 25 years with CPC in IT simultaneous with 23 years running a boarding kennel. Inherited my love of toy soldiers from my mother's father. Married with a pack of litle Italian Greyhounds and a cat. Prematurely retired and enjoying leisure to game, maintaining our 170 yr old farmhouse and just living.
Born and raised in the suburbs of Montreal 7 decades ago. Began playing with toy soldiers at 5 years. Started painting & converting at about 12 yrs and wargaming about 15 yrs. Never really stopped.
5 years in the Black Watch of Canada Cadets, 5 years at the Collège militaire royal de Saint-Jean followed by 4 in the navy. 25 years with CPC in IT simultaneous with 23 years running a boarding kennel. Inherited my love of toy soldiers from my mother's father. Married with a pack of litle Italian Greyhounds and a cat. Prematurely retired and enjoying leisure to game, maintaining our 170 yr old farmhouse and just living.
 |
| The first half of the Greys, still minus carbines. |
Born and raised in the suburbs of Montreal 7 decades ago. Began playing with toy soldiers at 5 years. Started painting & converting at about 12 yrs and wargaming about 15 yrs. Never really stopped.
5 years in the Black Watch of Canada Cadets, 5 years at the Collège militaire royal de Saint-Jean followed by 4 in the navy. 25 years with CPC in IT simultaneous with 23 years running a boarding kennel. Inherited my love of toy soldiers from my mother's father. Married with a pack of litle Italian Greyhounds and a cat. Prematurely retired and enjoying leisure to game, maintaining our 170 yr old farmhouse and just living.
 Born and raised in the suburbs of Montreal 7 decades ago. Began playing with toy soldiers at 5 years. Started painting & converting at about 12 yrs and wargaming about 15 yrs. Never really stopped.
5 years in the Black Watch of Canada Cadets, 5 years at the Collège militaire royal de Saint-Jean followed by 4 in the navy. 25 years with CPC in IT simultaneous with 23 years running a boarding kennel. Inherited my love of toy soldiers from my mother's father. Married with a pack of litle Italian Greyhounds and a cat. Prematurely retired and enjoying leisure to game, maintaining our 170 yr old farmhouse and just living.
Born and raised in the suburbs of Montreal 7 decades ago. Began playing with toy soldiers at 5 years. Started painting & converting at about 12 yrs and wargaming about 15 yrs. Never really stopped.
5 years in the Black Watch of Canada Cadets, 5 years at the Collège militaire royal de Saint-Jean followed by 4 in the navy. 25 years with CPC in IT simultaneous with 23 years running a boarding kennel. Inherited my love of toy soldiers from my mother's father. Married with a pack of litle Italian Greyhounds and a cat. Prematurely retired and enjoying leisure to game, maintaining our 170 yr old farmhouse and just living.
 |
| Prince August SYW Dragoons with bicorne heads added. |
Born and raised in the suburbs of Montreal 7 decades ago. Began playing with toy soldiers at 5 years. Started painting & converting at about 12 yrs and wargaming about 15 yrs. Never really stopped.
5 years in the Black Watch of Canada Cadets, 5 years at the Collège militaire royal de Saint-Jean followed by 4 in the navy. 25 years with CPC in IT simultaneous with 23 years running a boarding kennel. Inherited my love of toy soldiers from my mother's father. Married with a pack of litle Italian Greyhounds and a cat. Prematurely retired and enjoying leisure to game, maintaining our 170 yr old farmhouse and just living.


 Born and raised in the suburbs of Montreal 7 decades ago. Began playing with toy soldiers at 5 years. Started painting & converting at about 12 yrs and wargaming about 15 yrs. Never really stopped.
5 years in the Black Watch of Canada Cadets, 5 years at the Collège militaire royal de Saint-Jean followed by 4 in the navy. 25 years with CPC in IT simultaneous with 23 years running a boarding kennel. Inherited my love of toy soldiers from my mother's father. Married with a pack of litle Italian Greyhounds and a cat. Prematurely retired and enjoying leisure to game, maintaining our 170 yr old farmhouse and just living.
Born and raised in the suburbs of Montreal 7 decades ago. Began playing with toy soldiers at 5 years. Started painting & converting at about 12 yrs and wargaming about 15 yrs. Never really stopped.
5 years in the Black Watch of Canada Cadets, 5 years at the Collège militaire royal de Saint-Jean followed by 4 in the navy. 25 years with CPC in IT simultaneous with 23 years running a boarding kennel. Inherited my love of toy soldiers from my mother's father. Married with a pack of litle Italian Greyhounds and a cat. Prematurely retired and enjoying leisure to game, maintaining our 170 yr old farmhouse and just living.