Saturday, April 29, 2017

Could get a little Hott in Southern Maine in May

My annual trek south to a wargaming convention isn't just about the convention. Its also a chance to visit with co-host Rob Dean  (sharpbrush.blogspot.ca), have some extended chats, some planning sessions and hopefully play a face to face game or two to supplement our occasional  remote games  using either Hangout or Skype. As it happens Rob and sons have been building and playing with some 1/72nd HOTT armies mounted on 60mm wide bases for some time now. Since the rules don't really care what you put on a HOTT base as long as its representative, the 1/72nd figures let your units look slightly more like, well, units. OK so 6 or 8 figures instead of 3 or 4 doesn't sound like much but it works for me.

Since I had a motley crew of painted 1/72 figures, mostly Celtic and fictional Viking types in need of a reason to exist, and since 1/72nd figures are easy to transport and its not hard to find a corner to play HOTT in, I decided to base up a HOTT army and challenge Rob (and Norman, junkyardplanet.blogspot.ca, if he's coming this year.) to a game at Huzzah.
The Cauldron of Rebirth, and a Horde of born again warriors.
Note the glazed stares, the rigid poses and the rising dead warrior.
I was trying to think of what to do with the single wounded Airfix Briton, make him a Sneaker perhaps, playing dead until the enemy passes then rising to try some dastardly attack? Seemed like a lot to put on one lone wounded guy. I moved on to other things and happened to stand a bunch of the Airfix axemen alongside some Orion Vikings and was suddenly struck by the stunned look and wooden movement as they all lofted some weapon and waddled forward, all shieldless and unarmoured. Couldn't help but think "Zombies" !  That made me think again of the wounded guy sitting there, looking like he was about to get back up! Ok, sounded like a Horde stand to me. But what brought them back?

In College I read a Yearling series fantasy tale called the Black Cauldren, I forget the details but the idea has stayed with me. I was already assembling a Cleric team to use up some viking women with dagger and drinking horn and some of the non-combatant Britons and was wondering what to do with an excess Viking chief in Bearskin headdress with sword and arm raised to the sky. Well, I had a vague memory of having a Cauldron somewhere.....and there we were. A Priest supported by acolytes of some sort, a pagan standard bearer, some kneeling guardsmen, and a cauldron with a warrior just emerging from its murky depths.
1 Cleric (3 AP), 1 Horde (1 AP)

Wild barbarian cavalry, tribesmen and archers
The next lot were easy. For nostalgia's sake I had painted up some Ancient Briton's when Hat re-released them. The originals had been included in the earliest Valdurian armies until I went Minifig.
I rebased one stand of Italeri cavalry and here we have the Hillmen allies.
1 Rider, 1 Warband, 1 Shooter (6 AP)
Meg the Mighty, and his little friends too.
I didn't want to go with a straight human army but didn't have much to choose from in 1/72nd. The Revel Saxons included copies of various Elastolin figures such as form my current Gathering of Hosts armies. It amused me to take one of the 40's who is chopping downwards and mount him as a Giant backed by a few normal humans from the same range of Elastolin poses.  (hmm must remember to give him a dark wash and touch up the metal)

Another section of those Orion Vikings were copied from Marx vikings, both the 54mm soft plastic ones and the painted hard plastic ones issued in 60mm as Warriors of the World and in 25mm in the Knights and Vikings set I had (best Christmas present EVER). A couple of archers and running spearmen, copies of my old favourites, backed by an Elastolin copy and voila, Shooters!  
Giant (4AP), Shooter (2AP)

OUT! OUT!

There were several good Chieftain poses in the Orion Viking box but I've always had a soft spot for the Vercingatorix like Airfix "guy".  I had made an armoured viking standard bearer when I painted these guys some 15 years ago so it was just a matter of adding 6 more armoured vikings and I had a General and his Hearthguard. After trying to sort the rest, I gave up, reversed course, and did as thorough a mix of Marx and Elastolin copies and original Revel and Orion figures as I could to make 3 more stands of infantry. They look a little wild so I probably ought to call them Warband, but....... I wanted to use the Airfix guys as the lighter, faster, woods fighting guys and these for the main shieldwall battle line, rather like my earliest Valdurian army. So Blades? or Warband? or both?  Deferred Decision but it would probably be best if they were all the same in any given game.
4 Blades or Warbands (8 AP)

Total: 11 stands, 24 AP

Wednesday, April 26, 2017

Test of Arms

My very first wargames were not set in the ancient period, it wasn't until a visit home for Christmas 1972 that I first pitted a new box of Airfix Romans against an equally new box of Ancient Britons. Ever since then ancient/medieval wargaming has been one of my primary wargaming interests though somewhat receding of late. So when Bob Cordery mentioned that he was developing an Ancient Portable Wargame, I volunteered to read over and play test the current draft. Since they are still in development I won't be sharing a lot about the proto-rules or the feedback that I will be sending Bob, just a few general impressions and a quick look at my first test game.
Duke Imonsay deploys his army with his Valdurian allies atop a hill on his right flank.
The rules are essentially a variant of the original Portable Wargame sharing as many rules and mechanisms as possible which makes it easier to move back and forth between period for those like me that dabble in several. The biggest difference comes from the characteristics of the available unit types backed by additional special unit characteristics for a handful of historical troop types.  This approach allows Bob to cover the basics of over a thousand years of warfare in a simple but effective manner but leaves the rules feeling fairly generic. Luckily it is easy to use the unit special rule idea to add appropriate flavour for specific campaigns.

The basic troop types are light infantry and light cavalry, fast with the ability to shoot 2 squares with bow or javelin, heavy infantry and heavy cavalry slower but with a melee bonus, and various traditional specialist units such as elephants, chariots and artillery.  One of the specialist troop types that I was tempted to try was Gallic or German tribesmen who are fast but weak though they can sometimes claim a charge bonus. However, not only would I have needed to stop and base up a few more units but my Viking barbarians are more shield wall types so generic heavy infantry it was.

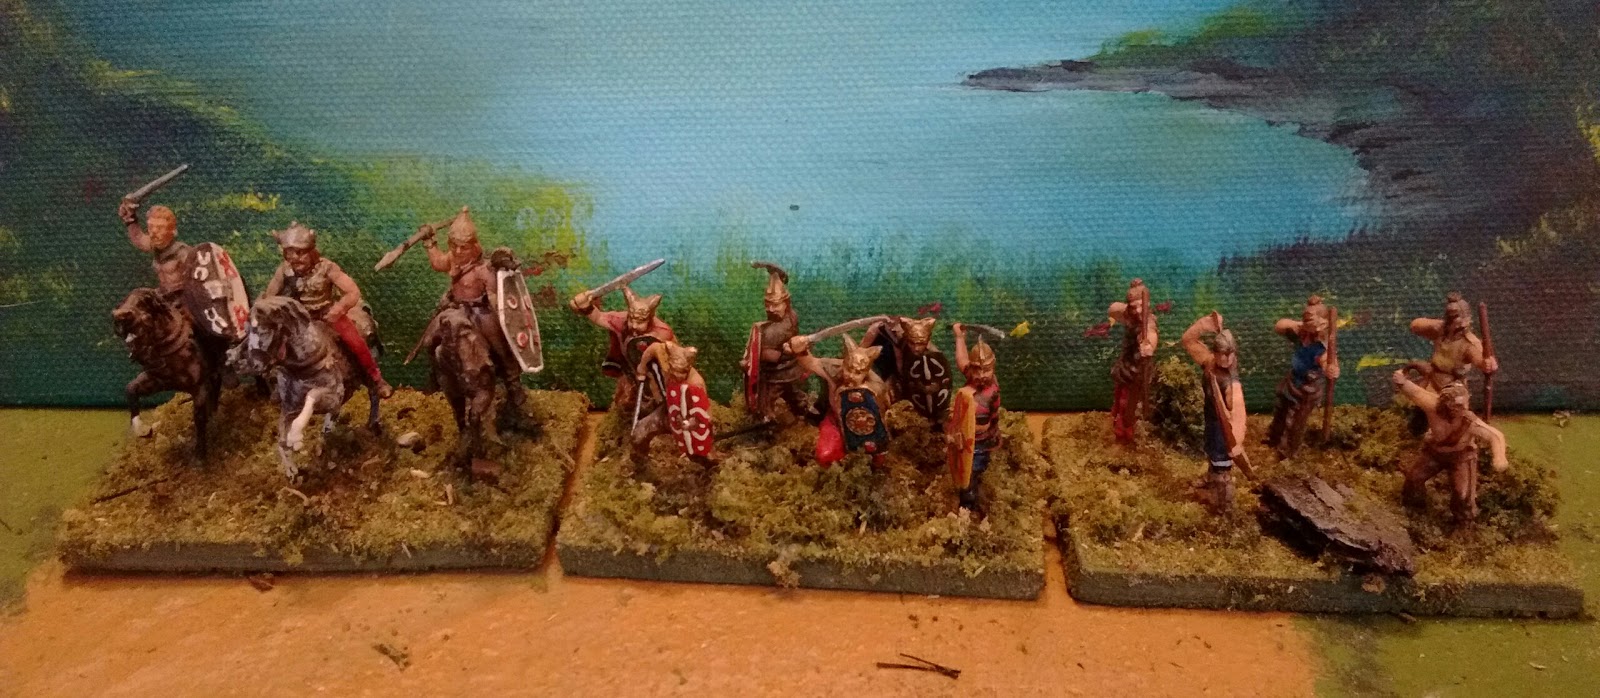
An overview of the opposing battlelines at the start.
Since I have divested myself of all my 25mm and 54mm ancient armies, apart from some Sassinid Persians and some medieval Scots, I turned to my 40mm Elastolin collection of Huns, Vikings and Romans for what could be seen as a comic book Rome vs Barbarians battle or as part of my fictional, not to say Fantasy campaign world. Any resemblance to a real battle, living or dead, is purely coincidental.

On one side was the Northern Confederation (aka the Barbarians) under King Preisages who commanded 4 heavy cavalry, 5 light cavalry, 3 light infantry and  7 heavy infantry totalling 59 strength points. (I didn't count either general for any purpose for this game.)

Facing them, in defence, were the Border Guards under Count Imonsay with 4 light cavalry, 1 light infantry and 9 heavy infantry assisted by an allied Valdurian contingent of 3 heavy cavalry and 1 light infantry totalling 59 strength points.

An army losing 1/3 of its strength points becomes exhausted and is unable to act aggressively. After several attempts, I'm still pretty vague about how aggressive one can be, shooting seems pretty aggressive to me but is apparently ok as is attacking an enemy who is already adjacent to you when you are activated.   To make it easier to track, I counted out 20 casualty rings for each side (white for the Romans who were assumed to have medical teams to bandage the wounded, red for the bloody Barbarians.) and when they were all issued, that side was exhausted.

Midway through the battle the opposing infantry is engaged in an indecisive scrum with the lines heaving back and forth with the Confederation light cavalry puts pressure on the Count's left wing.
The game began with the  "Barbarian" (the original Valdurian chronicler's prejudice, not mine) horse archers rushing forward to attempt to turn and then crush the Count's left while their shield wall advanced steadily. On the far side of the battle a few barbarian skirmishers came forward to attempt to drive in the Valdurian archers and try to draw their heavy cavalry off the hill.

The game went on with the battle lines pushing and shoving each other forward and back without a breakthrough on either side. The light cavalry held out better than I expected, inflicting few hits but being recoiled more often than losing strength points. (Dice!!) The Count finally decided to throw the Valdurian heavy cavalry forward to disperse the enemy skirmishers and turn the enemy flank.

Alas, the Valdurian Companions, the elite shock troops of the army, were barely able to nudge one small company of enemy skirmishers back off the hill and the attack stalled. On the left, numbers eventually told and the Count's light cavalry started to get cornered and pressed up against the reserves and the recoiling main line and as the second light cavalry unit was eliminated the army became exhausted.

At this point the Barbarians were also only a few points away from being exhausted even though they had not lost a single unit. Rather than risk going over the threshold the King pulled back all of his troops out of contact and outside bow range of the one remaining Valdurian archer and then his horse archers began shooting apart the Count's left flank. As unit after unit was removed the Count had no choice but to signal a general retreat.

The Valdurians still hold their hill but their cavalry has been unable to ride over the skirmishers in front of them, The main battle lines hold but the Count's left flank has collapsed and it is now a matter of retreating before the wild barbarian riders completely swamp the centre and slaughter them to a man. 

On the whole the rules did what they were designed to do. They achieved a believable over all result which could easily have been reversed and by and large the troop types worked. The failure of the heavy cavalry to sweep away the handful of untrained peasant skirmishers in open ground was troublesome despite moderately unlucky dice. The heavy cavalry had a small melee advantage over the skirmishers but it was so small that a minor wobble in probabilities was all it took for the skirmishers to more than hold their own even when flanked.  Possibly a Poor rating for the skirmishers to distinguish them from well armed, well trained professionals would have helped.

The push and shove of the infantry scrum felt right for these armies and the light infantry was about right against other infantry. The light cavalry worked better than I expected given that they have to move into heavy infantry charge reach to shoot. I'm still not convinced that Crassus could be destroyed by Parthians under these rules but possibly if the Parthians were counted as Elite, Horse Archers as well as Cataphracts and the Romans downgraded to ordinary heavy infantry. In any event I must fudge something to try that match up.

Although the rules worked fairly well and the game was enjoyable it lacked a certain amount of tension for me since everything is very incremental. A slow grinding fight sounds right for opposing infantry lines but less so for light troops and cavalry and there is no chance of anything else. It also still feels odd to me that my army could be exhausted without losing a single unit but that it will never collapse in rout like so many ancient armies but that may be largely an expectation formed by habit.

I also noticed something else rather interesting. Old habits die hard and in this game like the previous Zulu ones, I kept forgetting that units adjacent to an enemy do not have to initiate melee on their own turn, especially when they have already taken hits and are fighting against an enemy to their flank! Must make myself a reminder on a QRS.

Another old habit was formed by decades of having separate movement and melee phases in a score of different rules sets. I often forgot to resolve combats until all were done or did some and forgot others. Again a note and a closer attention to process would soon cure these old habits.

Anyway, I will be sending off more detailed technical comments to Bob and start planning another test battle. I would like to see an elephant in action and try the artillery rules as well.  


Sunday, April 23, 2017

Rough Wooing in the Valley

Yesterday I packed up troops and terrain and made the 45 minute trip to Kentville to the Table Top Games day where I set up a version of the game that Rob Dean and I will be running  at Huzzah in Portland next month. The scenario was the same Stuart Asquith one that I played twice earlier this month. The goal for both sides is to garrison the town and exit a force off the far end of the table by road.

The French march on as the game gets underway.
The stand-in Scots barely glimpsed to the left are technically off table at this point.
 Since I didn't have Rob's troops or terrain I fudged things with what I had on hand, throwing in some Scots and so on. I was hoping to have at least four of the lads show up for the duration but life intervenes and some couldn't stay for the whole game while others couldn't come at all. However, I managed to pressgang a passing gamer  who paused by the table for a few seconds too long. He (Greg? Garry? Damn I am bad at names...) turned into an agreeable companion and an able commander for the English (hopefully we'll be able to entice him to join us for more games) and so we had at least four players at one point and two players for long enough for me to get a good feel for the rules and scenario which would have been enough to declare the event a success. Better yet though, Martin was able to stay an extra hour or so and put up with me filling in as both GM and player for the last hour to reach a reasonable conclusion after about three and a half hours in all.

I didn't have room for all the troops to start on table nor did I have a spare side table so please visualize the troops lined up along the board edges  as actually marching down the roads from off table. 
The English were fast off the mark and very aggressive. Their forlorn hope managed to drive off their French equivalent and bottle up the main French force for a good while. A unit of Landsknechts in English pay made their way through the open woods aided by good movement dice and By the time they fell back and rejoined the main English force, nearly half the French infantry had been drawn off to face them. Thanks to the sacrifice of the Forlorn Hope, English archers had already made it to the town while their cavalry and more infantry were well on the way to bypassing it on their way to the exit.

Battle is joined.
The pictures got foggier as the battle went on. I'd like to think this was the effect of gun smoke and the angle of the sun shining into a dark room but I suspect a trip to the snack table for a handful of chips (
crisps for those from the Old Country) may have had an inadvertent, but deleterious, effect on my smartphone lens.
The French had two choices at this point, try to race the English to the exit, a long shot, or try to catch them from behind, crush the rear guard and force the main body to turn back or lose the town. Their General chose the latter. The card sequence and dice had helped the English at first but these things rarely last and the French were able to drive into the middle of the English army. When the large block of Swiss rolled into a small group of Billmen, French expectations were high. Eleven dice for 5 or 6.....0 hits! 4 English dice for 4,5,6 came back  with  3 hits!  A stand off and tied melee since the French took fewer hits than they had stands but not what was expected! (the Swiss mercenaries in 1544 were not quite up to their fathers' reputation.) The English billmen pulled back and let the archers and artillery pound the pikes. A combination of card sequencing, an opportune/inopportune turn ending Joker and more high movement dice allowed the Landsknechts in English pay to run up in time to hit the French in the flank as the bills rushed back in from the front.   The Scots avenged  them and broke the Germans but this left the French General with one slightly worn pike unit and a few stands of heavy cavalry with no swordsmen or halberdiers and very few arquebusiers to storm the town while the English still had two formidible regiments of bills and bows backed by cavalry. There had been some rather tense moments for the English though and the French attack could well have changed the outcome.

Gratuitous shot of the English as their advance guard of light horse, bowmen and sword and buckler men prepares to deploy and go into action early on. 
I won't speak for the players but as GM and rules writer I was pleased at how the game went. This was the first outing for the buffed up rules which have not been out much in the last decade. During this period I have tortured them in various ways to try and get a smoother, faster game without losing too much of the original flavour. In that time they took several false trails but have come back close to where they began but streamlined a little in organization, stripped of some fiddly-ness, and with a few small twists such as the inclusion of a few Chance cards.

Dusk sets in. A couple of turns before the end. The opposing cavalry are manoeuvring to gain an advantage, speed vs weight. Beyond the town the English Landsknechts are about to crash into the obviously second rate Swiss hired by the French.
The game also gave me a chance to spot a few order of battle weaknesses with the French being weaker than intended in firepower and in troops able to take and hold a town (no job for pikemen). All things easily fixed for May. Another lesson of the test is that I need to clarify what is a an acceptable garrison  and what makes a sufficient force leaving the table. I think I will also force Shaken "Regiments" to leave the table rather than having restricted options. These things will help keep the game length inside the convention time limit and make it easier to call it at the end.


Bring on Huzzah!

Friday, April 21, 2017

Bit of a Mess Really

If the shortage of blog posts recently suggests that I've not had much time for wargaming this week, well its actually more like I haven't had much time for wargaming this last week.
Hurry you lot, onto those bases, green up and get ready to board the transports!
Now not much is not none but there has been no actual wargaming, nor any new units added.

There is a game coming up tomorrow though and I have managed a quick reference sheet for     the buffed up and reborn Rough Wooing 16thC rules
(If you're new to the internet Click back there on the coloured hyper links see the QRS and rules.)

I've also managed to finally rebase the last of my Scots from thin-ish card to regulation thick-ish masonite, not the fancy laser cut ones with bevelled edges, I had to saw these up from old salvaged wallboard. I also made an hour to speed paint a few more Elastolins to round out my pike and shot forces to 22 pike and  10 shot.  Hopefully in the morning I'll have time to finish dry brushing the new bases and pack it all up for transport and be on the road a little after noon.

Sunday, April 16, 2017

One Done

I now have my 54mm portable playing field done.

Somedays I just can't get sufficient light for my smart phone.
In life it is actually possible to see the grid lines.
 

The cloth itself is the reverse of a Hotz hex mat with some paint dabbed on and over painted with gridlines. Due to a ......clerical error, aka brain fart, this mat has a grid of 15x11 3" squares instead of the intended 15x12 squares. Don't ask! I was planning to slip hills under the grid but the flocked hills from my original but warped portable board match well enough in texture and colour that I will use them.

The other 1/2 of the mat will be used hex side up for Russian Civil War games so that both can be on offer at the same time.

I did a quick test of a new scenario, hopefully better for a learning game. Eight British stands with Commander are tasked with holding a hill line for 12 turns against 18 stands of Zulus. To help them out the British are classed as "Disciplined" (ie Elite) while the Zulus are classed as "Brave" as in would rather die than retreat (ie Poor). A Sudden Death game was nerve wracking but very fast ending in a close game with a clear British victory. A game using the basic strength point rules lasted considerable longer but lacked tension until near the end where it looked like the British might eke out a draw. It was only after the game that I realized that I had screwed up and made the British melee every unit that they were in contact with on their own turn forgetting that this was optional. Oops might have turned the game to a British victory.

However, the Portable Game is going away for a couple of weeks now while I work on the main event, the Friday Night 16thC game that Rob and I will be co-hosting. We could run it tomorrow if we had to but apart from fixing up some broken figures and hopefully adding a few more and fine tuning a series of Orders of Battle depending on how many (if any!) players sign up, I need to make a quick reference rules summary to hand out so that is Job One in time for a multi-player local test game next Saturday.

Archive shot of an earlier solo test game.


Tuesday, April 11, 2017

Getting Back To The 14 Square Wood

Its been a busy few days but I grabbed a minute to cut some bases, dab some paint on them and glue a bit of shrubbery around the edge.
Woods with trees....

Each block is divided into either two or four 3" squares. There is a line of bushes along one outside edge of each quadrant to make it easy to slide bases of 54mm troops in but still make it obvious that this is some sort of terrain piece. The trees have been left loose to make it easier to pack and to accommodate the placement of troops during a game.

....and without trees.
The squares are only indicated by brown areas but its easy to see which quadrant units are in.
 
Next big chore is to make a matching portable ground cloth to take to Huzzah!.

Saturday, April 8, 2017

Just Out of Refit

Amongst the collection of Veteran Britain's I acquired some years ago was a contingent of a dozen or so sailors. I had promised to cherish and enjoy them so for years was reluctant to refinish them but really, what sailor wants to appear for inspection, or battle, in rags? So, having started with the Gordon's I progressed to the Royal Navy.

The Landing Party of the HMS Belmont. Lt.Cdr Burrell is stationed with the rocket battery while Lt. Howie leads the riflemen. (Hmm from this angle these guys look a bit Herbie-ish.)
Oh yes, the rocket is a cut down one from Barzso's New Orleans set.
I decided to start with enough for the game at hand, the rocket battery and a stand of riflemen. That would leave me some figures to crew the gunboat whose plans have not yet been approved and enough for a second stand of riflemen in future. More importantly that left me original figures to use as a guide when painting. Except for the officers so I decided to take close ups for reference before stripping the paint.

I've never been a big Stripper. Too impatient and my wife is extremely sensitive to chemicals but I found a product called Natura Safe Strip which is non-toxic, low odour,  environmentally friendly and fast acting. Brush it on and 30 minutes later the enamel was ready to be brushed/rubbed/washed off. My newer acrylics took about 45 minutes. Sometimes a 2nd coat on tough spots is needed but I didn't care if there were a few spots here and there under a toy soldier finish, I just like to see the hidden detail emerge from under the thick glossy enamel after 90 years.  I think I'll be ready to do more stripping in future!

Three broken figures become one repaired and one brand new figure.
Providing a crewman for the rocket was a puzzler at first, I really didn't want to start carving up
perfectly good, scarce figures. After some poking and thinking I came up with a running sailor with a broken rifle, another broken off his stand at the ankle and one of many kneeling guards with a broken rifle. A few minutes with a saw, some stripping, some putty and glue and the still running sailor had a new arm with full rifle and I had a kneeling crewman.

Couldn't resist finishing the job today. The paint job isn't a perfect match, sometime mixing the acrylics on hand could only come close to matching the original colour after 90 years of fading and sometimes I chose to add something (like painting the bayonet scabbards) but its close enough to please me.

I did get one surprise though. The men all have light red-brown hair but the officers have black beards. As I started to paint I thought...no..surely not.... so I looked at the picture taken from behind and YUP red hair, black beard! They've been on my shelf all this century and I never noticed? I suppose that means it works but not on my ship! One officer got black hair and beard, the other burnt sienna. I set him down on the desk and OMG it was Doug!  (A wargaming friend  from my Navy Days and after.)  Doug was a career officer, Naval Engineer with a background in astro-physics  and an interest in Space so the rocket battery seemed like a reasonable place to put his 1879 counterpart.  (Sure as hell wasn't going to let him near my cavalry but that's another story!)  Maybe a 54mm hot air balloon should follow.

At any rate the refurbishing has been a great deal of fun and they can now appear on public display as a credit to their ship.

Thursday, April 6, 2017

Oh look, More Zulus!

Actually its the same Zulus in the same scenario, different Brits this time.
(See my February 11 Battle Report)

The Portable Wargame and One Hour Wargames. They look like they are a good match.
Once again the scenario was "Escape" from Thomas's One Hour Wargame with Bob Cordery's The Portable Wargame and my 54mm Zulu War figures on a 3 foot x 3 foot battlefield gridded into 144 3" squares. This time though, I tweaked the forces a bit more for flavour. All of the British were counted as Elite but they only fielded 8 units including the General. The Zulu's had their -1 to shooting penalty and no general since one usually pictures "the old boy" on a hill at the back rather than leading charges. So, 12 Zulu units, 1/2 with firearms against 4 British Infantry, 2 cavalry with carbines, a rocket battery and a General, all Elite. Rocket batteries aren't mentioned but I treated it as a Mountain Gun with a range of 6.    Given my goals of under an hour per game at Huzzah and rules as written, I decided on the Sudden Death option.

The Zulu's won both of the initial tests but this time the British lost. ......OK so 3 straight losses for the British including two where they beat the Zulus but took too long and failed to exit enough units by the deadline in which case something drastic no doubt happens, the arrival of the main Impi perhaps.  I strongly suspect that the British just haven't been focusing on escaping as much as they should have. They probably need to be less concerned about their flank and rear (which tend to get hit anyway) and more concerned about time. I'm going to try again before I decide that its not a suitable scenario as an introductory primer.  After all, all of the games have been enjoyable to play and felt close so maybe I'll drop an occasional reminder about victory conditions. I might add one or two more British infantry units though or at least boost their Exhaustion Point and their activation deck.

The Zulus stand on the brink of Exhaustion but that won't stop them from causing delay.
 I was going to add a rule making the rocket battery less effective than other artillery but I didn't need to, It just kept rolling 1's all by itself.
I did try something new this time. I have a dislike for dice based initiative systems  that let you possibly fail all the time and not get to do anything. Bad enough if playing solo or at a weekly game but as an introduction to a game or as a once in a blue moon game with a friend, bad activation luck can leading to a boring game and spoil the occasion or the experience.  At the same time, I am also opposed to having too much and too predictable control. Something in the middle seems best.

The rules include an optional solo card draw system of the right sort, always something but not always enough but it allows for a run of cards on one side. In a scenario like this such a run could end the game after 10 or 15 minutes. After a bit of thought I decided to give each player their own deck and play igougo but with the card draw indicating how many units to activate. To make life easier I used an idea I have been using and made each deck 15 cards so that when the cards run out, the game is over without having to track turns. I also inserted face cards to mark when the Zulu Horns and Loins arrive.

It worked like a charm but with one little wrinkle. I don't have any matching decks so I increased the range of cards selected. As fickle fate would have it, both sides drew a lot of low cards when they only had a small force on table then a lot of high cards when they had their maximum units available then the rest of the small cards when they only had a few units left. There were some exceptions and over all it will work just fine, even if I don't get around to picking up some new decks of cards.    
Time's up! Turn 15 and only 1 unit has exited with one more on the edge and the rest several turns away.
There were a couple of minor rules issues but nothing new. I find it unsettling that a unit can move from in front of an enemy to their flank where it receives the same bonuses as one that sprang unseen out of ambush.  Its not so bad if it is the speed of cavalry or double-moving natives that lets them move from several squares away but a literal reading of the rule for moving away would seem to say that a unit moving away from an adjacent enemy may not move adjacent to the front of an enemy but does not preclude sidestepping to a square not adjacent to the front of an enemy then moving forward to the flank of the unit it was fighting thus gaining a 2 pt advantage. It that melee is a draw the enemy can then repeat the manoeuvre and thus the units will circle each other like monkeys and weasels until one pops.

Having thought about it I am going to go as far as interpreting the rule on page 46, where it describes a move away from an enemy as "withdrawing", to mean that a unit cannot withdraw from and then attack the same enemy unit in the same turn, even if it becomes a flank attack.

More painting and terrain building will be done before the next test game though.

Tuesday, April 4, 2017

Hasty Report Before I Move On

The slightly revised board has now been blooded (metaphorically).
Faraway's Composite Colonial Battalion prepares to advance on Asquith Junction.
(Note to self: Best make dismounted cavalry figures a priority)
(
The scenario was the first one in Stuart Asquith's most recent Solo Wargaming book.)
The main driving force for the various experiments has been my shiny new early 20th Century armies. (Well less than 3 years old which counts as new compared to decades for most of the rest.) I'll leave it to the pictures and captions to give an oh so brief summary of the game. Alas I was too wrapped up in the game to take notes let alone more pictures and the speed of play and number of tense moments and turns of fortune were too many to easily recall in order and make sense of in narrative form after two days lapse.

To save suspense, the 4 man company units on the small grid worked as well as I remembered and after some initial tinkering the game was just right for my vision of what the campaigns and battles of the Great Atlantican War of 1901 might have been like.
An overview early on: Larsen's Lancers have raced ahead to block the vital road exit while the Colonial Battalion prepares to assault the town backed by the 4.7". The Select Militia Volunteers in their Red tunics have barely arrived but will bypass the town and move on to the relief of Maybefaking.  Across the table Oerberg Mounted Rifles and Infantry have seized the town while the heavy gun and two battalions of Oberhilse "Volunteers" march around to seize the road exit. 
It took a few turns of trying and tweaking rules mechanics and so on before I managed to re-find that lower level "Colonial" action feel  but by 1/2 way through the game the feel was there. It was only when the game was over that I realized that I had subconsciously re-written the notes into the Square Brigadier, which is where this whole thing started anyway and rules which have given me many very enjoyable Solo games.    

Uncounted turns later (Literally, there was no time limit and I forgot to track the number of turns or the time spent gaming, merely noting partway through the complaints of a pack of hounds whose dinners were late.) the town is firmly in Faraway's hands but the exit is held by Oerberg's foreign volunteers. At this point Oerberg has lost 5 infantry, a machine gun and 2 cavalry or 8 out of 17 units while Faraway has only lost 3 out of 14 units. However, many Faraway units are near exhaustion and attack could  easily lead to heavy casualties and break their morale. It looks like stalemate.
Unless, just maybe.......
There was one new mechanism though. Ever since I dropped the order dice idea there has been a bit much order and predictability for a Colonial skirmish. Having gotten in some MacDuff games last year, not to mention a game of Howard Whitehouse's Gentlemans War at Fall In, I have started playing around with card activation again. It was slightly more work than straight Igo-ugo  but also more fun and (I think) better reflects the diminished control of Colonial warfare with small bodies of widely spread troops without radios.

Suddenly an alert subaltern reports that the enemy commander and the Oerberg artillery have been left alone on the ridge beyond the town, in easy reach of Faraway bayonets. The Baluch companies take over garrison duties and 4 companies of infantry sally out. The enemy general managed to leap in his motorcar and speed to safety but the gun is captured despite heavy casualties from point blank fire as the attack went in. With such heavy losses and no guns (not to mention an Army Morale of 0) any chance of taking Maybefaking  has gone. The order goes out to retreat off to the South East and the road is clear for a relief force to push on down the road while leaving a garrison to hold the Junction.

Now comes the task of once again writing a full version of the rules with notes, something I haven't done for a few years while all this questioning and exploring has been going on.  I've made some notes but that proper, double checked copy will have to wait. Its just over a month until Huzzah and I need to focus on getting both our 40mm 16thC game and my 54mm Portable Wargame event ready and looking as good and providing as enjoyable as possible a playing experience as I can manage for those who choose to sign up and play.

Sunday, April 2, 2017

The Committee has made its Decison!

For the past few years I have been conducting a series of tests to find the optimum size of grid squares for my table and gaming style along with the related question of the best choice of basing and organization for my needs. One might think that a thorough analysis of the facts could have provided the correct answer but I have found that  intellectual analysis of emotional/aesthetic questions based on untested assumptions rarely reach satisfying conclusions. So the testing and experimenting began.

A quick revised Tin Army takes the field with 1 Company per 3" square.
The real trigger was that I needed to reduce the size of my table from its original 6'x8' to something smaller, without reducing the size of my figures or the quality of the games. So far I have tried 6", 5", 4" and 6" squares subdivided into 3" quadrants. They all have an advantage and a fault.  (Note: I have also tried 4" hexes but there are non-gaming issues which means that they are not a feasible option in the foreseeable future.)

Small grid squares mean not just smaller units but also smaller terrain items or possibly multi-square terrain features and that proved to be the decisive issue as I found that the rules and my preferences were trending in a direction where the number of figures in a unit became irrelevant with a slight bias towards small is better.

Large grid squares mean fewer squares per table essentially making the small table even smaller and requiring me to be ever more clever to design a satisfying game but terrain features become easier to design.

Inbetween sizes provide a typical compromise. They provide the easiest acceptable solution but one which is never quite satisfying

I have had some really good quick games on the big squares but have not been clever enough to successfully design a longer, more complex game and scenario on the small number of large squares. However,  a review of past experiemental games played using smaller grid squares convinced me that that was the way to go IF I could resolve the issue of fitting in buildings, woods and vehicles.  The answer to that would require a mix of getting creative and letting go of some old favorite terrain items and accessories.

A shot from a favourite 2015 Tin Army game on sub-divided 6" squares.

I'm not big on letting go of things but I've been training myself and have reached the point where I am willing to let go of some things that won't fit even as multi square pieces and retire some others for use in the occasional non-gridded game which they are appropriate for.  Multi square boats and train cars are another issue but I can work the rules around that. The getting creative bit has been a mix of some experimentation with lots of looking at pictures of other peoples' wonderful creativity.  Having tackled making a handful of non-scale buildings that fit a 4" grid last fall,  I'm now satisfied that I can not only meet this challenge but enjoy doing it.

So, I took a few minutes on Friday  and once again subdivided each of my 6" squares into 4x3" ones and now the Tin Army is partying like it was 2015 again. What the results of my terrain labours are will be shown here when there are results!

Saturday, April 1, 2017

Meanwhile, in a Different Valley

I've been working on a follow up to my last post, had it almost ready last night. Thought I  might finish it today but there was a game on at Jeff's place in the Annapolis Valley ( armchair commander blog) ....

My Brave, Patriotic Antitank Rifle team who went on to liberate a brick house from the Fascists, distract the enemy and almost destroy a 1/2 track full of infantry before being over run by a unit of fascist infantry. 
Jeff had set up a simple multiplayer, 15mm Bolt Action, Russian Front game as an introduction to the rules. As a group our experience with the rules ranged from a little to none at all but by turn two we all seemed to have the hang of it and the rules were not a serious obstacle.
The cell snap we Russians used to plan our attack.

The Germans were defending with a large force of well armed but souless tyrants against​ our paltry handful of brave Patriots. (Which is to say that the forces were of equal value). We won the right to attack with our mission being to break through the German lines and exit units.

After a Council of War we decided to attack up the right bank of the stream with an armoured car and 3 units of infantry while our heavy weapons (mg, sniper and A/T rifle team) deployed left of the stream to provide fire support and fix or "amuse" the enemy. A T34 was in reserve behind the center and 2 veteran infantry units were making a flank March up the right flank. I'm not sure that my clumsy attempts to suggest that they were going to appear on the open left flank had any influence but they seemed hesitant to take our massed infantry assault seriously until it was a bit too late and spent a lot of time and effort on wiping out my handful of support teams and my poor T34 who appeared in the center and dueled with a PAK40 and a Marder for several turns. I say dueled but it was mostly about my guys surviving shot after shot until the last one.

Anyway, the plan worked, our right hook punched a wide hole which allowed us to break through with a substantial force for a clear win.

With  good company, lots of rolling of dice and a little brain work, it was a good day.