Friday, April 27, 2012

D-4 and almost ready

On Tuesday I load up and head out for Huzzah. It would only be an 11 hour drive if I went direct but I'll be two nights to visit family en route.   I was starting to get anxious about not having troops, terrain or rules ready but things are finally coming together.

Volunteer Rifles, freshly recruited.

At last I managed to de-flash enough of my new riflemen to make a light infantry unit. My original idea had been a unit of 24 close order militia in hunting smocks as well but close enough. I usually like to have my skirmishers in pairs with 1 firing and 1 ready, moving or loaded but that meant 4 conversions since I had only made 1 pose. Between the flash issues with the degenerating, generic "ready" pose of infantry and other calls on my time. I decided to settle for converting an officer and a kneeling figure at the ready. I was painting them before it sank it that I had grabbed a firing kneeling fellow. Oh well, maybe the unit is having a "mad minute" or is manning a palisade and has been waiting  to see the white's of the enemy's eyes before they all fire? Anyway, they'll do and my Maine forces are now ready.

Earlier this year, on rather shaky grounds, I decided to base my cavalry on 3" wide bases each about right for a squadron ground scale wise, with 2 stands per scenario unit despite having 3 per unit. In the games that have followed I noticed that the cavalry seemed a lot more fragile and a but less effective. My first thought of course was "Maybe I shouldn't have removed the -1 for shooting at cavalry". My second was that  I had not intended cavalry to be running in 1 or 2 stand units and that this was the real culprit. The obvious conclusion was that I should just put all 3 stands on the table. But this meant fielding 9" wide units that were only slightly more effective on a constricted table where I had had trouble finding 6" for a squadron to charge in. The uncomfortable conclusion was that the 3 figure, 3" wide bases have been a mistake. I hemmed, I hawed. I considered that only 1/2 of my cavalry had been rebased.  I thought about what would be more fun for any players at the convention and I went out, cut a stack of 2" wide bases and got to it. 

"By two's....Walk March!"

Originally I wasn't sure  if I should take the Director General Bodyguard along, masquerading as the New Brunswick Yeomanry or use my unlikely but more accurate King's Hussars but in the end, the latter were going to be the only chunky unit coming so I decided to base the DGBG up (again). But how to base the dismounted version?  In MacDuff, and in an earlier version of Hearts of Tin, I laid out rules for percentages of figures or stands that become horse holders and I prepared to base up 2 horse holder stands and 2 light infantry stands.  Oops! In the current version, it doesn't work that way any more.  Largely because of how the stands function under the rules, each mounted stand needs to remain a stand when dismounted so instead of separate horse holder and light infantry stands, the horse holders are assumed to be behind each stand. How was that going to work with what I had painted? It took a while but the result can be seen above. This will allow to field the regiment to be fielded as one 4 stand unit or two 2 stand units. (Technically each stand is a weak squadron based on ground occupied but I'm going to call them troops and make 2 squadron regiments.


The pontoon wagon has been painted and based but it looks like the driver will be a rather inappropriate Bengal Horse Artillery driver. I didn't get Guards in Bearskins or Highlanders sculpted, cast and painted so the troops in Havelocks will have to serve.  The Royal Navy landing party is not going to materialize but I have enough to man a rocket. I still need to come up with 2 crew members for the Steam Battery and touch up a couple of pieces of scenery but I should be ready for a solo playtest of the final version of the scenario using only the troops that I'll be packing.


 The glare from the gloss varnish sure doesn't make picture taking any easier!


Oh and I need to find something to pack the troops in as well as something for the Rough Wooing lads. They haven't been on the road in a few years now. 


Wednesday, April 25, 2012

Cleanse the Causeway! An Anglo-Scots War Game

So, no, not THE cleanse the causeway, this was a 14th century border clash using Ron's Hexed Basic Impetus variant. (Available at left.)  I had thought that the two games the week before last were really good but they were but a moon cast shadow to this one. An epic 4 hour, 15 turn game that teetered on a knife edge of victory or defeat for either side for the last 3 turns.

If I could type in a corny Scottish dialect I'd be tempted to write this as a 1st person account of a real event.  Luckily for you all, I can't and therefore won't.

Overview at the end of Turn 2. The casualty figures indicate disordered Scots units.

The game was Island Stand from CS Grant's Programmed Scenarios. Basically this involves an un-fordable river with an island in the middle. Bridges cross the river from the island to the Northern and Southern banks. The attacker is tasked with controlling a route across the river, the defender with preventing this. The attacker is aided by a small force of light infantry which has managed to cross off table. The original map called for various buildings but Ron chose to deploy woods instead which seemed very appropriate. If the Scots were the defenders, I would have tried to pull a Stirling Bridge, doing my best to shelter my schiltrons behind the trees, counter attacking any English force that crossed but the toss indicated an English defence.

Drawing on what limited knowledge that I could drag up about the poorly recorded reign of King Ross (most historians believe that David Bruce succeeded his father directly), I decided that the battle probably took pace in late 1330 as a Scots raiding force  was on its way home from an incursion into England, only to find its way barred.

The English force was composed of a unit of knights, three of bowmen, three of spear/billmen, 1 of Welsh light infantry and 4 of skirmishing mercenary crossbowmen.  A roll determined that the two southern bridges had been barricaded. Since the rules don't include barricades we declared them to be difficult terrain which was bad news for my pikemen.


Once again my cell phone camera skills were not up to the task. 


The Scots fielded 3 Schiltrons (double units), 3 Highland Clans, 3 units of skirmishing archers and an unlikely bombard. (The latter was supposed to have  been a unit of cavalry but there appears to have been a packing error.)     Two archer and 1 Highland unit started across the river.    


My plan was fairly simple, use my archers and bombard to pick at the enemy while the Schiltrons and Highlanders stormed the barricades. Once again the English archers were a major factor stalling schiltrons and forcing one clan out of the battle. The first assault on main bridge faced a tough fight but eventually took the barricade and then waited for an appropriate moment to cross it and drive forward. Once the 2nd schiltron had ponderously crossed the table under an arrow storm and was ready to attack, the signal was given and both started forward. After a tough fight the left hand attack finally took and crossed the barricade only to be broken by counter attacking English billmen.  In the center, the schiltron crossed the barricade but before they could reorder, a counter attack by English infantry drove them back across the barricade.

While I regrouped and my Highlanders traded a desultry bowfire with longbowmen in a wood, the  attention shifted to the far side where my archers were dueling across the river with Ron's while the Highlanders closed on the bridge. Ron's Welsh were unlucky enough to be  hit with the first canon ball of the game but a unit of mercenary crossbowmen still barred the way. Neither lasted as my clan stormed forward routing unit after unit.  Faced with another bridge, longbowmen and mounted knights, the victorious Highlanders slipped into a patch of woods and sent their handful of archers to the front to snipe at the English.

King Ross and his standard bearer and nephew, Sir Thomas Macfarlane, survey the battle.

By now, the Scots morale was looking a little shaky, even the bombard had been silenced by bowfire, but the English were not unscathed, the rout of a longbow unit under fire from the despised Highland archers being particularly notable. It was do or die. Putting himself at the head of the last schiltron the King led them forward. Once again an English  counter attack  hit them as they struggled over the barricade.
Crunch time. 

This time, after a prolonged melee, the English were forced back, once and then again,  pushing their way through and disordering the archers and knights behind them with the Scots hot on their trail.  Into the flank of the knights crashed the Scots. Nip and tuck! Both armies were on the edge of their break point. Whoever lost the next unit would lose the battle. Unbelievably, both sides kept making critical cohesion tests or failing to hit. For 3 rounds the tired men traded blows with no result, the 3rd English infantry unit, recalled from the bridge maneuvered into place despite the fire of Scots archers from across the river, and crashed into the flank of the Scots pikes. Still the Scots held! Finally though, exhaustion set in and the remaining Scots spearmen broke, flooding back across the bridge. King Ross barely escaped with his life, but escorted by Highland archers and swordsmen he made his way off the field.


Dool and wae for the order sent oor lads tae the Border!
The English for ance, by guile wan the day,
The Flooers o' the Forest, that fought aye the foremost,
The pride o' oor land lie cauld in the clay.


Monday, April 23, 2012

Trying it on (Continued)

As I surveyed the troops laid out on the table, two thoughts came to mind.  The first was that this sort of situation where one side is in position and the other is attacking was probably more common than the sort of encounter or odd situation scenario I tend to choose. The second was that without a back story, any surprises or room to maneuver, it didn't look particularly interesting as a solo venture. Not enough decision points. It didn't help that I knew that I was going to have to steal intermittent batches of playing time from household obligations.  For some reason that seemed to make it an ideal time to experiment.

One of the things I have pondered off and on for sometime is the difference in C&C in history and on the table top. One of the main issues is that one way or another, the gamer is representing multiple people. You can add charts and limits and rules as you like but this remains the case unless a large team of subordinates is employed. Getting too pedantic on the subject tends to get in the way of the game aspects, none the less,  getting too far away can lessen the enjoyment for me as well and systems that replace rational choices with random ones are neither satisfying for me nor inherently more "realistic". 

Instead of trying to incorporate mechanisms into the rules to represent all the processes by which information and orders are passed, interpreted and acted on. I simply chose to issue initial orders and tried to follow those unless a unit was under immediate threat or unless I as general had a reason to issue a new order to move units. This is in effect the Grant method but being solo, I didn't bother with writing orders or dispatching messengers. I issued mental orders and then refrained from fiddling with units the way I might in a typical "game" against an opponent.  The result was rather interesting though probably more appropriate  with games with multiple layers of command than with skirmishes. 

In short, all Oberhilse forces were placed and given orders to defend. The FTC forces were ordered to advance on the left to demonstrate against  the enemy's right and prevent them from reinforcing their other flank. The 1st brigade of the Queen's infantry was ordered to attack and take the farm and fields ahead of them. The 2nd Brigade was to support the attack and then to pass through and capture the bridge. The artillery was ordered to support the infantry attack while the cavalry was placed in reserve.
An overview from the North Bank.

On the North Bank the story is soon told. The Farway troops were ordered to demonstrate, the Oberhilse troops to defend and the result was a desultry exchange of fire with little effect. If I was roleplaying I could have made some sort of check to see if one of the opposing Brigade commanders exceeded his orders but decided that I would only do so if there was an obvious opening, an enemy unit routing perhaps. At one point, I did decide to thicken the "attacking" skirmish line by taking a unit of light infantry that was supporting the skirmish line and committing them to the skirmish fight while moving the Lancers to act as supports and bringing the Director General's Bodyguard forward to protect the rocket, dismounting them into a skirmish line to reduce the effect of long range shots from the steam battery.  It made little difference, both subordinates achieved their aims though no enemy units were shaken or destroyed. Mind you, with in excess of 30 shooting dice being rolled over the course of the game,  you'd think more than 3 6's would have been rolled!

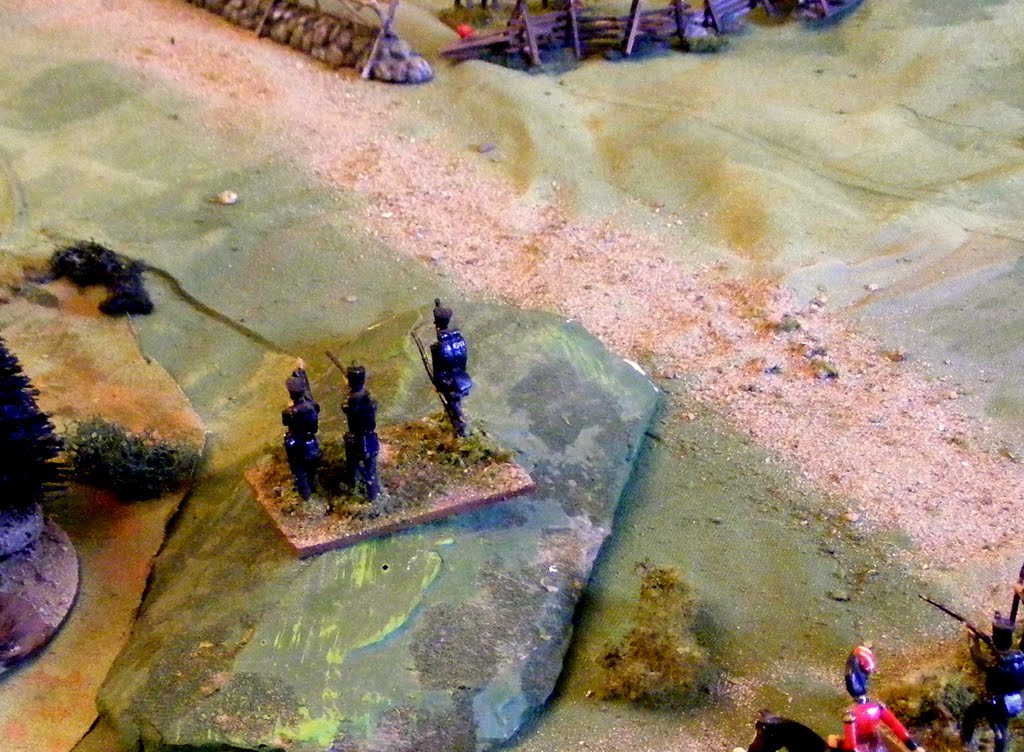
A squadron of the DGBG deploy to protect the Rocket Battery. I rather like the look of the individual painted bases on the new cloth. (lalalalala he chants childishly while covering eyes and ears)

 The only change came near the end of the game when the Blue General seemed to wake up to the fact that he had 15 stands of mostly line troops being pinned down by 9 stands of mostly light troops and that it might be to his advantage to drive them off. The Blue Dragoons were brought forward causing the DGBG to hurridly remount but it was too late and events here were overtaken by what was happening on the far bank.

Firefight!


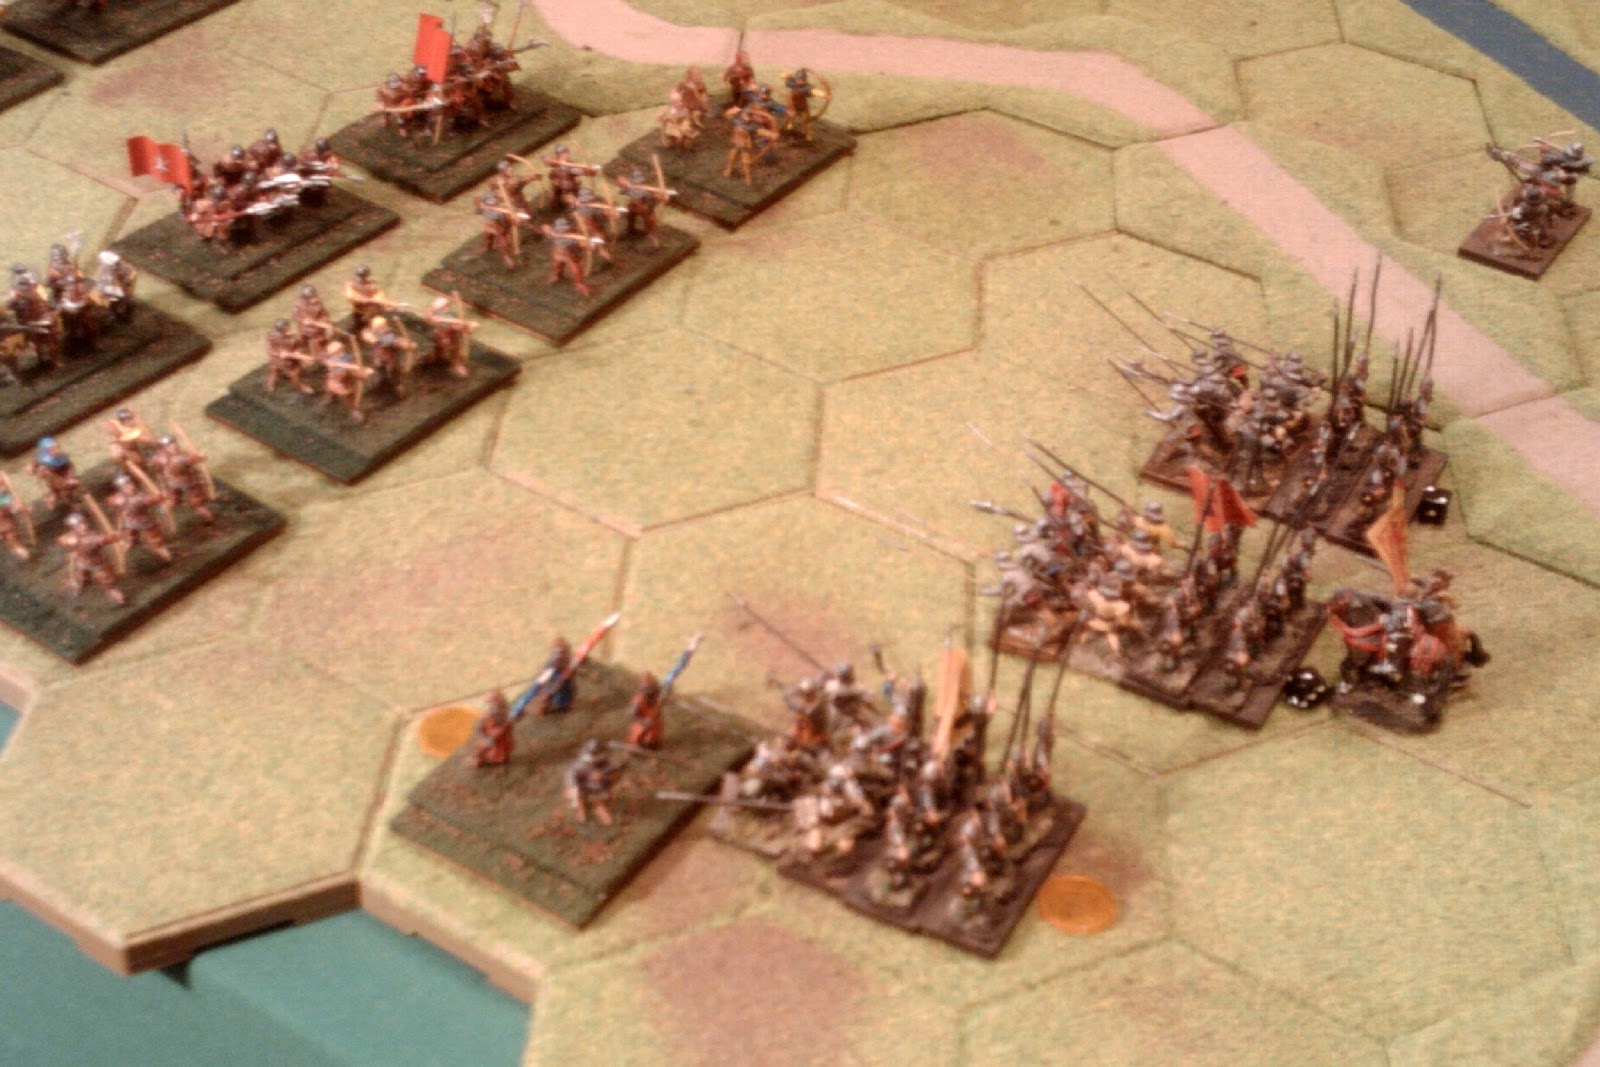
The main attack was a fairly straight forward affair, 14 attacking stands against 15 defenders with the both sides having 2 guns providing support when they could find a field of fire which was easier for the defender. The attacking line had a narrow superiority of quality with 4 elite stands and twice as many rifles.  The real difference was that the defence was supported by 4 stands of elite infantry while the attack was sustained by 8 stands of elite infantry and 4 of cavalry.

It didn't take long for the Oberhilse skirmish line to be driven off  which was no great surprise but despite several attempts by the Blue general, it proved impossible to rally them and the riflemen retreated off table. One  can't help but wonder if this might have distracted the general from the over all course of the battle.  In any event, there was nothing to stop the attacking riflemen from  working their way through the woods, around the enemy flank. In no time they silenced the pack howitzer and forced it to fall back. The Oberhilse 3rd Infantry was then forced to refuse their flank, weakening the firing line at a crucial point.

Near the river bank the attacking infantry passed through the riflemen which had been sniping ineffectively and opened fire on the defending infantry. These, supported ably by their guns, returned an astonishingly effective fire and the Red unit was routed exposing a battery of guns which was moving up to support them. Blue's artillery smashed these in a flash. (4 dice for 5/6, 4 hits with a switch of initiative in between shots to forestall any attempt to rally or retreat!)   The Red general ordered his Heavy Cavalry  to charge the Blue infantry which had not gone unscathed through all this. Calmly the battered veterans of the 2nd Infantry formed square and drove back the shaken cavalry.

In the center, the two infantry lines had been trading fire with no clear advantage to other side. With the battery destroyed and the cavalry repulsed, I was about ready to call it quits but soon rallied and remembering the advantage in quality and quantity of line infantry at the key point, I ordered the rest of the 1st brigade to press the attack. It was this point that 1 Blue regiment had just been pulled out of the line to guard the flank. Both sides were carrying casualties and even without a charge bonus, the fight was deadly. The Elite infantry and numbers clinched the deal  though. Red's line was shaken and some stands were lost but Blue's line collapsed in rout and Brigadier Zinn who had joined the fight was once again captured.  (There are those who suspect him of liking Red's rations.)

 The climax of the battle.

Rallying the Heavy Dragoons, the Red General; found time to order the Hussars to pass through and pursue the retreating remnants of Blue's line and the 2nd Brigade to pass through and press the assault. There was just time for the Blue Guards to belatedly  move up as the Blue Army Morale cracked.


So despite initial misgivings, it turned out to be an enjoyable, if occasionally alarming, solo game. In addition to getting to push my toy soldiers about and test wits against myself, it gave me a chance to give the rules another work out and triggered some thoughts for the future.


The end of the day.

In no particular order.

Dice. Hearts of Tin is one of those games where the dice can potentially skew things, something that worries me.  There were several strings of good or bad luck  for one side or the other or both at the same time and a few spectacular rolls so I went back over them and their effect. As far as I can tell, they had little or no effect on the over all game which was a relief.

The skirmisher shooting was poor  on one flank as were the rally rolls but while average shooting  and average rallying might have seen some units forced to retreat or even a stand being lost, neither would have made a significant difference as there were adequate supports to cover any gaps. Only an extraordinary string of luck combined with a decision to press the attack or an earlier decision to launch a counter attack might have made a difference.  

The destruction of the Royal Artillery was a shock. The fire was consecutive rolls, the last in one turn and the first in the other with a flip in initiative but the luck was only slightly above average and was partly unexpected because the Blue battery had been shooting so poorly! (I know this doesn't actually affect the dice in subsequent turns but....). More importantly, unlimbering a battery in close range of an enemy battery is a risky business and even with average rolls there was a good chance that the battery might have been silenced and forced out of the action for several turns with much the same affect on the game. After all the point of the maneuver by Red was to silence the Blue battery by fire so they can hardly complain because Blue did it to them!

Decisions. On the other hand, several decisions were crucial. This was made clearer since I avoided constant fiddling.

Probably the most critical decision was for Blue  to hold on to his reserves too long. The original idea was that the rifle skirmishers would pull back to protect the flank instead of routing. When that didn't work as planned, no action was taken and the 1st line was left to look after themselves. With only 1 unit in immediate  reserve, I was reluctant to commit them, and especially reluctant to move them too far from the bridge. I was moving to pull back the battered 2nd Blue infantry so that they could rally when the cavalry attack forced them into square and then pinned them in place to rally until Red's infantry could renew the assault.

The Blue Dragoons on the other bank were wasted. It looked too congested where the infantry fight was but I was reluctant to commit them to a counter attack up their bank of the river since there seemed little point in driving back a few skirmishers and much risk if it went badly. Red's cavalry found room for piecemeal squadron attacks on the other side though. Attacks which were useful as opposed to crushing. If the Dragoons had been pulled across the support the infantry, the Guard could have been deployed into the field to cover the retreat of Blue's front line or to counter attack Red's infantry when it was shaken and somewhat disordered by its attack. This might well have changed the game. On the other hand if the Dragoons had been thrown into an attack against the weaker pinning forces earlier and supported by the infantry, Red might have suffered enough damage to  shake the morale of the army..

Army Morale.  I recently reduced army morale from 1/2 to 1/3 to shorten games. I also did away with separate brigade morale. One plan for Blue might have been to attack and break if possible the pinning forces. Should that have had a major effect on the main attack? Perhaps the rule, which is only an "in the absence of other victory conditions" should be made even more flexible by saying 1/3 to 1/2 as agreed before the game unless other victory conditions are chosen?

At the moment, Blue's army has had 1 brigade effectively destroyed with 13 out of 15 stands lost. 9 of those stands were lost in 1 turn and 2 more in pursuit so a 50% brigade rule wouldn't have helped. The question is, can the rest of the army hold if the break point was 1/2 instead of 1/3rd  or if each brigade has to be broken separately?  The game is still set up and I am tempted to play on and see if either of these make a change for the good or if Blue has already slipped past the point of no return.

Table & Troop Size & Terrain. It is no accident that the battlefield resembles the sort of battlefield seen in the War of 1812 with a few small clearings scattered here and there, that's the sort of terrain that was to be found in this part of the world in the early 19thC.  I don't think its an accident that most 1812 battles weren't fought with larger armies and more cavalry even when these were available in theater if not at hand. Its just too hard to maneuver and supply troops in wooded areas with few roads and cavalry can't mass for effective charges.  However, while its interesting while exploring an historical war, its limiting in a bad way when playing generic Horse & Musket games. In particular, while I am committed to my 40mm Toys, I need some combination of less terrain and/or a bigger table. Look to see my 40mm battles moving to the more open and arid areas of Atlantica when I get back from Huzzah!  Somewhere cavalry can maneuver.

Even then, I am near the upper limits of how many 40mm units I can put on the table and still maneuver. This is on the lower end of what Hearts of Tin was supposed to handle.  The question is, is there enough meat to keep even smaller battles interesting? In theory I'm not sure there is, in practice, every time I've tried it, there has been. So this is nothing but a question and an excuse for playing more games. The obvious alternative is to haul out MacDuff and continue to fine tune it while exploring ways to make it work with multi-figure bases as well as singles but at the moment I intend to persevere with HofT for both scales & periods. The 1/72nd ACW is under no such cloud and I expect them to see considerable action as the year goes by.

Optional Rules. As a by product of the previous point, I found myself missing a few rules which I had removed because they required administrative work which I found tedious and game slowing when the number of units on table rose to 2 dozen or more. In fact some of these rules have been put in, taken out, put back in and taken out again several times. In one of those Duh! head slapping moments, I realized that this made them ideal Optional rules which can be used, some or all, or ignored by players as they wish, game by game. I'll probably use them with 40mm games and ignore them with 1/7nd ACW games.

The 3 rules are:
1) Fire and movement. A unit which fires or fights in melee will suffer a -2 to its next order check. (this means tracking  this across turns as well as tracking if a unit has fired yet this turn).

2) First fire. Troops with muskets get a one extra die per 2 stands if they have not yet fired or fought in melee during this game. (This means a separate bit of tracking. I prefer to use some form of marker that can be removed when they do fire or fight.)

3) Fresh Troops. In similar fashion, units which fight in melee get an extra die per 2 stands if they have not yet fired or fought in melee. (Same tracking as 1st fire thankfully but for more units)

These optional rules are now included in the on line copy.

Sunday, April 22, 2012

Trying it on.

 Trying out a new Battle Mat or whatever the trendy name is, should be a Big Event. It deserved a well crafted scenario with a detailed background, characters and so on. What it got was a casual conversion of a test layout into an impromptu  game played in 5 or 6 short sessions over 2 days. The game itself was unremarkable so I'll just share some pictures and a brief summary but it did give me a few things to think about.

The terrain was set up for the upcoming convention game but I didn't want to do yet another run through of that scenario right now. Time for that next weekend when I have painted what more I can of  the remaining figures and equipment that I want to use. I'm beginning to look forward to having this game done with so I can get back to other distractions like 1/72nd ACW. Anyway, I decided to make it a straight forward attack on a defensive position. Having laid out all of the Oberhilse infantry and guns it occurred to me that the attackers were going to be outnumbered and that there wasn't much room for any Oberhilse cavalry to operate let alone all of them, so I just deployed two squadrons of dragoons. Their mission was to hold the bridge.  I deployed the Oberhilse Field Force Brigade, (3 battalions strong supported by the pack howitzer and a unit of rifles) on the far bank. A brigade of Volunteers, (2 battalions plus light infantry and a Steam Battery) held the near bank. A battery of the OFF was also placed on the near bank but aimed across the river. The Dragoons were deployed in reserve behind them  and last but not least, the Blue Guard was placed in reserve on the far bank.  

The Faraway army was tasked with capturing the bridge. Apart from a ford near their table edge, they were also allowed to deploy troops on either or both banks. The terrain was quite constricting so the Faraway Trading Company troops were deployed across the river, two squadrons of cavalry, the Rocket Troop and 2 units of Irregular light infantry. The Queen's troops made the main assault, 2 brigades of infantry, 5 battalions in all (2 of them  being understrength at 3 stands apiece) , 2 units of rifles, 2 squadrons of cavalry and a battery of Royal Artillery. To help make up for the shortage of line infantry, I classed the veteran Buffs and Tigers as Elite as well as the Royal Fusiliers.

An overview of the game around Turn 5. 

Tomorrow the game itself and some various thoughts for down the road.

Saturday, April 21, 2012

The Good, The Bad and the Ugly

No Western gun fights, but I have paused long enough in working on the canvas topping to try it out.

Overview. 

COLOUR:  Firstly, it doesn't photograph easily. The colours in the picture are not accurate but they are the best I've achieved after trying a couple of photo shoots and reaching my limit for fiddling with colours on the computer. The green is paler that I planned, thanks primarily to it being so badly diluted, but most of it is darker than it looks here and there is stronger contrast between the 5 colours of paint on it. I think this is something that  calls for better lighting, my tripod, some white balancing and a skilled photographer who really cares. Don't hold your breath.   

The cloth is not nearly as finished as I intend but time is short and energy low so its been declared good-enough-for-now. One thing I intend to try later is Bluebear Jeff's suggestion of sponging on colour. I did try a spongy mini-roller but it was a dud. The good thing is, it can be over painted and  repainted as often as I like.

I had hopes that the figure bases would blend better than they do. The paint colour was originally selected in part by painting swatches on paper and placing stands over them. Apart from any colour issues, the texture of the stands contrasts with the painted surface. Scattering flock on the table will help but that's not something  i want to do for every game. A more mottled paint scheme with stronger colours might lower the contrast between bases and surface. (Or I could just refinish all my bases.......)

HILLS. I was afraid that the heavier canvas would not settle as well as the lighter, more elastic cloth that I have become used to. It doesn't but it settles better than I anticipated. It works well over very shallow contours or over shaped foam hills. With steeper contours, you get a very natural slope with occasional hidden air pockets. Fine for stands of light plastic figures who glide over the top, not so much for single 40/54mm metal figures who sink down slightly then fall over. 

However, it belated  occurred to me that hills painted to match could be dropped on top and would blend in. This would allow for the inclusion of bluffs and cliffs which are extremely difficult to mange when draping cloth over shapes. 

An added "feature" of the mottled finish and gentle slopes is that hills are really hard to see. Could add an interesting twist to games over video.

This is an old hill, not yet repainted to match but its already acceptable to me. 

WOODS, RIVERS & THINGS. One of the things I decided recently, was to go back to putting template shapes down under woods and villages. I used to but had given it up for just marking the perimeter. Sometimes that works better than other times. 

The canvas shapes I have tried don't cling as well as felt clings to felt but a quick experiment shows that double sided tape would fix that when it matters. I have enough canvas left over to do as many as I want and since canvas takes paint, I could paint streets, paths and gardens, forest floors, oasis pools, plowed fields etc, what ever is needed. I just need to bone up on graphic art. (Anything not done in this live will be left for a later one.)

Actually,  I feel the temptation to paint on roads and rivers and just paint over them again when they get in the way. This would allow temporary terrain boards for specific historical battles or teasers and avoid unsightly edges. Next best thing to a sand table.

Battle to follow.

OTHER WRINKLES AND OBSERVATIONS. When laying out some troops, I included the San Carlos Volunteers who are still singly based. Being unable to resist, I plopped them onto a sabot and tried pushing them. The canvas is stiff enough and slippery enough that they slid easily along, something not feasible on either my sand in paint finish on my base table top or on my old soft cloth. Luckily the single figure on sabot vs multi-figure stands debate is OVER. ok? 

Wrinkles and creases are a little bit of a problem though. Not so bad with 40mm figures where they are knee high at worst but with 1/72nd a few are chest high. They might come out over time, or be susceptible to stretching, maybe.  I'm not sure when I last used an iron to press fabric. It may have been while I was still in her Majesty's service but its possible that there may be one somewhere in the back of some cupboard but that's an experiment that'll probably have to wait until I get a round Tuit. 


Wednesday, April 18, 2012

The Answer is Blowing in the Wind

For some years now I have been looking forward to getting started on a new look for my wargame table once I got re-settled. But just what that look would be has been the question.

I'd done the geomorphic terrain board thing in the early 80's and as terrific as it can look when well done, I knew I didn't want to go back there. I have often used a cloth laid over shapes but that method doesn't work well with single figures as they have trouble on the slopes so I have also often used a painted tabletop with hills placed on top.

The decision to stick with multi-figure bases for most of my collections coupled with the appearance of hexes on my tabletop meant that some form of cloth was in order for regular games.  Having calculated the cost and effort to do the latex and flocking on cloth thing, I decided I wasn't up for either aspect. My next choice was a piece of appropriately coloured cloth with some over painting. My old one is 15 years old now and faded and anyway it is was in fall colours and I'm ready for the sort of rolling green hills that I'll be living amongst in a month's time.  I finally admitted that I was not going to manage a fabric shopping trip to Halifax so hit the local hardware store for a canvas drop cloth and a quart of green paint. (BTW When we went metric, why didn't they resize the quart paint cans to a litre instead of 870ml? Who can remember to ask for 870ml? )

Stage 1 a mottled green. Now to add yellow, brown and darker and light green touches.

The drop cloths came in two sizes, too big and too small. I opted for too big, 10 ft x 11 ft. Not quite big enough for two since a 5.5" width would be a tight fit for draping over hills and wouldn't work at all on a 6 ft wide table. I could leave it as is to fit over the 6ft x 10ft  tables at Cold Wars but that would leave a lot of over hang to trip on during the other 99% of games. My current thought is to cut a piece 7ft x 9ft and use the offcuts as templates to mark woods, towns etc and to make a gridded playing service for a portable wargame. 


Monday, April 16, 2012

Viewer Discretion is Advised

Last year, after finding myself in a game of Hordes of the Things, I dug out a handful of old fantasy figures, animals and left behind ancient and medieval figures and assembled some proto-fantasy armies for HotT.   
A short time later I was surprised and pleased to receive a package from Tim of Megablitz fame. He had been sorting through the collection of his late friend  John G Robertson. and finding homes for them at the request of  John's widow, and came across these figures which fit right in with my new project.  They look like old Minifigs to me but my newest Minifig catalogue is from White Plains in 1974 and the only fantasy figures in it are the initial Middle Earth range.  In any event, they will fight again!

Thank you John! And thank you Tim.

Fantasy figures from the late John G Robertson's collection.

Ron has given me the OK to share his Hex based adaptation of Basic Impetus.  This is a totally unauthorized adaptation of the rules. I'll post the link shortly on the left. In the mean time, here are my initial thoughts on incorporating my fantasy figures. Having done this, Ron tells me there is a fantasy version on the net so I'll have to go check that out.   
____________________________________________________________________________________________

Fantasy thoughts for Hexed Basic Impetus.

The idea is to incorporate a few fantasy figures that I have into Hexed Basic Impetus with the minimum of disruption. For that reason existing rules are used as much as possible even if some flavour is lost. I have not bothered to add rules for troops that I don't envisage using. Inspiration has been drawn primarily from RE Howard's and Tolkien's works and some old rule sets that dealt with them but with a dose of Hordes of the Things.

Magicians.  A magician stand may be a powerful sorcerer/warlock/witch etc or a circle of lesser ones. A powerful Magician is always the real commander of an army even if there is a figurehead General or King. He may not attach to any unit. Minor magicians or circles may work in support of an ordinary commander but only one magician is allowed in any army.  A magician moves 3 hexes, has a VBU of 1, 0 Impetus and is VD3. He follows all of the movement rules for Skirmishers and is considered to be a skirmish target. A really great magician commander may be VBU 2. 
  1. Spells. Whatever the details of the spells that a magician uses from illusions, terror, fireballs, earthquakes or what have you and how they actually effect a unit, the effect in the game is worked out precisely the same as shooting with Artillery A. However, it is not possible to move and cast a spell nor may a spell be cast when disordered.
  2. Vanishing. A magician may always vanish or teleport to a safe place on his/her turn instead of any other activity as long as he/she is not disordered. He/she is does not count as lost for VDT purposes but if a General, the +2 on the inititiative is lost. It is, unfortunately, not possible to return during the game.
  3. Summoning. A magician may summon a demon, monster or other fearsome object. Nominate an empty hex and roll as normal for a spell. If any hits are scored a disordered Beast will be put in that hex, facing a random direction. These things are notoriuosly hard to control. As long as the magician concentrates, he may control the Monster. If he/she moves, becomes disordered, fights in melee, casts a spell or vanishes, he/she will lose control. Roll 1 die to pick which direction to face then each turn, after all units on both sides have moved,  the monster/demon will move full speed in the direction it is now facing until it leaves the table. It will attack any unit of either side which gets in its way.  Having it move off table, controlled or not, or routing it is the only  way to get rid of it once summoned.
Monsters, Demons, Great Beasts and other Behemoths. Any large creatures, magical or not, including Trolls etc count as elephants for all rules purposes.

Flying creatures. Flying creatures count as light cavalry (CL) for all purposes but may pass over any unit or terrain of either side as long as they can land in an empty hex. They count as mounted if fighting in woods. Dragons are another story and an army unto themselves. As such they are not covered.
Most are  VBU 2 Impetus 1 VD 2. 

4. Huminoids and smaller beasts. (ie Orcs, Dwarves, Elves, etc) These are treated as equivalent Human troops. Hordes of ineffective infantry should have a low VBU, low impetus, a VD of 1 and be formed into large units.

5. Special Characters, heroes, assasins, lurkers, sneakers and the like. Hero types should be treated as Generals including the unattached General rule from Hexed Basic Impetus. The rest I leave to scenario/army specific rules or later additions. For example a particular magic sword used by a hero attached to a  unit may be worth an extra die in melee vs some troop types or a magic shield might provide cover. 

Sunday, April 15, 2012

Anglo-Scots Addendum

Yup, The winter campaigning season has ended early. Yardwork is putting a serious crimp in my gaming! And yes, I'm supposed to be  working on the last bits for my Huzzah game  and I did get in a good casting session. I even fixed the mold sufficiently to get the brim on my sailor's sennet hat to more or less come out. But..............my mind has been focused on my 25mm Medieval Scots.

Ron sent me a couple of pictures he took of Friday's game so here's a better shot of the first battle as the lines close.
.
Now a shot of King Ross I on his new base.  He is a Garrison Nimidian King that I painted about 35 years ago. The standard bearer is from 15 years ago. He is one of a number of 14thC medieval figures, including the kneeling Scots spearmen, that I bought back then in a local shop. I recall them as being sold in bags labelled "Revenge", possibly sold by Old Glory? But I can't seem to find any mention of them on the net.

Anyway, here is a shot of most of my newly rebased Scots. We aren't using the Basic Impetus lists except as a guide, instead we are using the Grant scenario lists. In those terms this a force of 2 HC (dismounted knights forming front ranks or FP in BI terms), 1 LC (Mounted Scots CM), 7 Inf (4 FP pike, 3 FL Highlanders), 2 Lt Inf or Arty (Skirmishing archers, SI).

The other 1/2 of my Scots army (literally 1/2) are Heritage figures sold as part of a fantasy range but taken pose and all from Almark's book on Flodden and which I bought as part of my fictional Valdurian armies in college. The two armies have jostled uncomfortably together as vaguely "medieval" Scots for the  last 30 years but given that the force above is about as much as I'll need for a Table Top Teaser using Hexed Basic Impetus, I have separated them at last. I'm not sure yet what the fate of the early 16thC army will be, given that I have sold my 15mm 16thC Scots but also have my 40mm ones, but even after putting aside some more 14thC spearmen to be joined by a couple of dismounted knights to make a 4th Schiltron, I had enough archers and infantry with mixed polearms left over to get a start on a matching English army. Just add some mounted knights. Luckily, for the first time in a while, the war-chest may not be brimming but  its not quite bare either so its time for  a small order to Garrison to plug the holes.

Then there is that handful of fantasy figures I dug out last summer, and some additions that need to be mentioned. Hmm, supplementary fantasy  rules needed I think, or at least classifications. This all feels just right for a fictional medieval kingdoms campaign.

Thursday, April 12, 2012

Scots Wha Hex

 
25mm Medievals from Heritage, Garrison, Revenge, Ral Partha and Minifigs

Today saw the Return of the Scots after a 15 year hiatus.  Ron Porter and I have been playing a Hex adaption of Basic Impetus (see my Gathering of Hosts blog ).  Having reached the end of a mini-campaign we decided to dig out a different set of armies for a change. There were some epic Armati Scots vs English games in the mid-90's but they hadn't seen the table since 1997. Thus seemed like a good time to fix that. (Dating from 1976, My Scots aren't my oldest figures but they are my oldest army, the first one where I actually managed 200 figures that actually fit together!  By 1997, I had enough to field opposing Scots Armati armies.  Last summer I  started integrating some of the Scots into some Hordes of the Things armies, now I'm thinking about a fantasy Hexed Basic Impetus adaptation, more on that later.)

The scenario was Two Sides of a River from CS Grant's Programmed Wargame Scenarios. Our first efforts at adapting Basic Impetus to hexes bent over backwards to stay as close as possible to the original game but gradually we have moved towards making the best and easiest use of the hexes and worrying less about being exactly the same. For those familiar with Basic Impetus, we have settled on 1 hex=2.5U (where U=a measurement of length, normally 2 cm for 25mm troops) for ranges and movement. Units face a hex corner and can move into either front hex. Wheels have been replaced by a   rotation of 1 hex corner. Movement rates, rounded down work out to 2 hexes for heavy infantry, 3 for light infantry and heavy cavalry and 4 for light or medium cavalry. Bow ranges are 4 for close range and 8 for long. Each unit has a 2 hex ZOC and a charge is a move adjacent to an enemy. Since we like playing Grant scenarios, we have used the army lists as a basis for what stats troops should have but use the Grant lists for numbers of units. For example, for my Scots, scenario  HC/MC equate to Nobles, usually fighting on foot as elite pikemen, LC can be moss troopers or replaced by skirmishers, INF are pikemen or highlanders, LI are archers and artillery can be replaced by what ever unit type we wish. As it happens I did deploy 1 bombard today when defending but otherwise added extra archers.

We had been playing with 1 hex=5U which better matches the ratio between moves and base widths of the original game but which made a lot of things difficult, such as distinguishing units which were within javelin range from those in contact and which made TT Teasers very lengthy to play  as it could take 20 turns just to cross the table. Today we played with the extended differences and it turned a good game into a Great one. (It also allowed us to fit 2 games into an afternoon.)

The scenario sees a force tasked with preventing the enemy from moving down a valley split by a river. The defenders don't know on which side of the river the enemy will appear so must split their force. The slightly larger attacking force draws up an order of march then rolls to see how close they get before the morning mists lifts to expose their position. On the first game, my Scots were defending and Ron's English attacking. He chose to come on the side where the river curved away giving the widest possible front for his archers.

Ron's English in the foreground. A mix of Ral Partha and Revenge figures.

My bold skirmishing archers held up Ron's advance long enough for me to bring all of my spearmen and highlanders over the bridge and form up. The range on the cannon was startling after months of having bows only effective at 2 hexes. The effect was not quite so startling but eventually the gunners blew all the dust out of the bombard and I managed a 6 to hit a unit and Ron obliged by rolling a 6 on his Cohesion test which removed a unit of mercenary crossbows.

 An old Hinchliffe bombard. (or was it Heritage?)

 Eventually my skirmish line was stripped away and my Scots faced with the age old choice, stand still and be shot to pieces or attack.  Attack it was. I didn't have enough troops to fill the gap between river and impassible hills  (aka table edge) so the best I could do was stay bunched against the table edge hoping that the bombard firing across the river would guard that flank and pray for good melee and especially cohesion test dice.
   The Scots roll forward missing no opportunity to fail a cohesion test.

Luckily the way the rules handle pike units means that even unlucky Scots schiltrons can suck up a fair amount of damage from arrows. The Highlanders  are a different matter and a brave attempt to dash across the killing zone, cleverly win the initiative and smash into the archers before they could fire a shot went astray when I lost the initiative roll.  Before long,it was clear that it was going to be one of those dice days. On Cohesion (or morale) tests a 6 always fails and a 1 always passes. In combat 6's and pairs of 5 hit. By the end of the 2nd game I was grateful when a roll of 10 dice resulted in 1 hit rather than none and was getting used to seeing the missing combat 6's show up whenever my best units checked morale. Apparently iffy dice doesn't make up  for a questionable plan.

I did drive in his lead units but Ron's army was still very intact as the last handful of nobles from my center schiltron staggered forward to die in melee with the English billmen, bringing my army to its break point.  The game was closer than it looked though by the final score though. A slip at the wrong time might easily have resulted in the English infantry being driven back through their mounted knights and off the table. It was  in sum an exciting, gripping game. It was also over in time for us to change sides.

  The Scots head for the hills.

As I put away the bombard and pulled troops including some light cavalry for my slightly larger attacking force, I decided that my best bet was to go for the narrow side of the table to force Ron to face me with a minimal number of archers and to limit his ability to send heavy cavalry around my flank. To protect the spearmen from archers firing across the river, I would deploy a skirmish screen of my own archers. There was a series of hills on the table edge and I aimed the highlanders for the hills and followed up with the pikes.

As the game opened, I made some gaffs with the skirmish screen which gave Ron the chance to shoot up one  schiltron. The resulting cohesion test made it clear that the dice hadn't turned, the 5th morale 6 in a row. My melee dice hadn't turned either. After about 4 turns my army was 2 units away from breaking with 3 units having only 1 hit left. It had been fun but looked pretty hopeless. I figured 1 more turn.

But you can't trust dice. 5 turns later, after some good cohesion tests, some good melee rolls and some timely turns of initiative, I still hadn't lost those 2 units, Ron was rapidly approaching his break point, and I had broken through his line along the hills. The loss of his General and only unit of knights sealed the deal but the Fat Lady only sings at the end of a turn, not the middle and Ron had 1 last chance to make it a draw. All it would take was to land one arrow on 1 of 3 disordered units with 1 hit point left, no cohesion test needed so none to save me, or have his flank attack on one of my disordered pike units work. But sometimes you just run out of 6's. Whew!  A squeaker of a victory beats a draw or a defeat any day!

And yes, if the game had been less intensive and exciting, I might have remembered to take pictures.


Tuesday, April 10, 2012

Getting Stubborn

I don't believe in regrets. "There is no way back through the waters of Lethe". One just learns what one can from life's experiences but its sometimes easier said than done. Especially so when contemplating things like having mixed fictional (Atlantica),  historical (War of 1812) and pseudo-historical (Arrostock to Oregon) campaigns into a confused quagmire.  Last year I started the process of sorting things out, a process which will see the end of the Aroostock-Oregon project with it being swallowed  into Atlantica and with the War of 1812 standing alone as an occasional,  largely shelf-bound and convention oriented, historical, project. But perversely, I am knee deep in it all now as I try to bring this game to fruition. Since this was primarily an exercise and  I hadn't figured out characters, or settings or even which reality it is set in, Atlantica or America, I shall merely describe the armies as Red and Blue for today. 
Once again I laid out the defenders, (Red in this case) first and then let the Attacker (Blue henceforth) make his plan. Unlike the previous game, Blue had a numerical advantage in infantry and guns and the armies contained Elite and Militia units as well as Regulars. 

Red began by deploying his 1st brigade, composed of 1 unit of stands of riflemen (light infantry), 1 unit of elite line infantry and 1 of regular line infantry, on his right. The infantry was deployed along a fence and stone wall bordering a field. Its early in the year but the weather has been unusually dry and warm so while there are no crops, neither is the field muddy enough to be an obstacle. The Rifles were on the far right, partly amongst a copse and hedge line. The hedge is not the formal sort seen in Europe nor the ornamental type but merely an area where a thin line of alders, saplings, bushes and the occasional tree have been allowed to grow along the edge of a field, often along a brook or drainage ditch.  It will interfere with line of sight but does not provide cover. 

Red's 2nd brigade was posted from the stone house to the left. A 2nd unit of rifles as well as some Irregular light infantry were posted in some woods and in a copse on a hill with a battery on a lower shoulder of the hill then a battalion of line infantry. The final battalion of infantry detached its grenadiers to hold the house and then formed a central reserve. The detached grenadiers might have been deemed Elite if I had thought of it. 

Finally a cavalry brigade with one squadron each of Heavy (Dragoon) and Regular or Medium Cavalry (Hussars) were posted along the main road in the center. The mission of Red was to prevent Blue from seizing control of the road leading off behind their position (the West). Red had 28 stands with an army morale of 10.

After studying the situation from Blue's side, I determined that an attack up the center was unlikely to succeed. I proposed two plans, an all out attack up the left supported by a secondary attack up the middle or an attack up both flanks with a reserve that could go either way. The dice chose the latter option. Blue deployed a Brigade of Regulars to attack on the left, 3 battalions each of 4 stands, a 2 stand unit of light infantry riflemen and a mountain gun. These were formed in line along a lateral road to deceive the enemy and ordered to form a  road column, advance rapidly up the side road and redeploy to flank the enemy line. (They can be seen deploying above  under a Brigadier looking remarkably like Brigadier Zinn of Oberhilse. Red decided to pull back rather than trying to counter attack before Blue could deploy.

In the center I posted a battery of field guns and on the left a Brigade composed of 2 battalions of regulars, a unit of militia light infantry and a steam powered contraption armed with light guns. These were ordered to pin the enemy left. The line infantry deployed as skirmishers and supports. In reserve in the center was a Brigade of 2 squadrons of Cavalry and a Brigade containing a 4 stand unit of Elite infantry and 3 stand Militia unit.  Over all Blue had 39 stands with an army morale of 13

Blue's artillery deployed at long range on the hill and at first seemed frustratingly ineffective, however, eventually the odd hit would go on Red's infantry and with the penalty for being under fire, trying to remove hits was as hard as placing them and also forced Red to choose between rallying and maneuvering. Red's riflemen proved surprisingly hard to dislodge. After driving back Blue's rifles, they fell back just far enough to force Blue to deploy a battalion to try and clear the wood. Not willing to launch an unsupported bayonet charge, and stalling on some command rolls to boot, they ended up engaging in a lengthy but indecisive firefight. By the time another a battalion moved past the first, (reversing the order of the brigade line fwiw), and deployed to add its weight of fire, routing the skirmishers who had been too stubborn to retreat in time (yet another 1 on a control check held them in place, neither retreating nor rallying), Red was in position to meet Blue's attack head on and Blue's right was getting into trouble.

Initially Blue's attack up the left was more successful than anticipated, possibly fatally so as it sucked the troops forward.  Red's riflemen were quickly shaken and driven back and a gap opened in the line. Luckily for Red, the reserve infantry had already been brought across to support the guns and were now sent to plug the hole. As Blue advanced into close canister range, Red's dice heated up and soon all 3 Blue units were shaken or on the verge of it. One unit was threatening the guns however  and the heavy cavalry was sent forward, paying the movement and combat penalties for passing through the battery and forcing Blue's shaky infantry into square. The charge was repulsed but initiative favoured Red for once and close range canister soon shattered the square and drove it back.


  With his militia heading full speed for the table edge and his 2 regular units retreating shaken, Blue's right flank and center were wide open just as his attack from his left was hitting home. It was time to commit the reserve, but where and how? The Elite infantry, backed by militia were sent straight up the center to hit the end of Red's first Brigade while pinning part of the second brigade. To hopefully take out the guns, still carrying 1 hit, and to stall any counter attack until the main attack crushed Red's line, the Dragoons were sent in on the right. One squadron charging, one in reserve. Odds are that they would suffer but silence or  capture the battery. They might have too if the battery hadn't stood firm, shaking the cavalry with defensive fire on the way in then blowing them away in melee for no loss. In went the 2nd squadron which managed to shake/silence the battery but having been shaken itself by fire again, lost a stand and its brigadier in melee leading to a draw and was forced to fall back. Red's Dragoons, now rallied charged through the guns again and swept them away, over running the army commander and an infantry Brigadier as they went.


So what about the other flank where red's infantry faced twice their numbers? It was a glorious stand! Time and again Blue's musketry riddle Red's line with hits and time and again Red's stubborn infantry rallied under fire. The Elite bonus proved invaluable. At last Red's line infantry gave way but rallied when joined by Red's General. For two turns the Elite infantry in the center stood in a concave line surround by an arc of three blue units. At last it was too much and Blue poured enough hits in to take out 2 stands. Red voluntarily pulled them back behind the now rallied line infantry and the Elites rallied in safety.

In the center, the Blue Elites had stalled in front of the stone house. They would have been better getting stuck in except that in the not unlikely event of their being repulsed, there was no one to cover their retreat or the flank of the 1st Brigade so there was nothing for them to do but stand and trade fire with the Stone House and its supporting infantry and hope that the defenders would eventually fail.

Blue still had the advantage of numbers but back on his right flank, the Steam Battery had been forced to retreat by artillery fire and Red's Hussars had charged through the guns in turn and hit the militia as they deployed to take its place. These fought surprisingly well and though shaken, held the Hussars. Red's infantry soon dispersed them though and at the same time, the Red Dragoons, now rallied from their pursuit managed to catch the last of Blues's shaken infantry in the flank as it tried to rally and it was all up. Including lost Brigadiers and the General, Blue's army morale was at -5, having lost 6 stands on the last turn. Red still stood at 6 despite the heavy fighting.

The stubborn, against the odds, rallying of the Red infantry and artillery proved decisive.


This was the 2nd game with absolutely no change and the 5th since the return to the earlier system, the only change since having been to move the retreat of shaken units to their activation rather than at the end of the move. This game, with armies organized in table top teaser fashion, had 1/2 the units of the previous game though nearly as many stands and the result was a different feel with individual units mattering more than whole brigades but an equally good and at times exciting game. Its nearly time to remove the word "Draft" but I need to see if I can manage to add some notes and clarifications where questions have made it clear that there are still some little things where there are unclear or unwritten, all without accidently changing any rules in the process!

Incidently, I started the game using the card activation which felt right but which involved me chasing around the table to flip cards since the battle was active all over the table. On about turn Four, I switched to the Initiative system of dicing by sides. It also worked well but involved less circling the table. Don't get me wrong, walking around the table is probably good for me, if I cleared more space, I could probably even jog, but I was tired and a bit sore and I was happy that both methods still work.

The other issue I encountered is administrative really. I was constantly running out of markers, both hit markers and "having fired" markers (aka "smoke"). Not that I didn't have plenty but despite having laid out several supply depots around the table (as long as I was being lazy and it was a holiday after all), it seemed like every time I needed to mark a unit, I had to circle the room looking for camoflaged markers. That was the one nice thing about knocking figures over!  When I first started using markers a few years back, I added an under table shelf to my then table with containers loaded with 2-3 times as many as I would ever need and that worked reasonably well. With a cloth over the table, its hard to access under table drawers or shelves but I will have to work on a more permanent system of marker & smoke supply depots around the room, hanging from walls or surrounding tables.   These will have to be big enough to hold the casualty markers of the appropriate size and era which I intend to eventually use in place of red chits.

Monday, April 9, 2012

Meanwhile, on another ridge Far Away


OK back to the 1830's. As mentioned, I intend to focus on my 2 games for Huzzah for the next month. To separate scenario issues from rules issues, I reset the terrain and prepared to play a variation on Saturday's ACW game but pitting Oberhilse vs Faraway. While laying out troops, admiring my new 9 stand Brigade and trying to calculate if I had enough Red infantry for 3 brigades if I used both 1812 & glossy toy units, I suddenly realized something was wrong. Something about the look of the troops vs the terrain was off but I wasn't sure exactly what. As I studied it, I suddenly heard a little inner voice asking 'What's the point?". Now that's a scary question for some one who spends as much time with their toy soldiers as I do! 

Luckily, it didn't take long to recognize that the question was actually "What's the point of doing this with 40mm troops?". The game was starting to look/feel like a the previous game but with fewer units that didn't fit into the table as well as the 1/72nd ones. That was still a scary question. My first response was that it was supposed to present different tactical challenges due to the shorter ranges and the greater number of cavalry. Cavalry of which I only had 4 stands laid out (vs 3 ACW ones) and not much room for them to operate in. OK, so the table was a bit crowded with terrain. I started taking a few things off and comforted myself that if I was playing a game set in a fictional land, or in say, the Punjaub, then I wouldn't need so many fences and patches of woods but this was supposed to be vaguely early 19thC Eastern North America. Which led me to think about the unlikeliness of armies of 9 or 12 battalions or larger in that setting. Ahhh.

Technically at 1"~25 yards, my 6" wide battalions represent units of around 450 men, about right for the Canadian campaigns of the War of 1812 but the terrain having too big a foot print, they didn't look quite right (conditioning probably) and under the rules, 3 stand battalions are weak so you need more than a handful of them to make a decent game. I laid out one of my few 5 stand battalions and it looked pretty good  but it implied either a 750 man battalion or a change in scale and would mean adding figures to existing units. I had settled on 4 stand units a few months back so as to be able to play Table Top Teasers with 1 of my units = 1 scenario unit, but had decided to go back to three stands before reopening the rules because the four stand units were too resilient when taking 12 hit, leading to inconclusive games. I hadn't actually tried them in any of the five games I had played after the return to the older style rules so I ran a few 1 on 1 clashes, enough to show that the four stand units now seemed to be have a good balance between stamina and vulnerability. 

OK then, looking just at line infantry,  instead of 3 defending brigades (9 stands each) vs 4 brigades (27 stands vs 36 stands), I would try 4 battalions (4 stands each) vs 7 (16 vs 27 as it worked out).  Add in some light infantry, guns and 2 squadrons of cavalry and we have forces of a reasonable size and organization for an historical 1812 or 1837 game. The battalion frontages are perhaps slightly wide indicating strong units of 600 men, rare but some were fielded, or an actual ground scale of 1"=20 yards or a bit less which is close enough to for me to ignore.
The opposing armies laid out, ready to do battle.

Tomorrow: The game!.

95 Years Ago Today - Vimy

Vimy Ridge is an icon for Canada. The battle is seen as a 'coming of age' event for our country, the one battle even school kids are likely to know.

It was fought on Easter Monday, the 9th of April 1917 and is usually associated with Easter here even as that date wanders. Oddly or perhaps very predictably  (I'm no expert in the wanderings of the Moon or of religious festivals) the 95th anniversary has fallen today, also the 9th of April and also Easter Monday.

I don't have a Vimy Ridge wargame in my pocket to show nor have I looked up appropriate links to video or pictures, but.........on  the vintagewargaming blog  there is a link to the following brilliant video clip from the British pathe archives of a proposed (or actual?) pre-WWII training aide using toy soldiers and which the commentators suggest in Wellsian fashion, could be used to replace the real thing. With something like 15-20,000 men killed, wounded or missing from the two armies over the four days, that may not be an inappropriate thought.


MODEL BATTLEFIELD


Now, I could probably build a canvas playing surface and 1/72nd plastic figures would work, but where am I going to find volunteers to crawl around under the table while I play?


Saturday, April 7, 2012

Bent but not broken


 Ever since Kinch's Brigade paraded, ready for service, I have been itching to get them into action but it seems that playing solo games and painting troops are mutually exclusive activities so ten days have slipped away (yeah I know, that's not actually that long but until I checked just now I could have sworn it was two or three times longer and I am better known for impatience than patience.)

I also wanted to give Hearts of Tin another work out since Huzzah is fast approaching. I have to reset the 5 game counter since last week I finally figured out how to incorporate forced retirement for shaken units into the normal play sequence. To avoid any confusion between scenario and rules issues, I decided to try something I haven't done a lot of recently, a straight up attack/defence. Having noted that in a surprising number of early ACW battles the attacker had little or no advantage in numbers, I just laid out some terrain, two opposing ridgelines, some farmland and roads with woods off table in all directions, and set out all of my Confederates to defend and all of my Federals to attack, the assumption being that there was a strategic advantage to be gained by forcing the Confederates to retreat. Once again the lack of appropriate terrain was keenly felt when laying the game out. Obviously as the armies get flushed out, this is rising to the top of the Todo list

The defenders laid out first, dice being used to choose between various defensive options. I then allowed the Federal commander to survey the Reb position and make his dispositions, again aided by a die to decide between options when needed. The Rebs deployed 2 brigades forward in the valley, supported by artillery on the ridge behind them with the 3rd brigade in reserve near the center. The lone cavalry unit was deployed to guard the far left flank. The Yankee plan was to advance up the left with 1 brigade with a second supporting while the 3rd brigade pinned the Reb left and supported with fire. The cavalry was detached to guard the far right and stall any Reb attempt to advance.
 View from behind the Confederate Right as the Union army appears. 

To reflect the often disjointed nature of some of the early battles, I chose to use card activation by brigade for this game. As I started playing, it occurred to me that having game orders for the brigadiers might add to the game but I see that as a game/scenario issue rather than a rules one. Its the sort of thing best handled by multi-players but which could be loaded onto any rules system for solo play but in the event, my past experience was vindicated that the rules make it just awkward enough to keep changing your mind that it pays to stick as close to your original plan as possible even if you aren't technically forced to do so.

As I laid the game out, I was surprised to find myself feeling slightly apprehensive. Last week I had enjoyed a game of Charge! which, despite being quick and simple to play, has  a greater tactical feel to it with skill in the handling of individual units often being critical. Was I going to find the more generic Morschause inspired Hearts of Tin as engaging in its own way? Especially after having stripped it back down again?

The view from the Confederate Left as battle is fully joined.

The Federal advance started smoothly enough even though their gunners couldn't hit the proverbial barndoor. The Conderate artillery was well served though and with the cards also falling just right, on turn 2 one Yankee regiment was shaken and heading for the hills. It took the CinC riding across to bring them to their duty on Turn 4 as they were about to leave the field for good. He had to urge them to rally after they failed the first order check and then only managed to remove 1 hit marker by the minimum result with all bonuses applied. The gap they left in the line caused the 2nd Brigade to hang back a bit and then once engaged made them vulnerable to a flank attack which soon routed another regiment. An advance by the cavalry almost flanked the Reb flankers but again a card at the right time let them sort themselves out and that flank died down which each side eyeing the other warily and taking long range pot shots.

The Federal attack drives in the right of the Confederate 1st Brigade.

On the Federal left, their line was able to overlap and drive in the Confederate right. As the Confederate reserves began to be brought forward, (some rather reluctantly), the Federal General decided to pick up the pace to capitalize on his early success and avoid a battle of attrition between equal forces. He also committed his 2nd line and ordered a series of bayonet charges. To his chagrin, an attack by fresh units against a smaller number of shaken ones, was held and in part thrown back, largely due the example of the reckless courage of the Rebel Brigadier.

A charge from the flanking regiment on one of Kinch's regiments was held at first but upon being renewed the Rebs fell back in disarray and the triumphant Yankees surged forward into the flank of the next unit, shattering it leaving General Kinch alone to stare down the Bluecoats before calmly retiring to bring up his next regiment (he won his escape capture toss).
General Stuart Roger Kinch, sometimes known as States Rights Kinch, staring down the Yankees.


For a moment it seemed like a crisis was here for the defending Confederates but heavy casualties from flanking fire from the rebel reserve into the pursuing blue coats had brought them up cold and before they could rally, a Louisiana regiment had advanced on their flank and pouring a hot flanking fire, swept them away. With his army on the verge of breaking the Federal commander was forced to order a retreat along the line.
End of day. The Rebel line has been driven back a foot on the right and they have suffered heavy losses but their line is holding in a strong position and the Yankees are only one stand from breaking.

So, my fears were groundless, once again this played out like one of the original Morschauser Meets MacDuff games and was good fun and engaging. With 15 units a side, the game, which was about as simple and straight forward a scenario as could be, took about 2 or maybe 2.5 hours to play not counting a 1/2 hour or so to set up and 15 minutes to take down. The balance shifted several times during the game but despite some lucky/unlucky die rolls which tilted the end result slightly, they would not have done so if the Union attack had been better planned and executed. The right hand brigade suffered almost as heavy losses as the attacking brigade on the left but it was never seriously thrown into the fight so did almost no damage in return. Instead it sort of wandered into a firefight piecemeal, almost by accident. What was meant to be a weighted attack straggled into a 1:1 assault all along the line. The decision to abandon fairly safe shooting for risky bayonet attacks didn't help in retrospect despite the possibility of higher rewards if they had worked.

The big question now is whether or not the rules will work for the smaller 40mm battles. Since Huzzah is coming up fast, I will have to put the ACW boys away till late May. When I get back to them, since I am now happy with the rules and the organization and I have enough troops for small to medium games. I am about ready to start naming regiments and Generals adding some flags and to start working on scenery. Apart from several miles of rail fences, I need a way to show the sort of open woods that cover so much of the Western battles. Some sort of template with a few loose trees I think. Once I get the regiments named, I will also have to decide on an easy way to mark them. The Union in particular having had problems figuring out which stands belonged to which regiment where 2 brigades came together. I also want to paint up some of that heap of Airfix crawling guys as hit markers.