Monday, July 30, 2018

Doldrums

Between social and community events and the summer heat there has been only a little wargaming related activity here in the last week.


Work has finally begun on my 16th Century Turkish army. Strictly speaking, these Drabant 40mm figures are 17thC Poles and Muscovites but once painted they will serve my Turks well enough as earlier Walachian, Transylvanian, or similar subjects or allies regardless of details.

Wednesday, July 25, 2018

Tramp, tramp, tramp


General Kinch consults his staff as his 2nd Division marches to the battlefield.

Well, its hot out and the table was all set up and ...well, what did you expect? I was going to squeeze a Charge! game in but its been nearly a year since the ACW  boys have been out. I still have a hungering to use the little guys to fight bigger battles than my bigger figures do,  (There's an equation in there somewhere.) so I revisited my plans to use 6ish stand Brigades as units and decided to rewrite the rules a bit to include some Featherstonian influences which somehow turned into Charge! influences, not to mention OTR and BOFF.

The Yankees storm the hill with 2:1 odds while detaching a Division to hold up Reb reinforcements.
In a nutshell, variable length moves with a command roll if not "in command". The Side with initiative moves first, then the other, then shooting is simultaneous then charges are resolved. Broken units may be rallied and recover up to 1/2 stands if successful. Very quick and easy, not a lot of low level detail but lots of room for special unit rules and  similar sorts of tinkering.

OK, the first attack did not succeed as well as the Yankee commander had hoped but Reb casualties had been heavy and their reinforcements have not broken through the Zouave roadblock yet
At first I thought it was too fast and deadly but lo and behold it was turn 13 out of 15 when the Rebs morale broke and had been a ding dong fight lasting at least an hour if not more. I think that I will be able to use more figures now should I paint them up.
Second try was a charm and the inevitable counter attack was repulsed. The Rebs are done for today.
OK, back to the painting desk!

Monday, July 23, 2018

Never Mind said the Duke.

I'm trying to control myself with the growing 54mm armies and not fight all of the possible games before I get small, basic, opposing armies painted, based and organized right down to names. I also have to get a start on my 16thC Turkish forces for Huzzah 2019 so figured a game would help provide inspiration there.

Which is why we find ourselves looking at this One Hour Game scenario  loosely inspired by CS Grant's  Reinforcements on Table.

The main bodies of both armies are, technically, just off table at the start.
I rolled up the armies placing 2 stands per scenario unit then grouping them into Rough Wooing units. Due to the small size of the armies I counted each army as a single "Regiment"  or "Battle". I laid out a 4'x4' battle field, treating the extra foot on each end as "off table".

The French.
The French had an advance unit on the hill with 2 stands of pike and 2 of shot. Entering the table from the rear on turn two was a 2 stand unit of Gendarmes including the Commander and a unit with 4 pike and 2 shot.

The Imperial forces at the edge of the playing field.

The Imperials, entering the board on turn one, had a unit with 2 stands of Lancers including the Commander, a unit with 2 stands of mounted arquebusiers and a unit of Landsknechts with 2 shot and 6 pike.

Not over yet.

The Imperial infantry tried to storm the steep hill but despite 2:1 odds, 3:1 in pikes they were eventually repelled. In the meantime, the light horse rode forward to try to delay the reinforcements but the French Gendarmes went through them like a hot knife then pursued into the Lancers almost routing them.

The Imperial army has been repulsed and is on the point of breaking.

By turn 7 of 15,  it was all over.


Sunday, July 22, 2018

There's a battle brewing

A different time, a different place.....


The French advance guard wonders how close the Emperor's troops are and what the morning will bring?


Looming out of the morning mist..........

Saturday, July 21, 2018

Newly Gazetted

This would have been a good day for a game but apart from being a little  under the weather,  I have  promised  myself that  I would get basic armies table ready  before  getting  serious about playing this campaign. 

Brigadier Gray.
I have plenty other scales and periods to pick from but somehow I found myself converting and painting a commander for the Grey Brigade.


General Lannigan discusses plans with his newest Brigadier


Thursday, July 19, 2018

Bring up the guns!

Last fall I was "this" close to buying a Parrot Rifle mould from Miniature Moulds when Armies In Plastic announced a sale and I jumped. This week I finally put them together and added a second gun crew to the Rebel army.

The newly raised Red Cap Horse Artillery with their muzzle loading rifled field gun closest to the camera. 


The AIP guns come with a choice of barrels, an 1859 Armstrong 12pdr RBL  or the 1871 9 pdr RML. The models are pretty good for what they are apart from the barrels being a little too short but beside the Britains' guns, which are spring powered, firing, toy models of 2nd Boer War era 15pdr RBL's, the barrels look puny! I had been torn about which side would get metal guns and which plastic but the difference led me to decided to issue the lighter (literally)  guns to the Horse Artillery on both sides.

The Queen's troop trying out their new, lighter, breech loader.
Can a battle be far behind?

Monday, July 16, 2018

Modern Old Toy Soldier Style Zouaves

The transition is complete and the Rebels have now raised a battalion of Zouaves.

My "New Toy Soldier" Papal Zouaves facing some original Old Toy Soldier examples of the Soldierpac casting I used as a basis for the master.

 The differences between modern toy soldiers and antiques can be  small enough and not really important except to antique enthusiasts but to be honest, its the old style sculpting and attitude crossed with the modern toy soldier style painting that I love.

This may not have be the worst mould I've ever made but it certainly isn't my best. While I was cleaning up the castings I found numerous little flaws. Some were the result of sloppy work on the conversion which I was in too much of a hurry to catch let alone fix. Others are due to flaws with the mould which were at least partly due to the way I laid it out. If my intention had been to paint up detailed models, I would have been sunk but luckily, the toy style is more tolerant of small flaws in detail.

Gratuitous 2nd shot.
(It was one of those bad day for photos.
)

 Now they just need to learn how to stay in formation and not fall over by going through Base Training and they will be ready for battle.

Saturday, July 14, 2018

Crossroad: Day Two.

Order, counter order? At any rate, these things happen, the Rebels fell back while the Government forces reoccupied their old positions and had to be attacked again.

 "Here they come again!"
There were two main changes to the rules since the first game. 

First I ditched all the new Brigade and Army morale rules, reinstated my usual 50% unit loss Army Morale rule, and I brought back an improved version of a risk of panic rule that I had experimented with a few from a few years ago but hadn't adopted.  

In essence each time an infantry unit breaks nearby infantry units that see it roll a die with a chance that they will take a hit representing an increase in fear as well as possible straggling. This allows infantry to ignore the comings and goings of cavalry and sharpshooters. The roll is affected by the usual morale grade modifiers so an army of raw recruits or similar will be more susceptible to panic. 


I opted to repeat the battle plans for both sides. 
The second, smaller change was a correction to an oversight. I had been tinkering with various ways to represent what various scenario unit lists call "light infantry" in order to give them special characteristics but it was the least of my concerns. It became clear in the last game that my final choice had produced a super troop that could go toe to toe with line infantry with barely any "light" characteristics beyond the ability to move more quickly through difficult terrain and no weakness beyond being able to take 1/3 fewer hits. I decided to fix this by making them clearly "sharpshooters". I extended their range and let them keep their +1 for shooting  but dropped them to a single die instead of 2. When in the open they also share cavalry's reluctance to stand toe to toe in close combat. 

I also discovered that the flash on this smartphone actually helps.

The Rebel cavalry managed to drive back but not rout the Hussars who did equal damage on them but they had been under accurate fire from the  Sharpshooters in the Stonehouse and  were soon driven from the field.  On the other flank, the Rebel Sharpshooters had been quickly driven from the woods now that the Highlanders remembered that it wasn't a fortification.
The view from the other side.


Casualties have been heavy on both sides but there is a hole in the Government line and the Rebels are shifting their freshest units to the front to push the attack. 

Again, the view from the other side. Note the routing Blue unit which has just shaken the Grey's a bit, causing them to take a hit. 

2 turns later, the Rebels have taken the wall and it was beginning to look like another Rebel victory until fire from the battery and the Highlanders broke another unit while the Queen's commanders were holding their battered units in the line by sheer force of character (and good die rolls).

As another unit breaks the panic spreads and the Greys join the rout as does another battered unit on the farside of the wall. Suddenly the Rebel army is below half strength and must retreat. 

 This simple scenario lasted about 10 turns and took under 1/2 hour to play not counting set up and take down. Plenty of scope for bigger games with more forces on table, more complex scenarios and more time lost in the game. But, I need to paint and base more troops first!


Friday, July 13, 2018

Crossroad: First Assault

Its been a busy day so this is going to be a very quick look at the first game which was played last week.
Rebels: A brigade with 3 infantry, a brigade with 2 infantry and a light infantry, plus a battery and a unit of cavalry.
Government: A brigade with 2 infantry and a light infantry deployed along the ridge supported by a gun and by a unit of Hussars in support on the base road. A second brigade will march on table from the wall when they roll d6 less than the turn number. 
The scenario was an impromptu one. I wanted to have the Origawn Rebels attacking but I don't have enough troops ready for a large attacking force so settled on a reinforcement scenario.
Turn 2. The Rebel right is pushing ahead hoping to cut the road before reinforcements arrive. His left has advanced and engaged in a firefight while the cavalry carries out a flanking movement. A rather rash charge by the Hussars has just been bloodily repulsed. 
The Rebel cavalry has suffered heavily by fire from the house and a charge by the Hussars but they have forced the Fusiliers to move back from the wall to protect the gun, allowing Rebels to close on the wall. Across the road the Rebel light infantry is more than holding its own against two units of Highlanders though in part this was because I forgot that the woods provide protection against shooting and cavalry charges but not against infantry charges.

Minnow takes command. By the time the Fusiliers had dealt with the cavalry, the Ft Henry Guard and Victoria Rifles had both been broken. Under this version of the rules, the Brigade was now shaken and not allowed to move towards the enemy and was penalized if shooting or in melee.
Each side has now lost 2 infantry units but the Government has a shaken Brigade because both units were lost from the same brigade. Since the brigades on both sides were intermingled this felt more than a little unfair. Mind you, having lost their gun and the stone wall on the crest of the hill, the Government's hopes are a bit forlorn. On the next turn the Fusiliers  were broken and the Queen's forces were forced to retreat from the field.


Tomorrow the replay and a bit on the rules tweaks and how they affected the game.

Thursday, July 12, 2018

The Brigadier goes down to the Crossroads

That felt good!
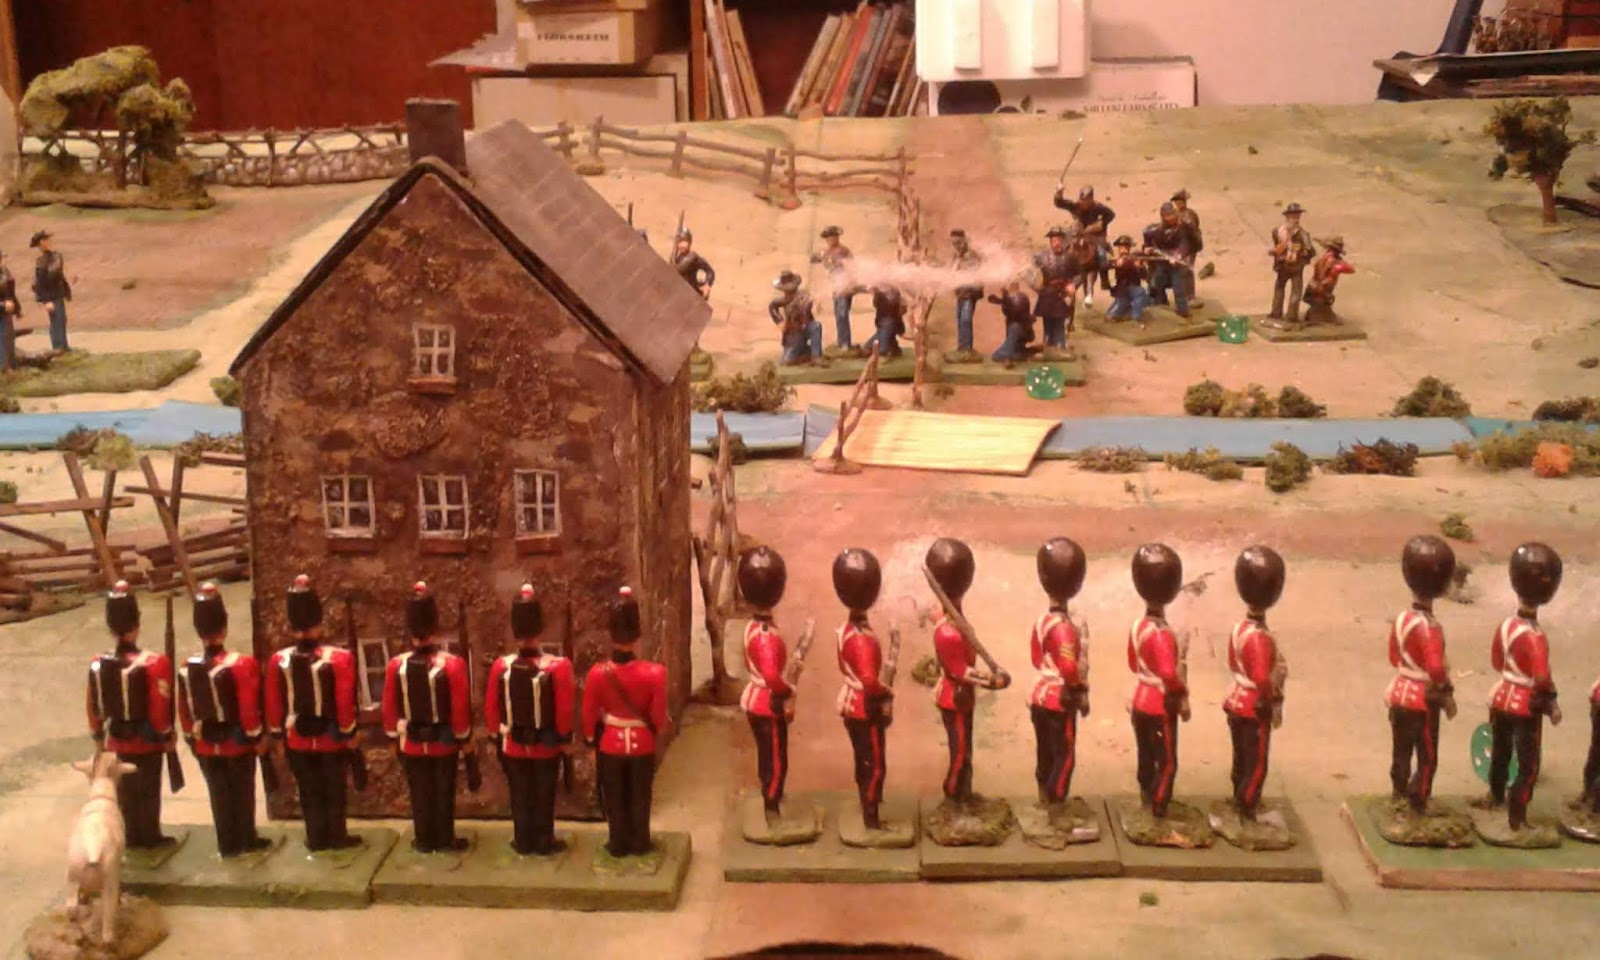
Waiting for the 1st shot.
I spent a fair amount of time yesterday trying to figure out what I thought I wanted and tweaking the rules again, then managed a quick game last night. During the game I continued to tweak and un-tweak the rules as the effect of the changes became clearer as did my poor mental expression of what I wanted. The game wasn't bad but it still wasn't 'there' though. Some processes were clumsy or ineffective while others had unfortunate side effects on my decisions as a player.

The intent with these rules has always been "for effect" but decades of habit  keep trying to bring me back to focus on detail and "how" rather that accepting what seem like abstract rules which seem to have the right effect on player choices and game results almost despite everything. The actual combat and movement rules never seemed to be a serious problem. Where I have had the most problems is trying to come up with simple but effective rules to reflect issues of command control and the interaction of friendly units, especially in terms of moral and physical support and the risk of spreading panic as the battleline starts to give way.

So, in the evening I re-tweaked the rules, removing several cherished ones as well as most of the new ones. I also brought back a few rules I had tried at various times but abandoned either because the rules as a whole were getting too unwieldy or because some rules ended up working against each other rather than with each other as planned or because I mistook which rule was having which effect on my actions. This morning I played again and....it worked!

It didn't just work though, it had that mysterious "feel" which I have had such trouble identifying to myself and the result was that without any rules to explicitly mandate it, I found myself forming and maintaining my battle lines and not leaving isolated units hanging without a good reason. In addition, with both sides having been battered pretty badly and short of reserves, one side suddenly collapsed. (You'll have to wait for the report for details.)

The 2nd Battle Rages.
 The basic framework is still obviously a gridded development of my 2003 Morschauser Meets MacDuff rules, using the same key concepts, but it works and will work for something more than a  small game and it will be easy to add new troop types and weapons when needed.

These small games took about 1 hour to play and I would expect a full game with say triple the number of units to be able to be played in an afternoon or full evening.

Its finally time to start again to write a full version of The Square Brigadier complete with all the extras, engineering, combined ops and so on which I haven't really had since my Hearts of Tin days.

Here is a link to the "2 sides of a page" version.

Hopefully I'll get the battle report written before I forget what happened!

Tuesday, July 10, 2018

Enough Already!

Well, I'm not done sorting and arranging figures and books or figuring where to store the rest of the surplus or "needs work" figures but I'm done!
The Elastolin Prince Valiant and Viking figures can go  at it day and night now.
On the far side of the room are the 16th Century and Prince Valiant shelves. I had to leave space for my gathering Turkish army on the middle shelf and that hasn't really left any room for the Romans but then I didn't really want a Roman army, they just kept sneaking into various lots of other figures until there was an army's worth. They are  probably prime candidates for resale.

Zoomed out view of the still-being-stocked and sorted North Wall figure and book shelves.

But, for now, its time to clear my mind of plans and problems, clear the jetsam from my table and get a game set up.

Saturday, July 7, 2018

Housekeeping

This weekend I've finally gotten back to work on my room.  My remaining 25's have again been banished to boxes in the cupboard leaving this wall of shelves for the 18thC and 19thC armies and the other wall for the 16thC and older armies. The bookshelves have been shifted and finally put in order and I've moved the table a little to make more room for players between the table and shelves.

Nearly 12 done.
Once I get the troop shelves on both walls adjusted and refilled, it'll be time to build the table. (At the moment its a few pieces of thin plywood balanced on various improvised supports.)  I do actually have room to make the table just a bit bigger but I've found that I almost never use all of this table as it is.

It seems that the time spent learning how to adapt rules, scenarios and armies to smaller playing surfaces has born fruit.


Thursday, July 5, 2018

OK Back to Work!

The Zouave mould worked quite well except for one little problem: the bayonet!

The Papal Zouaves that Britain's didn't make!
(in progress)

After about six increasingly drastic vent cutting sessions, I finally got bayonets....and FLASH, major flash.

At first, I almost gave up on the bayonets but what kind of Zouave wants to charge without a bayonet on his rifle? It took some careful snipping, grinding and filing but one has been rescued so far with 2 more started. Hopefully they'll look OK once painted.

You may notice the not very French looking pack but after preparing to make a pack with blanket wrapped around it I noticed that the original Britains' Zouaves don't seem to have the blanket roll, so I'm just using the Fort Henry Guard pack.

I suspect there will be several regiments of Zouaves.  Wallace's Zouaves, also in grey, would be a good choice but I could see doing some simple conversions from kepis to stocking cap/fezzes and doing the classic, possibly erroneous, Louisiana Tiger look in brown jackets and striped pants.

Wednesday, July 4, 2018

Year Nine

Well, here we are, "That Time of the Year" again!   Today is the 8th anniversary of my heart attack and I'm still here!


Had a slight scare a few months ago and while a slight adjustment of meds has left me feeling better and less tired than was the case during the last few years, it was a good reminder.

Hector back in my old gaming room in Five Island Lake.

Last winter I got so focused on getting ready for Huzzah that other plans went by the wayside until that was over. I had all sorts of plans for too many projects but they didn't include getting lost in the 54mm old toy soldiers again, until they did.


The main reason for dumping the original 54mm version of Atlantica was lack of space due to changes in my situation although falling in 'love' with the 40mm Scrubies helped confuse things as did the huge influx of plastic 54's in modern style which broke the consistent look and feel of the armies. Anyway, I'm enjoying them so much at the moment and so ready to do a mini-campaign that almost everything else is on hold for now. The exception being my comittment to finally build a small 40mm, 16thC Turkish 'army' for Huzzah 2018.

Elastolin 4cm Turks and Landsknechts.

I'm not going to rush into getting rid of everything else or even ceasing to add figures to and game with other collections as the mood takes me but I am going to revisit my plans and relegate several things to a "Reserve List". The idea is to avoid splitting my time and attention quite so badly  so I can finally get a mini-campaign going and get my games looking less improvised, at least perhaps some examples of faux-improvised where that might enhance the toy soldier atmosphere.

I also want to continue to work on improving the look and functionality of my room. To help with my focus as well as the state of my room I am considering revoking my "everything must be on display" maxim. "Hiding" a few collections might help lessen the distraction. Time will tell.

In the meantime, if anyone is interested in a 40mm 1914 German army of about 150 figures and 2 guns, drop me a line (rmacfa@gmail.com). The British, Indian and French units are needed for some early 20thC Colonial campaigns.

I built this army as a Centennial project. It's 96 years to the Bicentennial and I'm not sure I want it to sit in the cupboard till then.
So that's the plan for Year 9!

Oh and Happy Independence Day  to my American friends and readers. 

Tuesday, July 3, 2018

Origawn Rebels Attacked at Moose Creek

Our Volunteers Strike a Blow From the Rear!

This report has been wired in from Edmonville by our corespondent with Major General Douglas' Column of the Origawn Field Force.
An overview of the battlefield as the Reb's flank is turned by MacDuff's column.
The first battle to crush this rebellion in Origawn has been fought! On Sunday night General Douglas announced that the Queen's Volunteers would finally have a taste of battle,  the army would attack the enemy on Monday.  The Veteran Colonel MacDuff was to lead a column consisting of his Mount Royal Highlanders and the Victoria Rifles to march before dawn to cross upstream of the enemy's position on Bull Creek.

"The Rebels will be so surprised that the battle will only last One Hour" he announced.

Fierce fighting rage as the Reb cavalry is repulsed by the brave Highlanders.
 Seemingly unable to respond in kind to the General's brilliant manoeuvres, the Rebels, under the command of the newly promoted General Lannigan. just stood their ground and fired as fast as they could.

The Queen's Volunteers press forward as the sun sinks. 
Despite several ineffective charges by the Blue cavalry, Blue seemed unable to stem the Red tide. They slowly retreated farther and farther downstream but never ceased their fierce fusillade and it was obvious that while they had surrendered the bridge, they had little notion of abandoning their grip on the Ford as well.

As the sun sank low, the stream of casualties grew larger and the supplies of ammunition grew smaller. General Douglas issued orders to cease all attacks and fall back to the south bank of the Creek.
Blue's Last Ditch defence.
As the army fell back he saluted the tired companies as they passed. "Well done my  brave Volunteers! We have given the Rebels a lesson they will not soon forget".

This correspondent hopes that the lesson they learned is not that they stood toe to toe with the redcoats and at the end of the day they still held their ground.

Sunday, July 1, 2018

Teaser: The Origawn Rebellion goes hot at Moose Creek

Happy Canada Day to us!


The first shots in the Origawn War have been fired! There's no stopping it now!
The Rebels open fire and redeploy as the Red Queen's army appears on the far side of the bridge over Moose Creek.
What a relief it is to once again have a free hand to not only imagine the armies, the politics and the military situation, but to not know the outcome in advance! Will Origawn fight its way to freedom or be once again ground under the Red Queen's High Heels? Only time will tell.

Emotions are running high, I'm predicting a seven or even nine year war.

An overview of the table at the end of Turn 1.
Hmmm there seems to be a lot of empty space on the battlefield. I have a feeling that these armies are going to need more men!.


The Grey army (yeah I know a large chunk of the army is in Blue but I want to avoid confusion with Oberhilse's army.) has moved a significant percentage of their combat ready forces to the bridge at Molasses junction. Their plan is to hold this line until they have enough force to cross over into the Blue River valley.

Hearing of this, General Douglas, the commander of the Queen's Field Force, has determined to launch a pre-emptive strike. A portion of his force has been dispatched to pin and distract the enemy at the bridge while the rest makes a forced march over a crossing to the East to flank the enemy and rout his army.


Well, that's the plan anyway. We'll see how it goes.