Monday, February 26, 2018

Painting the Town Red

Nothing like a quiet Sunday morning with coffee in hand and a game on the table, all set to go.

The armies collide.
For those not familiar with the "Sawmill Village" scenario, two advance guards clash at a small town with victory going to the side (if any) that holds the town at the end. To avoid long term background story consequences, I just called the armies "Red" and "Blue" without getting into where, when and why the clash was taking place.

In the Scenarios for Wargames version, players choose 6 units from a list. Cavalry and light units are described as being half the size of infantry units so, since I have recently decided to up all units to 4 hits regardless of troop type, I placed two infantry "companies" per "unit", grouped into two to four company "Battalions". Grant notes that light infantry units should be able to break down into  smaller sub-units which my rules don't normally allow but I decided to try it.

Red fielded 8 infantry, 1 gun and 1 light infantry while Blue had 6 infantry, 1 gun and 2 light infantry.  Once the light infantry were split both sides ended up with 11 game units.

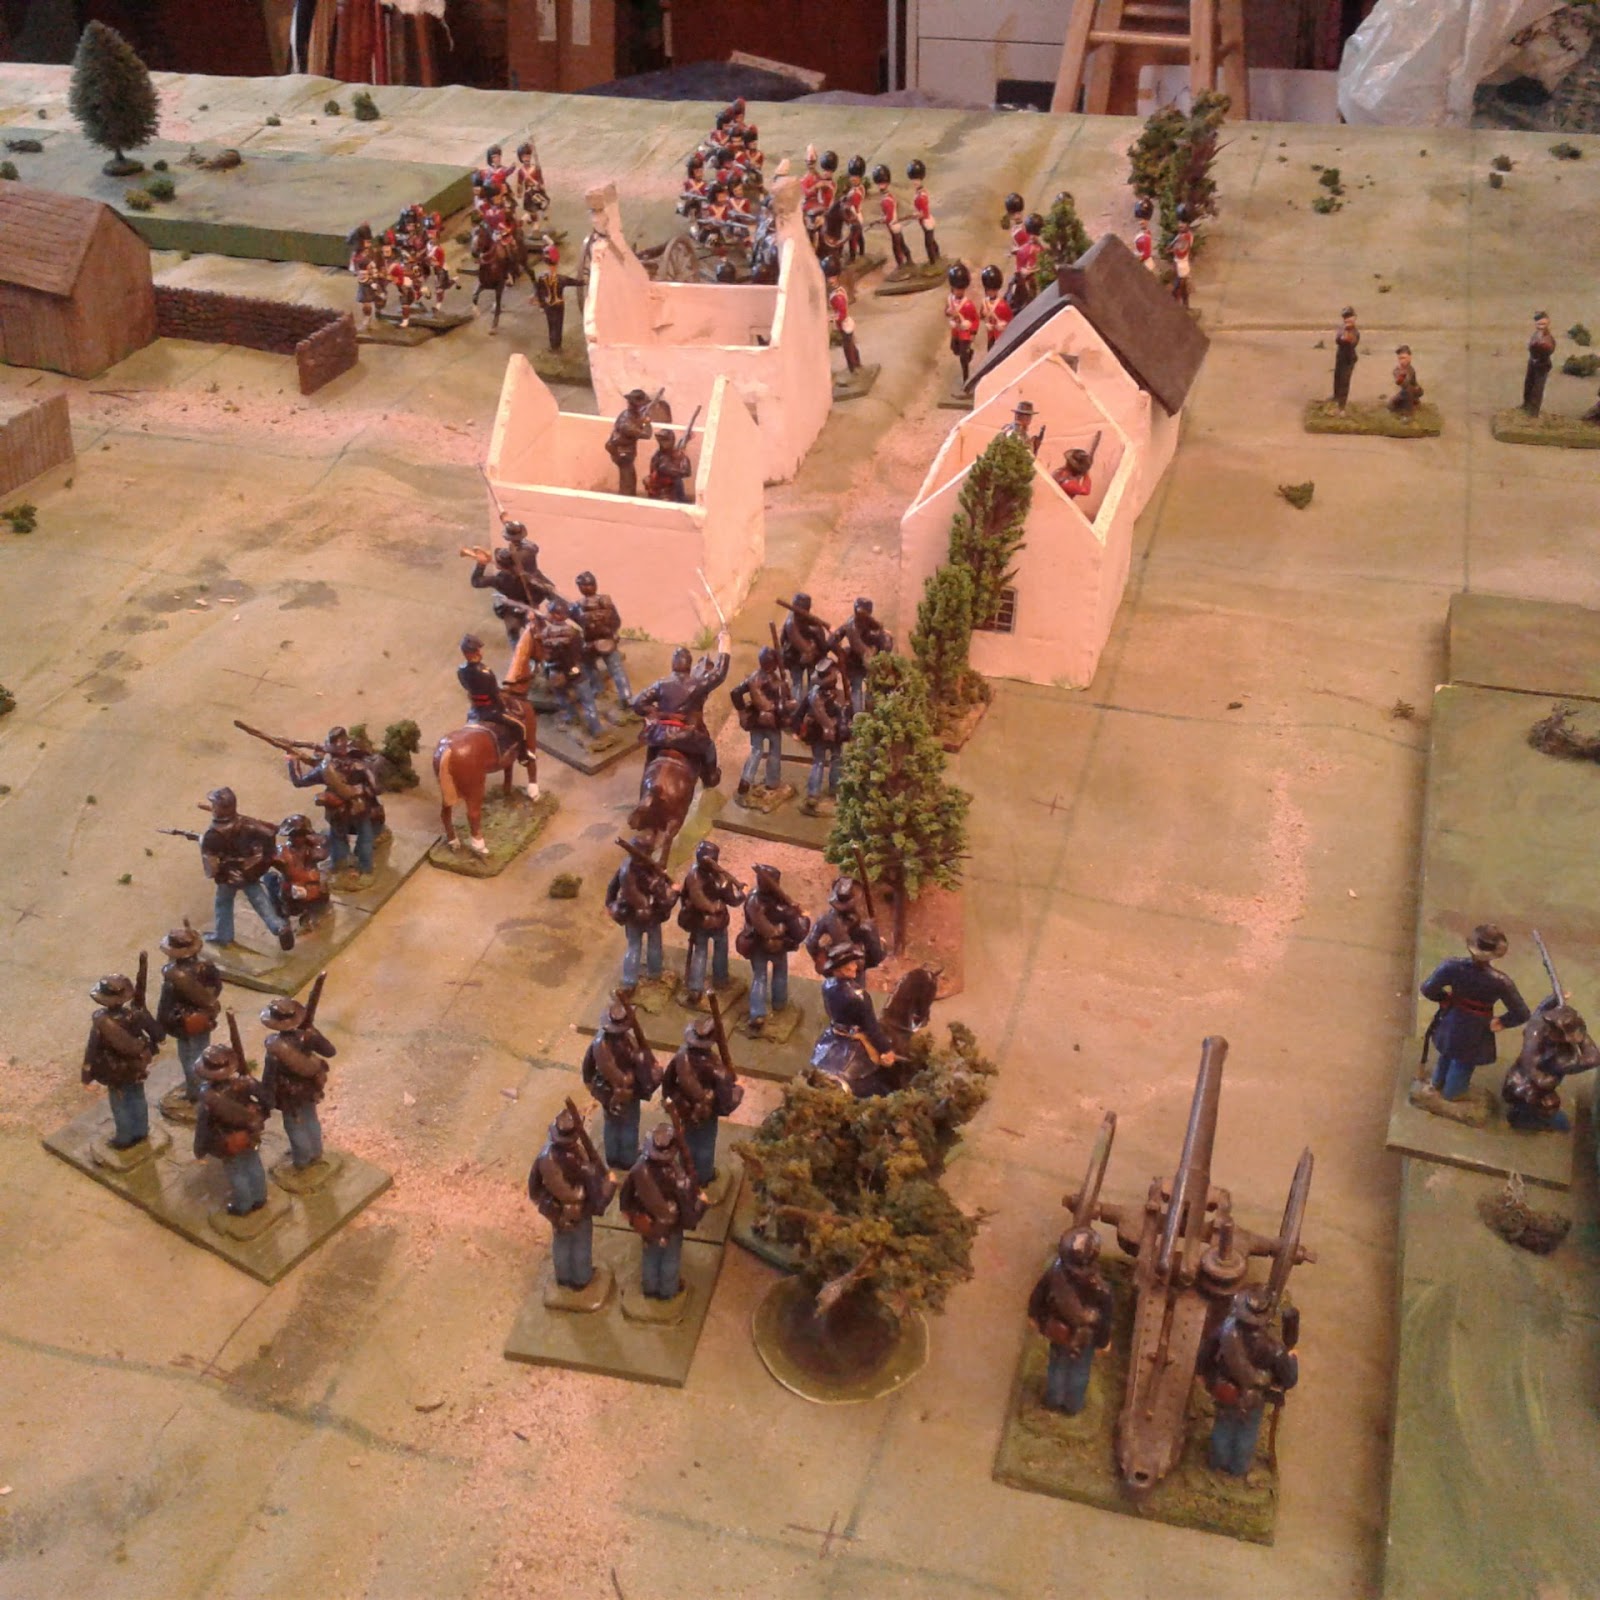
Blue's Skirmishers have grabbed the town as both armies deploy. They were soon reinforced but Red's Guardsmen soon drove Blue from the town.
The scenario begins with both armies marching down the road until they spot the enemy. Since neither side had cavalry present to race ahead, the opposing columns bumped into each other on the streets of the town. At that point I rolled to determine a basic battle plan for each side. 1-2 left hook, 3-4 push up the centre, 5-6  right hook. Red rolled a right hook, Blue a "hey-diddle-diddle, right up the middle" approach.

Blue retakes the East side of town but casualties are mounting and the counter attack stalls. 
The game was one of those ding-dong affairs where one side would grab what looked like a commanding advantage only to be knocked back while the other side surged ahead. Some of the buildings in town changed hands 4 times as well as being successfully defended several times.

Initially I thought Red's plan of attacking up the right might have been a mistake since it took so long to get in place. The fighting in the town surged back and forth though with little room for intervention and eventually the flanking force was in position to bring fire on Blue's reserves and rallying units and still be able to directly attack the flank of the town in support of the Fusiliers. Blue's reserves on the other hand were backed up and had to attack in waves until they finally opted to modify the plan to try and counter the Highlanders. Too little too late.
Red once again drives Blue from the town, this time inflicting heavy losses as the flank attack by the Highlanders comes in. Blue is forced to withdraw.
A brisk and very enjoyable game with a slightly stripped down version of the rules. I played 14 out of a potential 15 turns, with 11 units a side, in about an hour and 1/2.  Since this is one of the smallest scenarios I should easily be able to handle a scenario double the size or more in an afternoon.

Looking back through some old blog posts from 2012, I found that I had decided back then that a 5" square grid was my best fit as long as I did the work to make a table wider than 4 feet. Several times since then I've reconfirmed the right-ness of the 5" grid for my figures, basing and terrain. Its just taken me a while to investigate all of the next best, appearing easier, alternatives and dismiss them.

With an eye to the upcoming Huzzah! convention game, the next post will delve a bit more into the current version of the rules and the impact of rules focus on scenario size, pace and complexity and on the types of things I want to see players focusing on, especially at a convention.  

Saturday, February 24, 2018

An Old Saw (mill)

Finally things are settling down and I've had a few hours to get back to chasing things back onto shelves or at least out of the way. Its not done but the room is already more functional that it was.

Its time for a play break.
Sawmill Village about to be contested yet again!
Having spent a few minutes updating the Square Brigadier Quick Reference Sheet (click), it is ready for a proper test game. It would have made the most sense to get the 40mm WW1 guys out but I was in a mood for Guards and Highlanders. I wasn't in the mood for much more brain work so I fell back on an old favourite: CS Grant's Sawmill Village.

Largely by coincidence, my new 11 x 14 square tabletop grid matches the 5'x7' table used in Scenarios for Wargames at a scale of 1 cm on the map equalling a grid square on the table. That level of accuracy is, of course, not needed but it tickles my fancy to do so. Too bad it won't work with any of the other books.

The troops have just marched on to the table and will now bivouac until Sunday morning when all hell is likely to break out.

Tuesday, February 20, 2018

Half Time Show

Its been a busy few days with neither time nor energy to spare for my room. Tonight I found an hour for myself. I could have spent it tidying and organizing but......
The Cree warriors have galloped across the plain and are now creeping through the woods towards their exit point.
Only having an hour and minimal energy, I decided to get the 54's on table and hauled Thomas's One Hour Wargames off the shelf. I had a book mark on "Infiltration" which I had been planning to try a few weeks ago but hadn't. Looking at the open terrain with one patch of woods and a single hill, it looked like a scenario for the Prairies.

Black had a 4 unit raiding party moving on at the start with the aim of getting 2 units off the road exit on the other side. Road? OK obviously there must be a ravine or ford just off table.

Red ended up with 4 units of infantry,1 gun and 1 cavalry. A company of rifles manned an outpost on the sole hill. B battery and the Governor General's Bodyguard would enter from the road exit on turn 3 while the rest of the infantry would arrive by road from the opposite side a few turns later.


Turn 6: Every one is now on board. Its hard to see but there is a two contour hill behind the riflemen . 
The version of the Square Brigadier I had been using for the Northwest Campaign was slightly different in detail from the WWI version but I couldn't find a paper copy of either, or my dice and markers for that matter. Eventually I found a pair of dice and set too, fudging the rules as I went. (The regulars were fine but I had trouble  remembering what unit characteristics I had settled on for the Indians who were all mounted infantry but adverse to close combat.)

The Indians rode quickly across the table with the Victoria Rifles refusing to move without orders, turn after turn. Luckily the artillery and cavalry arrived in time to form a road block. A bit of a firefight broke out but that pair of dice seemed to be heavily waited towards scores of 3 or less.  Eventually the Indians charged the gun and dismounted cavalry, being repulsed by canister but breaking the cavalry who took 5 turns to rally. A second charge led by their War Chief took  the gun, opening the road. One turn earlier, the raiding party could have ridden off but with a flip in Initiative, the reinforcements were at hand and the dice had warmed up. Rifle fire broke two bands and the rest were cleared off with the bayonets and the swords of the finally rallied GGBG.

Turn 15, having rallied, the GGBG has charged and scattered the remaining Cree warriors.

With so few troops on such open terrain and such narrow victory conditions, it was a very quick game (about 30 minutes playing time) but it "hit the spot". It also confirmed  my decision to go with the 5" grid and make the table just a titch wider (14 x 11 5" squares). The old table had a more grid squares but the bigger figures and terrain fit better on the larger squares and the extra two 5" squares of depth that I was able to add after the move are just enough to make the difference.

OK, back to work!

Saturday, February 17, 2018

Recovery Efforts Contine

By now you'd think I'd remember to allow extra, extra time when moving bookshelves to allow for perusing books I haven't opened in years and for wallowing in nostalgia when I come across things like Barker's Purple Primer on Ancients or a folder of clippings and photos. 

The big problem though was a mix of indecision,  adhoc "try and see" plans due to access issues during planning and the Chinese puzzle aspects of having to move things multiple times. This is the 3rd location for that bookcase by the window and I think I'm going to move it back to the 2nd position underneath the long shelves. But not today.

Even a little added depth is welcome.(An extra 2 squares of depth

At least the jury rigged, reconfigured, 70"x55" (14x11 5" grid squares) table top is in place and ready to use. That was supposed to be part of the next phase and I wasted considerable time looking for the optimum solution and only narrowly avoided buying wood to build a new table. Always best to play a couple of games on a jury rigged test table before issuing a final seal of approval.

Almost unrelated: a new prototype 5" grid woods template, paint on canvas, just add trees. 
No time to work on my room this Sunday and Monday looks iffy but by Tuesday night I should be on the picture hanging phase.

Wednesday, February 14, 2018

Hurricane Ross has blown through again

I finally got tired of trying to find an easy solution to the habitual mess and congestion in my games room. As a side incentive, I want to have sufficient space around  the table to once again be able to invite  a couple of friends over for a game once in a while. It was time for serious measures.

KaBOOM!
  So, apart from a large bag of garbage now out by the curb, I also took a large box to the local Thrift store. Aside from some fantasy novels left by my brother in law, some CD's etc., it included a few bagged painted plastic toy soldier sets (Modern infantry & armour sets in HO, Romans vs Barbarians in 54mm, etc). The rest of the cupboard emptying and reorganizing can wait.

Next, my 40 year old, no longer rollable, roll top desk moved down to my proto-workshop in the sun porch, sans a few of the drawers which will catch up as soon as I find somewhere for the contents.

Hopefully, tomorrow and Friday I will be able to empty, move, and refill all the book shelves in the room and outside on the landing (sighhh) and move the long drawer cabinet that used to, and will again, live under my table and by Friday night have everything back together and tidied, ready for a game. The table itself is going back to its 2014/15 location with one end against the East wall but only 4x6 this time.

The last game (click) on the old 5x7 against the East wall.
August 2015.


Not only will there be more room and order around the table, and more room for storage underneath again, but there will be room for a daybed or similar under the windows at some future time.

I don't think the old 6'x8' is ever coming back.


Saturday, February 10, 2018

1914: Live Playtest

Its good to have friends willing to kick the tires on my convention games and a regional association that welcomes us to join in their quarterly Table Top Games days.

Today 6 of them and I played a version of my 1914 game. From intro to end of game lasted about 4 hours, maybe a titch more and reached a conclusion after some 8 of 15 possible  turns including some heated fighting and heavy losses.

The Germans took a big chunk of the primary objective, the hill, but again lost it to a counter attack. On the woods in the far North the French were finally wiped out but at a high cost and a counter attack by the armoured car broke the back of the flanking attack.  On the other flank there was a prolonged long range duel which ended with the beginning of a French counter attack.

In short, it was Good but it can be Better!
After 3 hours and about 8 out of 15 turns, I called the game as the defending French began a pursuit.
The available table was around 5'x7' or about the same size as many of the Huzzah tables. I was able to lay out my 5'x6' (+ variable border) cloth with a few inches of bare table on either for paraphernalia. I always used to try and cover the table completely for scenic effect but I am starting to appreciate the practical uses of on table/off game-mat space and there was easily room today for more units than 3 players per side can handle in a 4 hour game slot and certainly room for a 4th player so I may plan for a 5'x6' battlefield for Huzzah.

The game slot at Huzzah is 4 hours and that has to include the rules and scenario briefing. I played all 15 of the planned turns but today we reached a conclusion 1/2 way through the game.

What I do need to do for Huzzah is to strengthen the attacking army and spread the objectives out or else find a way to get the game to play faster and that brings us to the rules.
Set up in progress.
Photo courtesy of Jeff of the Armchair Commander blog. 
When I resurrected the 1914 campaign I instinctively brought back 2 rules from that era of Square Brigadier: rolling for numbers of available orders each turn, and a Pin rule. Both of these had been dropped from my late 19thC rules after an intense internal debate. The last game had me wondering if that had been a mistake. This game confirmed that suspicion and my first act on getting home was to repeal them. 

Both rules slowed the game without adding anything really useful although they appear to reflect the command structure on one hand and the reaction of troops to heavy fire on the other. 

The  19thC rules I have been using assume that if a Commander is there then he is doing what he is supposed to be so I only test isolated units which is a big time saver and ends up having  similar effect. 

The voluntary pin rule allows a player to, cancel one hit in exchange for not shooting or moving that unit. In effect it made fire feel ineffective even though it wasn't for the defender and meant that less bold attacking players took that option too often thus had trouble making any headway. Its something that has to be learned but my years of GM'ing convention games tell me that few players will have time to learn the lesson during one convention game and rather than increasing "realism" it really just makes the game slower.

The alternative which I normally use is to allow a unit with multiple hits to try and remove one hit instead of shooting or moving. It has the same practical effect as the voluntary pin rule as heavy fire will usually stop an attack cold but it is less likely to be abused since it is an immediate choice of a chance of saving vs an immediate chance of shooting or moving as opposed to a guarantee of a cancelled hit now in exchange of not moving or shooting at some later point.

The new, slightly more complex, artillery rules also served largely to confuse everyone including me and have been trimmed back.

This puts things back to the well tested version and I feel like slapping myself up the back of the head for talking myself out of making the change before the game. 
Jeff's counter attack secured the main objective.Photo courtesy of Jeff of the Armchair Commander blog.
So far so good. With the rules in hand I need to turn my attention to reinforcing the German side by adding two battalions of infantry, a few squadron of Uhlans and another field gun and the Allied side by adding the 2nd half of the  British Battalion and a British squadron as well as the French heavy gun.

Monday, February 5, 2018

Debrief

Its always a little hard to judge a game when its been played in short spurts between non-gaming obligations especially when there were also pauses to consider the rules but we do what we must.

The game patiently awaiting my return.
As laid out in the first post of this series,the game was an attack by German forces on a thinly held French position with British reinforcements being rushed forward.

The German plan was to screen the French infantry, which was hastily entrenched on the objective hill with a battalion supported by cavalry, while attacking the thin screen of dismounted French cavalry with 2 battalions.

The troops laid out, ready to begin.
In retrospect, the attack was not as well handled as it might have been. The pinning attack got carried away and stormed the hill while one of the battalions making the main attack drifted a bit far to the right and took heavy casualties engaging the French infantry when they were supposed to be pressing the cavalry. Oops.

Mid game and the Zouaves have already had to retake the hilltop once.
Despite the action in the centre, the cavalry line did look hard pressed and all reinforcements were originally directed  that way with the cavalry and armoured car finally making it secure so that even when the French MG was FINALLY knocked out, the Germans lacked the strength to push forward into the gap.

The Lancers close a gap in the middle while the armoured car secures the extreme right flank.

At that point the German cavalry came forward to dismount and attack through the woods held only by a 1/2 strength  Company of Zouaves. They failed, twice, and then were evicted by a counter attack! Brave Zouaves! By the end of the game the Zouaves had been reduced from 4 companies to 1/4 of one company but they still held one length of trenches.

The battered Jaegers managed to take the hill top again and held it against several counter attacks interspersed with artillery, machine gun and rifle fire but finally on Turn 15, the last turn, a final counterattack by dismounted French cavalry managed to take back the hilltop for a narrow victory.

A close end.
So, what does this mean? Firstly, I'm satisfied that I can take this to a convention and run it with the hope that some players will enjoy the game. The rules don't deal in low level detail and don't have a fancy activation system but there is lots of uncertainty and following period tactics and basic military principles will generally help. I may have a good imagination but the games remind me of my overall impression of accounts in several  memoirs that I've read as well as some histories and that's good enough for me.

Secondly, there is ALOT of work to be done to get ready. I need to add units, make and mend lots of terrain and either tart up this cloth or preferably get a bigger cloth and do it up.

There was nothing new in the rules but I fiddled and then unfiddled a couple of things and identified some unwritten rules. I don't have a full version of the rules anywhere so I really should write one and at very least I need a better Quick Reference sheet to hand out. It may end up being 2 sided.

I did make an interesting discovery about terrain and the grid. Twice I had a problem trying to figure out whether opposing units in diagonally connected squares were in cover to each other or even capable of seeing and firing at each other. For example, when lining opposite sides of a hedge kitty corner to each other. Similarly when a unit captures a defensive position they are suppose to occupy it but if its a linear defence, it would then be behind them and not providing cover. These are plainly artificial situations created by the grid and rules. I finally realized that the easiest solution would be to run roads and hedges as well as trench  lines, through the middle of a square, not along the edge.

More importantly, I've been worried about the smaller number of 5 inch squares and so reduced movement which meant losing the option to move 1/2 and shoot. Movement in this game was just too slow for the time limit and speed of action. Even if the German attack had been successful at the first go, they didn't really have time for a turning movement or to cross the full distance to assault the second objective. I needn't have worried about the slight reduction in grid areas so the movement rules will go back to move 2 being slightly more vulnerable or move 1 then shoot or attack.

Sunday, February 4, 2018

and the work goes on

Sorry folks, no battle report but it was a useful day.
Game 2, Turn 4. A French counter attack has recovered a captured section of improvised trenches atop  a vital hill.
 I started out with a test of a new system but after four not very interesting turns, both sides had lost so many stands that the game was essentially over. I'm not trying to do the  Somme or bore the players so I pulled the plug, updated the Square Brigadier, reset the table, and started again.

Game 2 Turn 4. The first British reinforcements have reached the front line.

After playing four engaging turns, there has been some to and fro action, some tense die rolls and the need for both sides to keep making decisions. There were still a lot of turns to play but  I was out of time. Hopefully I will be able to pick it up and finish tomorrow or maybe even reset again from the begin and play a game from start to end.

(OMG there is a LOT of work to do, troops, bases, scenery, markers,etc etc)

Saturday, February 3, 2018

Trial by Battlegame

Next Saturday, weather permitting, I hope to run a live test of a smaller version of my Huzzah game  with a few of the lads from the valley. I figure I should test it at home first though.

The allied HQ prepares for battle. The frontline is composed of a battalion of Zouaves and two squadrons of Chasseurs supported by a howitzer battery but British reinforcements are arriving.
 My initial thought was to use the Square Brigadier rules but I have an itch to try a different approach.
Three battalions of German infantry prepare to attack supported by two batteries plus cavalry.

Stay tuned!

Friday, February 2, 2018

The Ross Machine Gun

Don't worry, no one else has ever heard of it either. The Ross Machine Gun was developed by me in 2014, so, no connection with the Ross rifle at all.

The original prototype.
(Archive Shot from 2014)
I have been contemplating how many  40mm MG's I will need for my Great War and trying to recall just why I have been too cowardly to attempt any more since the 2014 prototypes. It was in my mind that it might be best to make  mould of one so I could spit out as many as I need. It would be a very tricky mould to make though and I don't need dozens of MG's so I had a closer look at the old ones.

Toy style MG08's before painting (Archive shot from 2014).

It didn't take long to remember that the original issue was with making the sledge for the MG08. It was fiddly and annoying to make and both are a bit wonky, something sort of hidden by the crew now. The basic Toy Vickers  was relatively easy, it was the seated gunner conversion that was hard. A kneeling crewman will serve just as well for my purposes. As for the MG08, it did come with a  tripod option and the Turks at least used them and I intend to add Turks so, there we are!

Hopefully practice will help, as may some proper dowelling instead of bamboo skewers.

So there we are, one universal, handmade, wonky naive, Toy MG pattern can serve all nations and be made as needed.

Two full, 4 company German battalions attack the now up-to-strength Baluchs.

Time for a game to get the feel.