Click on pictures for larger size. Depending on your machine, you can use your figures to enlarge or shrink the picture, or there may be a '+' on the picture which will expand again and allow you to slide the large picture to see all of it. Click on the header arrow pointing left to go back to the regular screen.

Showing posts with label New Year. Show all posts

Monday, December 31, 2018

Out with the Old, In with the New!

Happy New Year.

Thank you! to all who have stopped by and an extra thank you to those who took the time to drop a line. 

The last game of 2018:
A Gentleman's War meets NQSYW at Sittingbad.


May your dice be blest in the year ahead.

Saturday, December 30, 2017

1759, A Minor Affair

This incident is not recorded in any history book.
This is the only period for which I have  an appropriate card deck.
(Note: the troops in the foreground are my own originals)

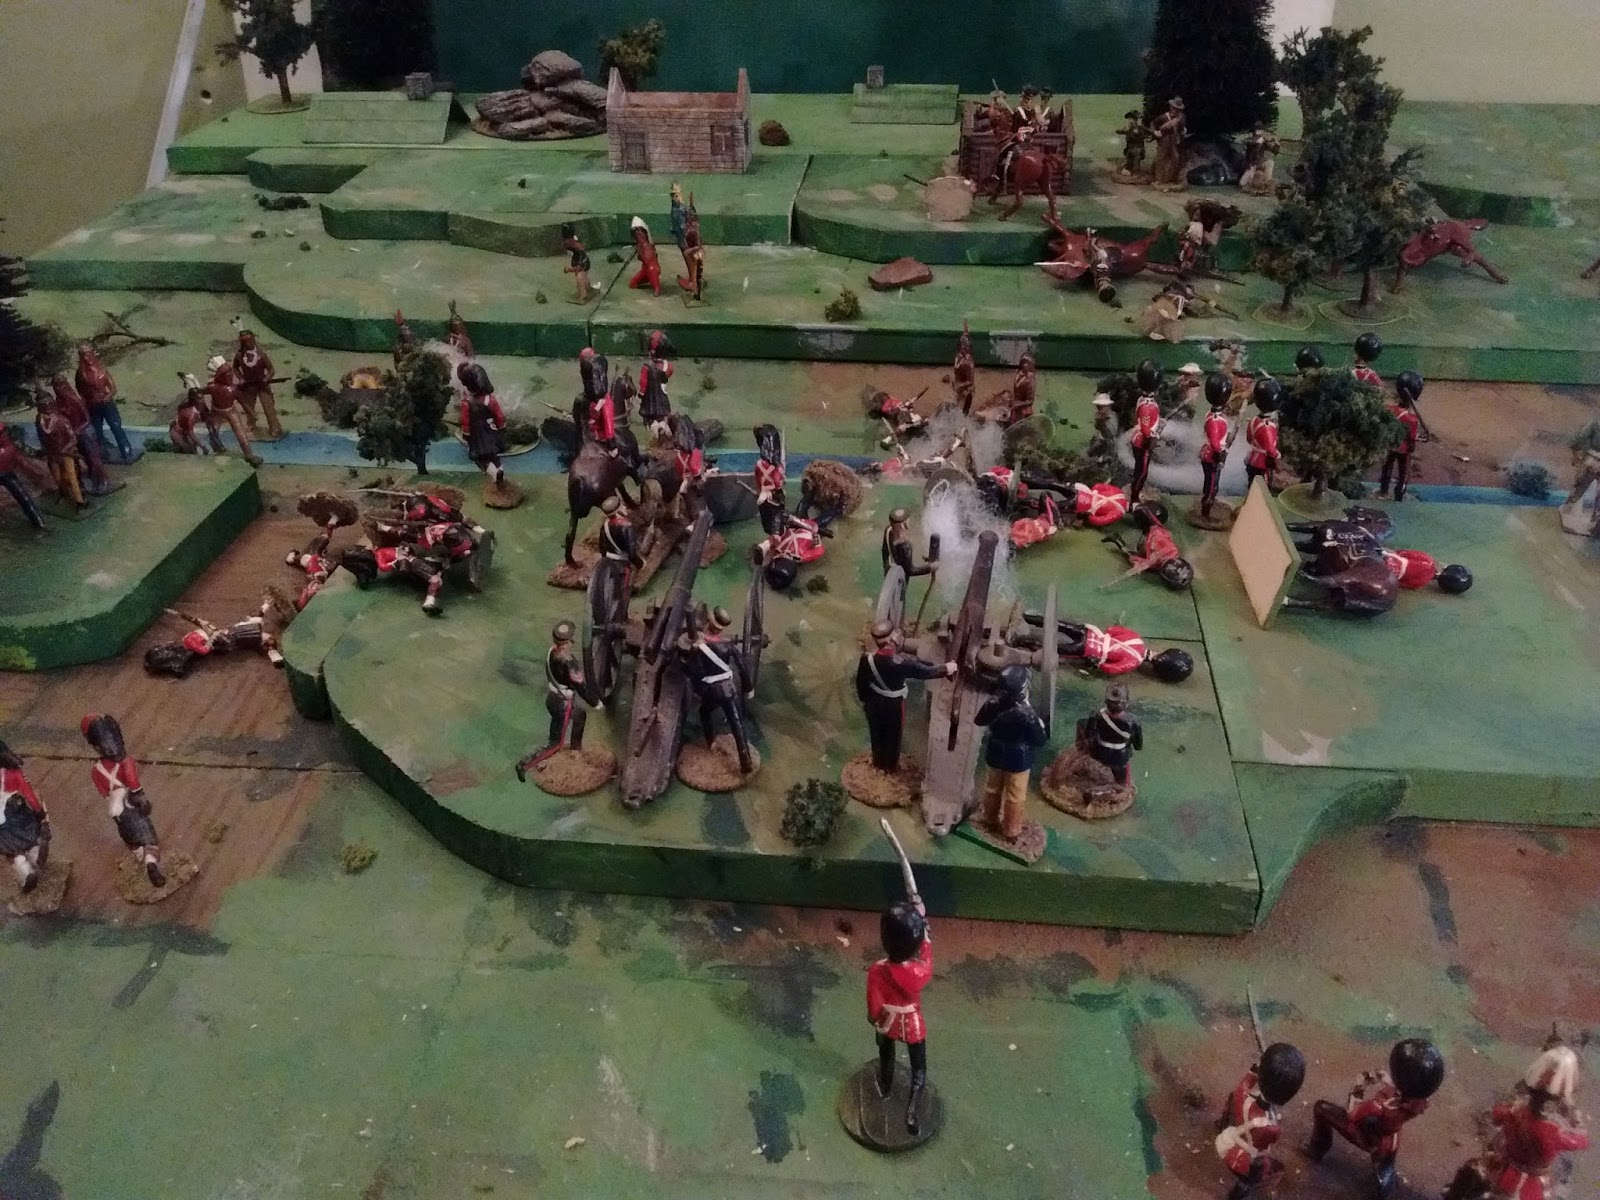
It was late summer in 1759 and Brigadier Murray had landed with a party of troops on the North Shore of the St. Lawrence, up river of Quebec. He learned  that French troops were approaching from the south and decided to await them at Petite Ile. His force consisted of detachments from the 27th and 58th Foot, Louisburg Grenadiers and Fraser's Highlanders along with two companies of Rangers and a field piece.

 The game began with artillery and skirmisher fire against the British positions, answered by the British gun but soon the French infantry began their advance. In the far distance Indian scouts can be seen hunting for a ford.
The French force, commanded by de Bougainville, had orders to  protect the inhabitants but above all, to protect the string of supply depots. Knowing that there was a major cache just downriver, he decided to force his way past the British.

None of the troops with him were local but he knew that many of the tributaries were fordable in places so he sent some of his Algonquin and Huron allies  to scout for crossing points. To keep the enemy occupied, he decided to deploy and attack the bridges on the main road. His force was comprised of 5 detachments of infantry, mostly Troupes de la Marine, 2 parties of skirmishers, 2 bands of Indians and 2 guns.

The French pinning attack on the Western bridge closes up and a long distance fire fight ensues.
The scenario was again an adaptation of "Holding Action (2)" from CS Grant's Scenarios for Wargames.

The British hold the Western bridge, repulsing 2 charges and winning the firefight.

Those who have been paying too much attention may have noted that the preview showed 30mm European armies on the full 4'x6' table but that here we have a 30mm French & Indian War game on a 4'x4' board. All will be revealed next year.

General Murray, alerted to the Indians fording the river and dispersing a company of Rangers, and noting the French movement to their right, begins to shift half of his infantry to block the ford.


The game was played using our Seven Year's War Portable Wargame based on the Ancient version. Line infantry count as "Heavy Infantry" in melee and have a range of 2. Light infantry have a range of 3 and do not suffer the -1 for fighting in woods.

The Highlanders  hold the Compagnies Franches after a protracted fight. 

The game lasted 9 out of a possible 15 turns and ended when the British became exhausted after heavy casualties. They were not in a position to block the ford and were no longer allowed to attack. There was really nothing they could do to prevent the French marching off.  It was one of those games where the British units decided that they would rather die than retreat while the French were very sensible and fell back quite often. This was of course, part of Bouganville's cunning plan, to wear the British down so they couldn't counter attack any troops slipping across the ford. 

The British are still holding but casualties have been heavy and Murray is forced to drop his planned counter attack on the ford. Instead, he will have to let the French pass and reembark when the fleet returns.

So that is it for 2017!

Thank you to all who have stopped by over the year and an extra thank you for those who took the time to leave a comment. Not only do comments help reassure me that someone besides bots are looking in but I confess that the comments even more than the viewing stats sometimes influence which games and periods get played or painted when I'm undecided.

Last, but not least, an even bigger THANK YOU to those whose comments occasionally contain suggestions, observations, opinions, questions etc. Not only are they often valuable in their own right but the two sided conversation aspect helps me feel connected from my old farmhouse on the far fringe of wargaming civilization.

May you all be blessed and enjoy life in 2018.

Friday, December 30, 2016

The Last Bridge

I do like to end the blogging year with a game. The last game so far has been solo but by happy a chance I received a call from my friend Bruce who was home from Alberta visiting family. So today after several hours of chatting around the kitchen table I dragged him upstairs where I had a game laid out. Since the masking tape road and river for Blastoff Bridge was still on the table, I had hastily reset the rest of the terrain and laid out my War of 1812 armies for a Square Brigadier game, the first non-solo SB game I have played.

The British line under fire early on.
I had recently completed marking the middle of the 6" squares to allow them to be used as 3" squares figuring that this would allow me to use more units and give more maneuver room. By the time we finally got to it the afternoon was waning and it seemed to me that a game with 14 units aside  would take too long so I reverted to the 6" squares and just made all units 2 stands strong for looks only. It turned out to be a good decision.    I think it looked better and moved quickly with lots of decisive action and only a few lulls for manoeuvre and redeployment.  
The armies march on. The end of turn 2
Each side had 7 units and 2 commanders. The British had a battery, 2 light infantry and 4 infantry. The Americans had a battery, a squadron of Dragoons, 1 unit of Riflemen and 4 infantry. The US had the mission of destroying the bridge.  Bruce chose the Americans, largely I think because he was already sitting there while we chatted about wargaming and mutual friends. The first side to lose 4 units would lose otherwise victory was decided on whether the US could blow the bridge or at least hold one end at the end of the game.
Bruce in action.
I sent two units across the river to attack the farm while the rest marched forward with all speed and deployed to attack the bridge. Bruce quickly moved to occupy the farm, sending 1 lone unit across the river as a vague threat and massed the rest of his army around the farm and bridge.
Firing breaks out. Note the sneaky NY Dragoons lurking behind the farm. In a few turns they would sneak down the table edge and then take advantage of a flip in initiative to make a double move and charge into the rear of my British infantry before they could react.
 The firing was soon hot and having lost a brigadier while trying to steady the troops my infantry was driven back. Bruce decided to send his cavalry around my flank and with a sudden flip of initiative he was able to charge into my flank before I could rally and face him. He then proceeded to roll up and wipe out the 104th. My light infantry were caught in a pincer between a charge by the Lafeyette Volunteers and the pursuing Dragoons behind them. Having already taken losses from the riflemen they were easily over run. I was now 1/2 way to my break point and out of position.

Firefight across the river.
 In the centre a fierce firefight raged for several turns before I managed to silence his battery and drive his infantry back. I felt uneasy at doing it but crossed over my infantry and started moving up supports. A possibly rash charge by the now tired Dragoons ended with the loss of the Dragoons and their accompanying Brigadier. A chance card now allowed me to shake loose his reserve infantry unit threatening my flank. I was hoping it would retreat but rolled an unordered advance to the middle of no where. I expanded the bridgehead, opened with cannister on the stray infantry unit and was starting to relax when another initiative flip resulted in a sudden resurgence of Blue infantry. Swinging his unit around to fire across the river into my flank he attacked from two sides and destroyed my Glengarry Light Infantry. I was now down 3 units against his 2 losses. Cannister drove one American unit back and some unusually effective musketry routed another battered regiment and shot down his Brigadier. The game turned on a thread, next loss to either side would end the game otherwise the end was 5 turns away. and I no longer held both sides of the bridge. The next turn was indecisive but at last I sent in the Fusiliers supported by the 89th. Either or both sides could lose but the Fusiliers came through for me.
Mid game, the British have lost more units and leaders but the remaining American units are in worse shape.
All is yet to be lost or won.
Here ends the year.   A look ahead will be next.

HAPPY NEW YEAR!  
MAY 2017 BRING JOY AND GOOD FORTUNE TO YOU ALL. 

Wednesday, December 30, 2015

Something's a Bit Fishy About This Creek Pt 2

I was intending this game as a quick diversion to be followed by an end of year game but it looks like this is it so I'll postpone any chat about rules etc, wrap this post and call it a year.

This Grant scenario was chosen because it felt vaguely more appropriate to the period than some others but I'm a bit embarrassed to admit that I didn't recognize the vague similarity to the "battle" of Fish Creek until after the game had started. Good choice by instinct!


Deadground: Game 2, using the Square Brigadier. 
(The fun one, the one I'm counting!)


The Canadians advance, 5th Royal Highlanders to the left, Hochelaga Fusiliers to the right, guns in the center and mounted troops flanking on the right. Their objective is to take the farms visible on the ridge in the distance by the end of turn 15. As the troops reach the row of squares at the far edge of the first hill they discover the hidden stream and the enemy hiding in ambush. Troops in the gully may only shoot or be shot at  troops on the edge. The artillery for example can only see the far ridge. 

The lead companies of the Fusiliers are hit hard and have to pull back to rally covered by the reserve companies. The Highlanders push forward but are caught in a heavy crossfire of 5's and 6's and are also thrown back. The mounted contingent however finds an opening on the right  and the cavalry push forward covered by fire from dismounted Scouts. 


The Canadians advance, 5th Royal Highlanders to the left, Hochelaga Fusiliers to the right, guns in the center and mounted troops flanking on the right. Their objective is to take the farms visible on the ridge in the distance by the end of turn 15. As the troops reach the row of squares at the far edge of the first hill they discover the hidden stream and the enemy hiding in ambush. Troops in the gully may only shoot or be shot at  troops on the edge. The artillery for example can only see the far ridge. 


Turn 15. The line has stabilised and the Fusiliers have pushed forward under General Centerton's  command and have taken one of the farms but losses have been heavy, the fight is far from over and the sun is sinking low.  The General must get his men and especially his wounded back to the laager and safety before night falls. Reluctantly he orders a retreat but the war is NOT over. They will be back!


Wishing a happy 2016 to you all! 
See you in the New Year!

Tuesday, December 31, 2013

NQSYW: Anything to declare?

As the convoy approached the bridge that marked the exit from Wentworth Pass and safety, nerves tightened. If the rebels were going to try to stop them, it was now or never. It was now!


To escape the hail of bullets the Hussars  spurred forward leaving the Pandours to deploy and clear the rocks overlooking the road. There was no escape however and the Hussars were met by a charge of the Orleans Light Horse, oldest of the Rosmark cavalry regiments and now apparently part of the Rebel army.
At first the Hussars held their own but soon the weight of numbers told and those not cut down were taken prisoner.


The remaining  Royal troops, now reinforced by the Queen's Regiment and the 2nd squadron of Hussars, pushed to cover the vital convoy from all angles as the old King's Regiment appeared rushing to block the road ahead and an unidentified body of light troops emerged from cover behind the convoy.


Amidst the smoke and confusion the Hussars, pushing their way to the front, suddenly found themselves mere yards from a company of grey coated infantry and drawing sabers, were upon them before they could fire. The infantry recoiled in disorder but the Hussars could not allow themselves the luxury of finishing them off. They rallied back. Behind them, the Pandours having already suffered heavy casualties from Rebel sharpshooters, had been hit by the Orleans cavalry and despite their Colonel taking his pipe out his mouth long enough to personally lay low an enemy trooper, had collapsed and run.


As the Hussars rallied back, the 2nd company of the Queen's pushed forward to cover the front while the 1st company spread out as far as possible to cover the flank and rear. Through the smoke ahead them the ghostly shapes of infantry appeared. It was the 2nd company of the King's rushing to fill the gap. After a short sharp melee, both side fell back  and prepared to resume the fight in a more disciplined fashion.

Although their ranks were much thinned, the Orlean's Regiment gathered it and once again spurred forward crashing into the Queen's men around the carriages. With horses blown and men tired they could make no headway but they had forced the infantry to fall back and rally while they rallied themselves.


To give the Queen's regiment time to rally, the Hussars pushed to the front once again. Passing through the enemy skirmishers before these had time to fire they galloped against the old King's men. Now rallied, these delivered  a shattering close range volley and the Hussars were held. Behind them the sharpshooters closed in on those hated Red Pants from front and rear.At point blank range their fire was deadly and soon the Queen's Regiment joined the flow to the rear.

Surrounded by enemies and abandoned by friends, the Colonel of the Hussars signaled for a parley. While the rebel citizen sharpshooters tended to the enemy dead and wounded the so far unidentified light infantry in their dashing fur caps pushed forward to take possession of the carriage and caissons earning them selves the nickname of Customs Inspectors. With a heavy blow struck against the Royal army and with fresh supplies of gold and munitions the Rebellion is well placed to establish itself.

Full fledged Civil War looms!


Happy New to all!  Here's to toy soldiers  and bloodless battles a plenty in 2014.

Saturday, December 31, 2011

One last game

I have struggled this last year to keep 2 blogs active and have found it awkward to have the run up to my ancient games happen on the other blog while the final battles appeared here. The thought crossed my mind to shut the other down but luckily I slowly realized that I could just shift the ancient reports over there. So it shall be from this day forth.

So, to read an account of a wargame based on Thymbra, Cyrus the Great's famous victory over Croesus of Lydia, where reserves and a central position were used, along with some WRG worthy Gimmick troops, to defeat a double envelopment, please step over to the Gathering of Hosts blog

Happy 2012 to all. 

More thoughts on wargaming and battle reports to come here in the New Year.


Friday, December 31, 2010

One Last Bridge - Pike and Shot Meets Bill and Bow

Light Lancers in French service cross the main bridge while the English Prickers drive a picquet off the 1st bridge. The infantry marches on in the background.

Well the table was all set, just had to swap out houses and troops. My 1st thought was to pit Scots and English again but in the end I decided that the Landsknechts deserved an outing. So here we are, France, 1545, somewhere near Boulogne which is now in English hands. Two small forces clash at crossings over the Dur River. The 40mm armies are a motley mix including mostly original figures mixed with 3 vintage OOP toy ranges from the 60's, home cast Meisterzinn figures and a few figures each from Irregular, Sash&Saber, Doug Miller and Perry.   The rules are Rough Wooing developed by Rob Dean and myself from Joe Morschauer's rules.

THE ENGLISH


The Earl of Belmont.  Gendarmes General

Prickers (4 companies). Sir Henry Percy, Captain of light horse lancers, 3 light horse lancers
Vaward. (6 companies) Redcoats. Michael Alan, Captain of swordsmen, 1 swordsmen, 2 bows, 2 arquebusiers.
Main Battle. (6 companies) White coats. Sir John Smythe, Captain of Billmen, 3 Bills, 2 bows

THE FRENCH


Le Duc de St. Lambert. Gendarmes General

Scots (4 companies). James Douglas, Captain of light horse lancers, 3 light horse lancers
Vaward (6 companies). Jacob Nuremburg, Captain of Pike, 3 pike, 2 shot
Main battle (6 companies). The Rhinegraf, Captain of Pike, 3 pike, 2shot

The English light horse has driven off the single company of Scots that had been deployed to hold the French side of the bridge but their Captain was almost the first to fall. Leaderless, the northern horse spurred forward riding down some arquebusiers and spreading out to avoid the oncoming German pikes.


  While the French troops disperse the English cavalry, the English infantry seizes the 2 bridges. (There is a 3rd bridge but no one gets near it) 


A rain of arrows starts taking its toll of the lightly armoured pikemen. The Duc de St. Lambert orders his German mercenaries to counter attack and the pikes drive the English back across both bridges. Eventually the impetus slows and the bills and swordsmen hack apart the pike columns and the Germans break and run. The cavalry makes a desperate attempt to retrieve the day but it is beyond them and the Duc is forced to ride for his life, leaving the "Goddams" in control of the river crossings.

And that wraps up my wargaming for 2010!

HAPPY NEW YEAR to ALL 

Thanks for dropping in 2010 and I hope you'll be back in 2011