Showing posts with label 19thC. Show all posts

Tuesday, August 4, 2020

Ready to Rumble

All the troops are laid out, they're ready to go. 

(Annoyed aside:  What the $#$@$##$# is blogger playing at? The old version was soooo easy to use. The new one is ok if you work in compose and never want to change more than spelling, but the html editor is about the worst I've ever worked with. I tried to move ONE picture so I could post then go to bed then spent 45 minutes trying to fix the post to make it legible while blogger covertly added 2 to 6 lines of code for every line I took out or added. I finally deleted 2/3rd of the post so I could get to bed and not put a hammer through the screen. Luckily, none of it was really worth reading anyway. )

Please don't copy this out of print, copyrighted, map of the scenario I'm playing, taken from from CS Grant's Scenarios for Wargames ....
(The map shows a 5'x7' table, mine is now down to 4'x4.5')

After playing about with map, table and measuring devices, I finally managed to work out that about 2cm on the map was roughly equivalent to 12" on my reduced table with just a little bit being cropped on the ends.  I made no effort to match unit footprints but I think the 8 man organization ends up with a close enough foot print that I can use the scenario orders of battle without having to tweak the number of units used. Its been a while since I could do that so its 2 feathers in the cap for the 8/4 figure units that the figures were painted for. That'll make my life easier. 

I didn't even have to tweak the ranges. Once the game was scaled out and the troops deployed, I realized that even though the frontlines begin within extreme rifle range in places, the addition of cover means an exchange of fire could last all day without decisive effect unless someone moves forward. 

In the meantime, a battlefield truce has been declared so that I can get on with some overdue errands and chores after having taken advantage of the "Atlantic Bubble" to spent a few days visiting family in New Brunswick. 


.

Sunday, May 17, 2020

Where this came from and where its going


A few years ago, when I decided to trim my collection of toy soldiers again (still chasing the dream of having room to store/display and play with all of my "keepers" without duplication of period and game style), I hit one snag. The 40mm, 1840/50's British forces that I had initially created for campaigns in India didn't have an enemy and I had no idea when I was going to find/make one or an equivalent without duplicating my 54's. However, one has only to look at my blog header to see why I didn't want to let them go. Then the Great War bicentennial arrived and I decided that required my attention.
The Queen's troops  storming a Brethren of the Coast stronghold in  2009 during my play through of Scenarios for All Ages,

Now that "my" Great War is done and gone, and some of the Scruby Colonials, the figures that converted my to the shiny toy soldier look (See  Dick Larsen's Enfilade game) are available again, its time to get back to the planned Northern Atlantica Colonial campaign. 

I want it to be compatible with my 40mm War of 1812 as there are a number of units that  can do double duty when I'm in Toy Soldier mode and short a unit. (See "The Fox is in the Henns").


The last game, "The Fox is in the Henns"April 2017

I also want to go back to the look of the early days of these armies (see Blog Header) and of the last big Faraway vs the Brethren game before the Great War came to dominate things. However, I'm planning to stick with small quick games apart from special events so I am not planning the larger armies for this setting that I once dreamt about building.
Air and Sea expedition against the Brethren April 2017. Photo courtesy of The Newport Noodle

So here's what I expect to have available for a One Hour game sometime this week:

Faraway Trading Company
Brigadier Stonefort (Royal Army officer on Loan)
    Faraway Trading Company Troops:        Larsen's Lancers
        FTC Rocket Battery
        FTCM Landing Party (Heavy Gun
        Ross's Rifles
        (1st Kapelle Sepoys - not available)

Royal Faraway Army Brigade:
    The Buffs
    The Green Tigers
    The Royal Fusiliers
    Victoria Rifles

Royal Kyuqoit Army

General: ??
Household Lancers
Royal Grenadiers

Freedom Brigade (Foreign Volunteers )
1st Battalion
2nd Battalion
Brethren 
Mountain Battery

Provincial Forces
Local Scouts
Riders
2 x Local warriors 

Faraway forces currently  available for this campaign.

Monday, April 2, 2012

Building Bridges

Sappers from a  "Coloured" Company prepare to start in on a pontoon bridge.

The push to get ready for Huzzah continues. I'm not aware that a "Coloured" company of sappers was available for service in New Brunswick in 1839, if anything, volunteer sappers would probably have been raised from  local lumber jacks and boatsmen. However independent companies of African-Canadian volunteers both artificers (sappers) and infantry played a role in both 1812 and during the late 1830's along the US border and I wanted to represent them. The African-Canadian artificers had been praised for their skill in 1812 (while being cheated on their discharge rewards)  so I decided to base my pioneers on them while dressing my unit in 1830's style.

The figures are all conversions of original figures,  the sapper on the left (their left, your right) with musket and white belts is my standard 1830/40 infantry in shell jacket used for US troops and British Artillery in Havelock amongst other things, the corporal with maul is the shell jacket version of my pointing officer while the 2 figures in shirt sleeves are converted from my pirate figure. After some dithering, I decided that since my rules have ended up penalizing 1 stand units unduly, I would make it a 2 stand unit but since it would have been a small unit, I placed only 2 figures per base. With 2 dice per turn of construction power and the ability to take a hit without being shaken, these brave volunteers should have that bridge across the river in no time.

Jack is up next. Just as soon as Make and Mend is done.

Saturday, October 15, 2011

From the Archives: A battle from the future of Faraway & Oberhilse


It occurred to me this morning, that I have archival material from the future of Faraway that show what the uniforms will look like in 1861. Doesn't mean that there can't have been a major shift in the 1840's, just look at the fashion havoc wrought by King William IV in 1832 with his attempt to put all British units into red. (I note that the artillery and Rifles escaped that one) .


Obviously, there are some factual errors in the following background blurb, for example, there is no mention of the hereditary Queen or the FTC and Faraway is described as a break away republic. I think we can guess the source of that information. This does call for more research as to whether Faraway did indeed become a Republic in 1849 or perhaps a Constitutional Monarchy?  

In the mean time, here is the first battle report ever written about a battle in Faraway. I believe it was  first published in 2001 after a wargame fought during a visit of good friends from Virginia. I have left it intact and not attempted to correct details where they differ from what is now accepted as fact. The miniatures are 54mm, the rules used were With MacDuff to the Frontier. The scenarios is the Island Battle from CS Grant's Scenarios for Wargamers. Note the artillerymen in the first picture, this is the only clue as to their dress as they do not appear in the battle. I believe that the New Dundee Highlanders may have been formed in 1842 so perhaps we will see it in action again within the year. 

_________________________________________________________________________________

FROM THE ARCHIVES OF WITH MACDUFF ON THE WEB, AUGUST 2001: 

Oberhilse & Faraway

I'm always on the look out for less well known campaigns to recreate so I was pleased recently to come across a Charlesburg University Press publication:  "Russell's Dispatches from Oberhilse and Faraway: A European View  of the Border War 1861-1863" . Up until then I hadn't realised that William Russell had covered this little known conflict but this book is a wealth of information and has become my main source of information for a new wargames campaign.


BACKGROUND


I won't bore everyone with a long history but I figure a short intro as to the origins of the border war are in order for those who aren't familiar with this area. Leaving aside the question of whether or not St. Brendan visited the island on one of his voyages, we can pass on to mention that the Danish Vikings were the first to settle in what is now known as Oberhilse and that despite various charters from the Stewart's to their supporters (I have a copy of one such granting lands to Black Angus MacFarlane and there may be some validity to the claim that the name Faraway commonly applied to the Western Shore dates back to the MacFarlane grant), generally Denmark's title to the region was not disputed.The discovery of gold in the Rawdon Hills in 1821 led to  an influx of Irish, Scottish and American immigrants and in 1849, discontent with lack of civic rights for "outlanders" led to a revolt and the establishment of the Republic of Faraway. Denmark of course had her hands full with the Shleiswig-Holstein War and when Great Britain recognized the break away republic and pledged support, Denmark gave in and granted them independance with sovereignty over the Western half of the mainland.

FENIAN INVOLVEMENT

Hardcore nationalists in Oberhilse felt betrayed by this settlement and never accepted it. When they were quietly approached by members of the newly formed Fenian organisation who felt that seizing Faraway would provide a good base for their campaign for irish independance, they gladly took the opportunity to strike a blow at the hated British and allowed armed camps to be formed along the border and on some of the islands just off the coast of Faraway. From here the Fenians proceeded to raise and arm troops while sending agents across the border to forment dissent amongst the large Irish population. The Faraway goverment reacted by appealing to Britain for aid and in August of 1859 a small expeditionary  force arrived and a joint operation was launched against the Fenian camp on what is now known as Rebel Island.


This operation was the basis for the first wargame in my campaign. If you want a well written, colourful, account of  the battles and skirmishes of this war, "The thick blue mass tipped with lead" and so forth, I refer you to Russell's dispatches. My own account of our wargames will cover the forces and set up with just a brief description of the highlights. Following the usage of the time, I will refer to the British and Faraway forces as "Red", the Danish and Oberhilse forces as "Blue" and pure Fenian forces as "Green". 

REBEL ISLAND

Dundee Highlanders marching past Governor General & Lady Beaverbrook on their way to embark for Rebel Island. 

Red Army

OC:  Brigadier Daniel Johns (John Daniels Jr.)
2ic: Colonel H MacDuff (Ross Macfarlane)

  • Ft Henry Guards (Officer, colour, drummer, 7 bayonets)
  • Ft Henry Guards  (Officer, colour, drummer, 7 bayonets)
  • 11th Hussars (Officer, trumpeter, 4 sabres)
  • 17th lancers (Officer, 5 lances)
  • Naval brigade  (Officer, 9 ratings,  field gun and rocket)
  • Scots Fusilier Guards (Officer, colours, drummer, 5 bayonets)
  • Grenadier Guards (Officer, Drummer, 6 bayonets)
  • New Dundee Highlanders  (Officer, Piper, 8 bayonets)
  • Lawfordton University College Rifles (Officer, 5 bayonets)
All troops were regular with all but E,H & I being steady. The cavalry was impetuous, the Rifles are Light Infantry. All infantry was armed with muzzle loading rifles.

Pandora leading her Volunteers into action on Bighil Heights.

Green Army

OC:  General Jack Daniels (John Daniels )

  • McAlpine's Fusiliers (Officer, colours, 8 bayonets)
  • O'Reilly's Regiment (Officer, colours, 8 bayonets)
  • O'Carroll's Chasseurs (Officer, 5 sharpshooters)
  • Harper's Battery (Officer, 4 gunners, field gun)
  • Farrel's Fenian Dragoons (Officer, Bugler, 4 Light Horse)
Colonel "Annie" Pandora (Pandora Daniels )
  • New Waterford Volunteers (Officer, 9 irregulars)
  • Tipperary Tigers (Officer, 9 Irregulars)
A,B,C were regular light infantry, C were also sharpshooters,  E was irregular light horse, F&G were irregular light infantry. All troops were armed with muzzle loading rifles.


Rebel island as seen from a hot air balloon as the action begins.
Setup
 The general layout of the island can be gathered from the accompanying photos.  Red had a choice of  3 beaches, one to the East, one to the Southwest, 1 right under the guns of Ft. Daniels. There were sufficient boats to land the troops in 5 waves,  the waves appearing every 4th turn. The waves were selected as laid out above. Gen Jack Daniel's men were encamped in an earthwork on the Western end of the island, Pandora and her Volunteers in billets in New Waterford and the Tipperary Tigers billeted in Farmton in the south.
The game began with the Dragoons departing for their daily patrol of the island heading east from Fort Daniels through New Waterford, while the 1st wave came ashore at Souwest beach, hidden by a screen of trees and the lower slopes of  Bigill Heights.


The fight begins.
The Buildup 
By the time the Dragoons stopped to chat with local inhabitants, frolicked on East Beach and finally topped the crest looking down onto Souwest beach, the first 3 waves of Red troops were ashore and running out of dead ground to hide in. At the same time as a courier was sent galloping back through Farmton and over the saddle, sounding the alarm "The British are coming, The British are coming" (sad but true),  an alert sentry in Ft Daniel spotted the first company of Fort Henry Guards emerging from the woods and sounded the alarm.
Bluecoats spilled  from the fort forming a skirmish line along the creek and up into the hills while the gunners quickly (2 6's in a row) wheeled the gun from its position overlooking North Beach to face the attackers. Brigadier Littlejohn ordered the cavalry to sweep away the enemy skirmishers as the rattle of musketry disturbed the morning's peace.

The Hussars chase after the scattering sharpshooters.
Garry Owen Hail!  
Hearing the bugles ring out from behind the musket smoke, the Fenian skirmish line fired one last hasty volley and scrambled back towards the fort or up the grassy slopes of Bighil Heights. Incredibly one of those bullets, flying high, reached back and plucked the unfortunate Brigadier Littlejohn from the saddle. As his aides gathered round the stricken general,  the 11th Hussars emerged through  the lingering smoke and seeing only the sharpshooters climbing the slopes, spurred after them.
Despite the uneven, rabbit hole strewn hillside, the Hussars caught up with the fleeing Fenians and laid nearly 1/2 of them low in a running fight . Seeing Pandora and her Volunteers emerge from behind the crest to cover the sharpshooters, the Hussars spurred forward yet again but a burst of musketry from the volunteers and cannon fire from the fort tore into them  and sent the dazed remnants staggering back to the beach where they spent the rest of the day tending to wounded men and blown horses.


Irregulars firing from cover.
As the hussars retreated, the 17th lancers spurred forward, but, falling foul of the rabbit holes, they too were gunned down , only Col. Flashinpan and 1 trooper making it back down the slopes to the beach where they hastily re-embarked.

Come Out and Fight!
As the cavalry charged to glory, MacDuff took  command as best  he could. The Naval Brigade was now up and he ordered them to bombard the fort  while a company of Scots Fusilier Guards moved up into line. After a sharp exchange of fire, the Fenian gunners were driven away from their guns and  the British infantry which had been standing under a peppering long range fire from the fort and from the slopes of Bighil Heights, prepared to advance.

HMS Invisible  covers the retreat.
On  the right, a company of Fort Henry Guards reinforced by another of Grenadiers was trading fire with the Tigers and dismounted Dragoons. Despite the steady conduct of both companies it was soon seen that standing in close order  trading fire with an equal number of  skirmishers was not going to win the day. (esp when rolling fistfuls of ones )

Beating up their men's muskets, the British officers ordered bayonets fixed and led them forward into a withering blast of musket fire which laid low the colour party and 1/2 of both companies. The red coated soldiers fell back, rallied and advanced into another furious hail of fire then broke and ran covered by a handful of Grenadiers.


Billy Russell covers the retreat in a different manner.
Thank Gawd for the Navy.  
The last wave of troops was not quite up yet and  the command was badly scattered with only 2 companies in the main battleline but with the enemy artillery silenced, it was now or never if an assault was going to go in.  Slowly the Red line moved forward under a hail of  rifle fire from the fort. Then, suddenly  a blaze of fire came from the flank where Pandora and her crack shot volunteers had crept forward along the slopes into close range. In an instant the British line was a bloody shambles  and reluctantly MacDuff ordered a retreat to the boats covered by the Dundee Highlanders and the boys of the College Rifles.

For a moment it looked like the Fenians would press their advantage but then like a deux-ex-machina, HMS Invisible appeared bristling with guns, and the Fenians crept back to cover. (Actually it was deux-ex-machina, it was bad enough the British got drubbed in the opening battle (very traditional wot?) I wasn't about to allow them to be annhilated !) .


Tuesday, October 11, 2011

More discovering Imagionary Peoples and Places.

Last summer I talked a bit about resuming my exploration of a fictional setting for my toy soldier campaigns. All the usual reasons that one sees in various OS books apply, the ability to fight wargames based on various historical campaigns without building an unlimited number of armies, the removal of national prejudice and political/morality issues that might surround militarily interesting historical campaigns and so on. However, the more I indulge in this business of creating a fictional land, the more interesting it becomes as an exercise in its own right.

I'm not a linguist, despite having managed to rate as functionally bilingual in French in my younger days, which  meant no more than being able to read tolerably well and to carry on basic conversations if the other person spoke slowly and listened thoughtfully, and having picked up a smattering of Scots Gaelic a few years ago. So don't expect an explosion of colourful invented languages and names. I'm not a sociologist or economist either so expect no more than the merest scattering of background such as the average dull witted tourist might pick up on a whirlwind tour. Oh and it may be a long time before the facts uncovered appear anywhere, collected and presented in a coherent fashion. Instead, snippets will appear here and there as they occur to me or as it becomes relevant to a game, partly because I tend to write what I am thinking about with little filtering and partly because I benefit from milking comments. Right, off we go then.

Last night I sat down with pen and graph paper (couldn't find a pencil which I would have preferred), dice and an early copy of BG and drew the basic map of the Northern 1/2 of Neuland. (suggestions for a better name for this island are welcome, both possible native ones, mangled or not and European ones given original discovery/settlement  by Danes and Scots.) The first order of business was to establish the coastline, a topic not actually covered in Henry's Faltanian Succession cartography article. Not being able to remember how I did the first 1/2 other than that when I drew the 1st map, 5 or so years after the cretion of Neuland, I used Henry's article as a guide. I finally decided to start in 1 corner and veer left on a 1,2, go straight on  a 3,4 or veer right on a 5,6, intervening only if it got really silly. There are a few saw tooth stretches of coast that I may  soften a bit but over all it worked well. Once or twice I completed a circle which then became an island and I backed up to create a strait. There were also some interesting peninsulas. All to the good. Next mountain/hilly areas and woods. Here I was a little nervous since I had an idea already of the effect of backwards (sic and apologies to all the Southern Hemisphere readers out there) prevailing winds and mountains on locations of deserts and jungle, but I let the dice go and they didn't let me down. .The biggest area of jungle is on the East coast esp on a low lying peninsula just before a small mountain range. The interior and west coast are either steppe or scattered light woods. For cities, the dice co-operated again, landing a couple on large bays and one at the confluence of 2 rivers. There are lots of details to add over the next weeks but those will be done on the computer rather than by hand. Once I get the map scanned in, I'll share the work in progress.

Adding history, culture and peoples is going to be longer and harder (ie more fun) but the rough outline has been there since before I began. (It really does feel like discovering rather than inventing). As I have said before, I do not wish to copy too closely any real precedent but neither do I wish to stray too far from actual history. With this in mind I have been refreshing myself lightly on various European vs non-European contact in North & South America, South Africa and India. A patient, wise man would spend a year or 2 doing this more deeply but instead I am relying primarily on suggestion from browsing and instinct drawing largely on what I have already ingested in the past. These last few weeks were somewhat shocking to me when I realized just how little I actually knew of the history and peoples of South America, especially prior to the 19thC. Something to be remedied in future but to be honest, at the moment, too deep a knowledge is almost not good as it makes it harder to not copy any one history. Besides various details have already been published in the past on With MacDuff on the Web and I need to be as consistent as possible as I explore this land..

So, having said all that, what do I have so far?

1. The original inhabitants of the island arrived "when the earth was young" when the great warrior Mithiqual crossed the ocean on the back of a giant Crocodile, the descendants of which  can still be found on its eastern shores. He fell in love with a beautiful young seal and she came ashore, married him and became the mother of the People. (ok so some of this may be myth)

2. The bulk of the native inhabitants that inhabit the island are of the same racial origins and show strong cultural similarities on both sides of the Tsentral Mountains despite regional differences. South of the mountains, in the areas partially settled by Europeans, most of the population were largely hunter/gatherers or fisher folk with only small settlements of farmers living in stockaded villages. One of the semi-nomadic Southern Tribal groups, the Saskwatchay is composed of taller than usual men and was originally reported as a race of Giants. (modern research shows that they are only 3-4 mm taller than the average toy soldier but with a corresponding increase in bulk. Fierce-some opponents in hand to hand combat for sure.)

 North of the mountains the situation was similar in the center and the west but with increased agriculture and larger, more numerous towns. . The climate being drier and less wooded, adobe was used for both houses and fortifications. It seems that originally these typically had thatched roofs but as the climate changed and became drier several centuries ago, flat roofs became more common and with the introduction and rapid spread of firearms into the endemic tribal warfare of raid and counter raid,  rooftop parapets  became common, turning every farmstead into a small fortress.

3. In the jungles of the North-East Coast, is a population of jungle/coast dwelling people, off shore fishermen who have been accused of practicing ritual cannibalism. These appear to be of different, though possibly related, race from the rest of the island natives and have comparatively primitive technology and social organization.

4. Most of the native population lived in tribal groups associated into loose confederacies at best but there were three exceptions. In the south-west, the area now known as Faraway,  was ruled by an hereditary line of Queens. These still reign in theory though the Faraway Trading Company Board of Directors is the defacto government. In the  North there are a series of independent, petty kings in the interior who occasionally form significant alliances and in the North West where there are actual native cities that have been in existence since before the 1st European contact, there is an hereditary King who rules a large chunk of the Northern half of the island.

5. In the south, traditional costume was largely made of animal skins but increasingly blankets and other woven clothing were acquired by trade with the North and with the South-West. A mix of European and native styles is increasingly popular. In the north, cotton and wool fabrics are widely used. In hot weather a simple skirt and head scarf were once common wear but now loose trousers are widely worn. Brightly coloured blankets and ponchos are still popular as are head scarves but the latter are sometimes large enough to count as a turban while broad brimmed straw or felt hats, copied from the Europeans have become popular.

6. Horse were introduced by Europeans but spread widely as did the custom of riding. Cattle and sheep are also raised domestically.

7. Finally, the subject of the European history of what is now Neuland, has been touched on previously but briefly, the earliest settlers were Danish Vikings, probably around ad 900 or 1000. They settled along the Hilse River in South-Eastern Neuland and over the years this area has been heavily settled by Europeans from various countries with cities spreading up and down the coast.. This settlement was largely one of conquest and occupation rather than co-habitation. Recently, this settlement pattern has begun to expand north of the mountains.  The Faraway Trading Company (FTC) holds a charter from James VII of Scotland  which grants them many rights. As mentioned above they have turned this into defacto control of the Western coast of the Southern half of the island while maintaining the semblance of a native realm. This means that there has been much greater interaction and co-operation between Europeans and the natives but there has been some influx of farmers as well as many tradesmen and a tendency towards assimilation or European-ization.

The question of economic and political control of the remaining native areas of the Island has been the source of various wars and is likely to be so again..

Thursday, October 6, 2011

WW Who? Where's my Horse and Musket?

The 1st Brigade of the Oberhilse Field Force, pride of the Blue Republic, fielded with its experimental organization of 3 x 12 battalions plus Brigadier, flag and drummer.

OK so things have been a little bit more unfocused than is usual, even around here. In an unusually  persistent manner, I set aside distractions, set up one of the larger sized scenarios/TableTop teasers as previously mentioned. and despite interruptions, naps and movies, played out a Hearts of Tin (HofT) game to see how that felt compared to the semi-skirmish one played last week.
What's wrong with the smoke trail on those rockets?


On the whole the experiment was a solid success. Early on, I had a somewhat strange sensation as, despite the lack of a grid, or 1 Stand units and a different set of rules, it felt reminiscent of a Portable Wargame.   After some thought I am speculating that it was because the game was quick to set up and play, the number of units was similar to what I might have deployed in a PW2 version of the scenario, and the degree of decisiveness was similar. All of those I consider to be positive since it was being done with  over 200 of my 40mm Toy Soldiers in play which means it indicates that I am on the cusp of realizing all of my criteria for pushing on with my various mid 19thC campaigns.  I then realized that it also reminded me of early Morschauser Meets MacDuff games.

On the whole I would say that Mr.Cordery has been a very beneficial influence on me this year.

The Noel Bridge turns into a bloody shambles as Larsen's Lancers  hold the exits against all comers.

Due to various non-gaming related issues I was not able to sit and play the game out in one session, or two. I wasn't worried since by about turn 4 or 5 it was obvious that Red was about to win a major victory despite the valiant attempts of the Faraway Trading Company Horse Artillery Rocket Battery to prove themselves to be impartial (doing almost as much damage to their own side as they did to the enemy.)  Every attempt by Blue to cross the bridge has been thrown back with heavy loss, including one by the Dragoons, committed from reserve. The Blue Guards had been thrown back and only the Oberhilse Field Force was unbloodied.
The Blue Guards have been repulsed. Time for bed, we can finish up in the morning.

I got up this morning to finish off loose ends, after all, one doesn't wish to lay oneself open to charges of favoritism. OK in goes Blue's 1st Infantry brigade. Storming up out of the river, up the hill against the defended villages. Not much hope there. Oops.


  Ever have one of those games where  the winning side's dice suddenly go cold?

About 8 turns later, after the Rocket Battery came close to blowing itself up, and after heavy casualties, Red finally won their victory, by a nose. The only thing keeping Red on the field when Blue's morale finally cracked was Larsen's Lancers. They had been left by themselves to  hold the bridge while the rest of the flanking force fell back on the double to the main position, had repulsed a final desperate attack by a Squadron of Blue Dragoons and were still in fighting fettle. Full honours to the Lancers this day. 

The narrowness of the victory was partly due to Red's dice going suddenly cold but mostly to me not really noticing how much slowly accumulated damage had been inflicted on Red while over estimating how much damage had been done to Blue. As a result, I was slow to make the best of the available resource and also failed to pay heed to the victory conditions which were about blocking Blue's ability to proceed off table, not to necessarily stop them from getting a bridgehead. I could see however that some tweaks to the morale rules had not had the desired effect of making things more decisive but in fact had made them less so. This is a delicate matter that I have been alternately tweaking or drastically experimenting with over the last 8 years, occasionally getting it close to what I want. Hopefully the latest tweak will do it as I had been close enough this time for it to have been acceptable if not perfect. In any event, by the end of the game, and about 6 short gaming sessions over 2 days, the Portable feeling had evaporated.

As a minor aside, I was also trying out how the Observation balloon and Hospital worked with the simplified rule. For the 1st 1/2 of the game, they were pretty much irrelevant, for the 3rd quarter the hospital kept Blue in the game while the Balloon was useless while during the final quarter, the hospital became useless and  the balloon saved the day, breaking ties to give Red the initiative on several key turns.   So, good all around.
(hmm that came after the balloon was hauled down, moved and relaunched, maybe it was just in the wrong position at the start....)

The situation near the end of day.

Anyway, after a successful and enjoyable game which indicated that I am on the right track for my "main thing", and having posted the 1st couple of ideas for early/mid 20thC games, it seemed logical to clear off the troops and deploy 1/72nd Roscian and Naryatrian tanks and infantry to try out the rules.  Buuuuuuut there were just a few niggly little things before I pitch into painting and basing, making scenery, tidying my room, and all the other horde of things that have been put off over the last while.

While the 12 man units worked ok and could be a good basis for my projected campaigns,  this was one of the larger of the scenarios, top third anyway, and the table hadn't exactly been crammed. The Battalions felt small and fairly brittle and the Brigade turned into the effective unit. OK for my 1/72nd ACW where I'll be able to field brigades as scenario units but not so great for the 40's who will not be able to squeeze 8 brigades onto the table. A quick check of my scales also reminded me that a 12 man battalion is less than 400 men, ok for 1812, not so good for India. Perhaps I should run my 16 man line infantry, 8 cavalry or light infantry units  to see if they were the right solution after all, and then, there are those small tweaks to the rules that need to be tested.  I want to work a bit on bases and maybe movement trays and want to play the game in 1 or at most 2 sittings so while the table is set, I plan to try it out on Saturday.

Its been 2 years since my 20th C troops have been out, I guess they can wait a while longer.

Deja Vue only bigger. The forces redeployed with 16 man Battalions, 48 man Brigades

Tuesday, September 20, 2011

Portable Alto: A Mexican-American Proto-Wargame

I'm not sure exactly what Chapparrel really looks like. I am pretty sure it doesn't look much like  $ store plastic fake ground cover plants but there is an old wargamer axiom, "Use what ya got". It is in that spirit that I decided to see what it might feel like playing out an historical Mexican American  battle using the Portable Wargame 2.

The American army deployed.

Starting small and starting at the beginning both seemed smart and both led me to Palo Alto. Luckily, I just happened to have kept some old Courier articles on the war and one was this very battle. Having previously cross checked it against a few other sources, this is not a war that I am "into" but it is "in period" and I like the US uniforms, so I have a few books and articles squirreled away and websites marked.

Apart from lacking a few gunners, I have more than enough American infantry and dragoons to do Palo Alto using 10 infantry or 4 dragoons per unit. Until I rebase though, I can't fit that many in a hex so most units are  8  while I only used 2 Dragoons per squadron to avoid embarassing the supposedly more numerous Mexican cavalry who were only able to fit 2 figures in a hex.

The Mexicans are more problematic, I don't have any 1840's Mexicans and like the earlier uniforms better anyway. My one 24 man Mexican unit broke down into 4 6 man units and 1812 American infantry wearing Blue coats and shakos filled in for the rest. The British supplied gun crews and cavalry while New York filled out the cavalry ranks.

This is what I call a Mexican Stand In.

Each unit represents somewhere around 400 infantry, 100 cavalry or 4-6 guns.  Perhaps I should have halved the number of cavalry stands but it worked well enough.

I used the modified Quality/Effect die roll that I suggested but left all other rules alone, except for details of unit capabilities. This was a war where units on opposing sides were not always equal. The Mexican troops were brave but suffered from leadership and equipment issues with obsolete weapons, poor powder and so on. After some thought I decided on the following troop capabilities:

US Infantry: Regular Infantry, Muskets, no special rules
US Dragoons: Elite Cavalry, no special rules.
US Artillery: Elite Artillery, Moves 2 hexes instead of 1, Melee value of 3/6
(a little more Grape Captain Bragg, crack troops armed with light 12 pounders and 18 pdr howitzers, horse artillery really.)

Mexican Infantry: Regular Infantry, Muskets, -1 to all shooting dice
(due to old muskets and poor powder.)

Mexican Regular Cavalry: Regular Cavalry, Melee value of 3/6 4/6
(due to performance and smaller horses)
(Note: I just realized that I inversed the irregular and regular cavalry values when I originally typed this up. The red figures are corrected)

Mexican Irregular Cavalry: Militia Cavalry, Melee value of 4/6 3/6
(these were really bandits rather than soldiers and of little use in pitched battle)

Mexican Artillery: Regular Artillery. -1 to all shooting dice. Melee value, 5/6
(armed with old ox drawn 4 pounders and poor powder)

I ruled that it cost 2 movement points to enter a hex of chapparrell. Cavalry attacking through chapparrell would have a +1 penalty to their Melee Value. (it belatedly occurred to me that -1 for fighting enemy in chapparell would be better, reducing the effect of the troops struggling through the brush rather than increasing their risk.)

Once fighting was engaged, the historical brush fire would be simulated by having a turn with no shooting or melee allowed and giving the Mexicans a free move to start their redeployment.

Not being a campaign game, I decided that the first side to lose over 1/2 if their original units would retreat. The Mexicans had 7 infantry, 3 guns and 11 cavalry and could afford to lose 10 units. The Americans had 5 infantry, 3 guns and 2 cavalry and could afford to lose 5 units. Both sides had a general for looks only.

Both armies would follow their original battle plans as far as possible given that I only had the general idea, an exchange of artillery fire, Mexicans counter-battery without effect, Americans counter infantry with effect, followed by an attack by Mexican cavalry on their left supported by guns and infantry through the brush on the left, then the fire and redeployment and an attack up the right by the irregular cavalry supported by infantry.

Casualty figures and unmanned guns mark where units were destroyed. 

The first stage went according to plan with one Mexican battalion being destroyed and another forced to recoil. The attack through the Chapparrell started off historically with heavy losses from the US infantry but 1 squadron managed to charge and take out Ringgold's elite horse artillery. ( A 6 in melee followed by a 1 for effect...Oops! dice! What can you do? ). I committed the US dragoons and then called the brush fire. 6 out of 8 Mexican squadrons had been destroyed in addition to the infantry lost to artillery fire earlier.  The Americans had lost a gun and an infantry. Honours almost even but slightly in the US favour.

There were lots of Indian soldatos in the Irregular Lancers right? Oh. Not that kind?

The flanking attack by the Irregular cavalry looked dangerous until it got close. I decided to throw in the reserve and launch a major infantry attack at the same time. Units were forced back or destroyed on both sides with the Americans losing another battery (ouch!) and a battalion. This brought them to 4 losses, 2 away from breaking. The Mexicans however, lost 1 of the Irregular cavalry and no less than 3 infantry, mostly to artillery fire.

History repeated itself and they fell back towards Resaca de la Palma.


The game took a little over an hour to set up and play but it is one of the smallest American-Mexican battles and it was a fun little game with some tense moments. At first I pondered why the Mexicans let 1/2 their army sit while one wing attacked and then did the same on the other side. PW1's activation die might have supplied a reason to emulate it if not a reason it happened but then I realized that my 50% scenario army morale provided ample reason. An unsuccessful and bloody assault on 1 wing might have upped the casualty total fast enough that the game could be lost despite a bloody but successful attack on the other wing. So the rules worked well as is. (I consider my troop capability decisions to be campaign qualifiers not rules changes)

The historical result came naturally but it was close enough that it could have been reversed, especially if played by 2 players and no constraints on tactics.  If I get a chance though, I may try it again with Morschauser Meets MacDuff, the proto-version of Hearts of Tin.

Monday, September 19, 2011

Lost in the Fog, the Battle for Centerville

The 2nd Test Battle has now been fought and a cracking game it was too, unfortunately this report begins with an apology and a fistful of excuses. The bottom line is my camera was out of batteries and I was both tired and subject to a plethora of domestic duties, not to mention a trip to town to see if I couldn't get the Graf Spree in and out of Montevideo.  Instead of waiting, I indulged myself and played a turn or two when ever I could grab a couple of minutes, early morning, lunch time, on the way to bed etc., and my recollection of the details is almost as fuzzy as the poorly lit cell phone pictures.  (Have I ever mentioned how little natural light I get in my room and how poor the artificial lighting is? Its on my list. Ain't renovating 150 yr old houses fun? esp relying largely on shoestrings for materials? Worth it though.) Anyway the many pictures vary from bad to completely un-usable  so I am just going to use enough over views to give a vague impression of how this game looked vs the MacDuff game.
Through the 1/2 light of morning, The columns of the Oberhilse Field Force approach Righton. 

Stuart Asquith's scenario called for the militia to be 2/3rd of a regular unit with a corresponding reduction in effectiveness. Since my rules penalize militia fairly heavily, I thought they may have ended up even weaker than he intended. For the 2nd game, I made 1 unit militia but at nearly full strength (16 vs 20), made another only 12 strong but made them regular and made the last group 12 strong but called them irregular.

The plan was for the rest of the units to be 20 line infantry or 12 light instead of the 12 or 8 fielded for MacDuff, and 12 cavalry instead of 6. However, my cavalry had been raised as either 9 or 10 man units, depending on whether they were formed when I was thinking of using Charge! or not, so 12 man units were out. I decided to settle on 8 man squadrons capable of acting as 4 man troops when called for. (Still haven't written that into the rules and probably won't, I might just take out the rule inhibiting it which I ignored!)  For the  infantry, I called on some 1812 units to make up numbers but decided to field the Blue Guards and Royals as 12 man Elite units rather than replacing them with 1812 fellows. The Jury is out whether 12 Elites are equal to 20 Regulars but in any case I'm intending on fielding them as 20 man units so it was a daft experiment, typical of the sort of thing I might try late at night when I should be going to bed, not setting up a game!  (If I'm going to game on into my 90's I need to get used to making concessions to decreased mental stamina!)

At last the table was set and I began to carry out the same battle plans with increased numbers of troops per unit and using the revised Hearts of Tin.


The Republican battle line forms, watched by a handful of Irregular cavalry.

The militia was evicted smartly from Lieuton with minimal losses to the two battalions of Oberhilse Volunteers but in Righton, the irregulars proved to be made of sterner stuff and repulsed several attacks. The irregulars are no better in combat but are not as fragile. These were my new unit and this time, earned honours of the day. Rallying in support of the Queen's artillery, led by the General in person and aided by a troop of the Director-General's Bodyguards, (not to mention some lucky dice both hits inflicted and hits avoided) they saved the gun several times seeing off Blue Dragoons and infantry as they were slowly forced back towards the table edge.

The bottom line though, is that again, both villages had fallen before substantial reinforcements arrived. This time, however, the  attacking force did not look vulnerable to a counter attack so apart from a rather disastrous spoiling attack by the Irregular lancers (who knew the enemy's old dice had so many 6's in them?), the Queen's troops formed a defensive line in front of Centerville and waited.
Turn 7. The view 1/2 way through the battle. The last Red infantry is just arriving.

The last 7 or 8 turns of the game (I lost track despite the Officer of the Watch on the turn record chart) saw a series of attacks and counter attacks with Red eventually being driven back into the town.  Both armies had taken heavy damage, but still had fight in them. There was no possibility of a Red counter attack and while Blue had enough strength to renew the assault on  Centerville, fighting through the streets was liable to continue until well after dark with the issue still in doubt. If it was a campaign, they would not have pressed the issue and so I called the game. This time with 2 communities in their hands, it was a Marginal Victory  (Winning Draw is Stuart's term)  for the Blue Army of the Republic of Oberhilse.


So why do I think HofT will be better for my campaign than MacDuff?  There are fewer details for each combat, things that are partly tactics and choices in MacDuff are just die rolls in HofT and so MacDuff ought to form a better narrative, but at the end of the day, there seemed to be just as many memorable moments in the Hoft game and manouvering brigades of 60 men about the table rather than companies  of 12 or even, occasionally, battalions of 36 just felt more like what I picture for a campaign. Conditioning I suppose but the decreased ranges also helped make the table feel bigger.

On top of that, not only was the game as exciting and lasted for nearly as many turns, it was played with twice the number of figures in about 1/2 the time. More figures to paint! Yes!

I'm ready now to clear the table and chomping to get going on getting units up to strength, adding some Red  cavalry and getting all the units off the washers and bases and onto their own little bases, but first, I have one more play test for the sake of thoroughness. The Portable Game II will gets its outing. I may swap the period though, just for variety sake.

Tuesday, September 13, 2011

Raid on Centerville Pt 2 - The Red Queen Needs New Dice

Last time on BGotM, the forces of the Republic of Oberhilse had invaded the Kingdom of Faraway. Rushing to defend the border, the Queen's troops under Brigadier McDonnell have arrived at Centerville and begun deploying.

Quickly assessing the situation, McDonnell decided that the Republican forces consolidating their hold on Righton were too strong. The York Volunteers were still disputing Lieuton so a company each of the Royals and the Green Tigers  were sent hurrying up the road to reinforce them and take back the hamlet. The company of the Young Buffs were deployed along side the guns and cavalry to defend Centerville.

An order was sent out to the Centerville Battery to fall back on the main defensive line. A prompt move by the guns would see them safely behind the Buffs. Alas in all the confusion the Buffs failed to get the order to advance while the gun crew was slow to bring the gun out of action and limber it. If the enemy were to seize the intitiative, the gun was at severe risk of being ridden down.

Sure enough, the Blue Dragoons appeared through the  smoke. (Out of 18 turns, Blue won the initiative 14 times, no ties).  Over the hill, B Company of the 3rd Regiment had finally charged the Hillside House. The York Volunteers put up a fierce struggle but as the fight continued, they suddenly collapsed and as the Royals deployed, a stream of militiamen poured past them, heading home. Sending an urgent order to Colonel Larsen and his lancers to save the guns at all costs, MacDonnell raced across to rally the fleeing militiamen.

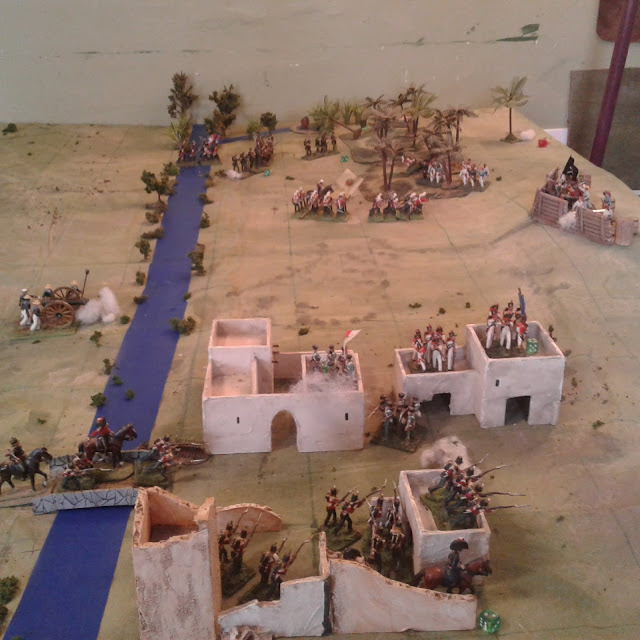
The Faraway forces in crisis.

Larsen's Lancers charged bravely and punched above their weight but the weight of the enemy cavalry proved too much and they were scattered. The guns however, were saved. As the Republican cavalry began to rally, a whiff of grape (sic) from the Queen's gunners, sent them galloping to the rear.

  MacDonnell rallying the York Volunteers

As the Redcoats pressed on past the retreating militia, MacDonnell rode amongst the militia, calling out for them to stand firm. A rump of the volunteer company fell into ranks were sent back to hold the town. For the moment the crisis was over.

 A shame faced group of Volunteers runs the gauntlet of the town's women.

Across the field, General Scott surveyed the field and wished the table was still a foot wider. He was going to having trouble getting through the defile between town and hill. Deploying his guns covered by the cavalry, he ordered The Blue Guards to march through the town, sending their attached Voltigeurs around the town to flank the enemy guns. The 1st Infantry were ordered to leave C company to hold the village while the rest of the regiment moved through the defile. As he rode forward to supervise the deployment, disaster struck. A blast of cannister tore into the 1st Infantry as he joined them, throwing Scott to the ground, covered in blood. As he was carried from the field, the Blue Guards deployed and seeing the enemy at hand, opened fire on the Buffs. It was a natural move, but one which the  veteran Colonel knew better than to make.   The plan had been to advance to fire a volley then advance to close range. With their General down and under a hail of cannister, the officers were unable to stop their men from firing and resume the advance to an effective range. (A unit which fired or fought in melee but which has a general within 12" will obey an order to advance on score of 2 or better but needs 4 or better to advance a full move. Without a general they need to score 1 higher). Before long the line started to waver then as the enemy  cavalry charged, the Guardsmen broke and ran back through the streets of town.

   The Blue Guards are driven in.
Now, thought MacDonnell, " the Royals have retaken the Hillside House, the Tigers have seen off the Light Horse and Voltigeurs and the way to the General Store is open. if I can just hold the initiative, I can wheel the Centreville battery around and see off these pesky Voltigeurs on that flank". But it was not to be. As the Peipur Tigers charged forward against the Bodyguard, the Voltigeurs, who had slowly crept closer to the flank of the Battery, suddenly charged. Quickly the gunners ran back behind the Buffs as these wheeled to face the riflemen. A brisk melee ensued before the Voltigeurs broke and ran for the woods.

As the Republican guns resumed their counter battery fire, the Peipur Tigers suddenly emerged  from the rear and with bugles blaring and charged forward. The Bodyguard wheeled and spurred to meet them. A clash of anti-titans, vying for the title of least effective cavalry unit in existence. It was a near run thing but even the fabled Tigers were unable to lose to the Bodyguards. The remnants rallied back while their opponents streamed off the table. Taking advantage of the Buffs disorder after the repulse of the Voltigeurs, the badly battered Blue Dragoons charged forward. The odds were 2:1 that they Buffs would be ridden down but calmly these tough veterans formed square and the Dragoons pulled back.

The Young Buffs earning the honours of the day.

As the sun sank in the  sky, the two armies paused. All that stood between the Republic and Centerville  was a battered company of infantry and 2 guns. The Republican army could still muster 5 battered companies of infantry and 2 guns but the infantry was still rallying behind Righton and it would be dark before they could push an assault. Even then, they were not fresh enough to be relied on to push forward and take the guns unless their own battery could win a artillery duel and that would take time as well.

In Lieuton, the battle still raged. The Royals, ensconced in the Hillside, were trading fire with the 3rd Infantry while the Green Tigers stood in reserve and watched, ignoring order after order for reasons that have yet to be given. At last, as the Royals were driven back by the volume of fire, the Tigers stormed forward, driving the remnants of the 3rd Infantry before them. Lieuton was clear of the enemy.  A costly fight for both sides but the Republican forces had no real choice but to retreat under cover of dark.  Every one is sure that they will be back, and in greater numbers.


As I said yesterday, this game has helped me remember why I used to enjoy MacDuff to the Frontier games. It also helped me accept that the attempts to change it into something else were misguided. The current version works well but since it has been done in a hurry, it has not been thoroughly checked and I ended up making up various rules and interpretations as I went, and relying on unwritten conventions and custom. This is just a matter of thorough revision now that the basics are firm again.

The replacement of a control check and variable moves by a better control/orders check including a 1/2  move delay result and fixed moves, worked really well. It gave a similar over all level of uncertainty, especially since my dice seemed to have an abnormally high number of 1's on them. (and unlike the Initiative and Melee rolls, these were not predominately a Red phenomena).  The improved shooting chart worked like a charm and the Rally rules worked like originally intended.

However, while the game was fun and exciting at times, with more tactical detail than I have been used to dealing with, the return to roots brought back the original issue. This is a medium sized scenario but it took me over 5 hours to play the allotted 20 turns, and it was only one Brigade a side. One of the issues is that it is not easy to remove units from the game entirely. Its possible, especially in melee but generally units can be driven back, rally and come back again, or at least hunker down somewhere safe, not a serious threat but not something to be ignored and forgotten.

For the wars the rules were meant to be used for, this is an entirely proper thing. In game terms, however, unless one side can follow up successes and mass decisive numbers where it counts, games tend to drag on even though each turn goes quickly. Scenarios need to have some form of establishing victory and an endgame condition other than destroying the enemy. This can include time limits, casualty limits, objectives like blowing a bridge and other more clever things.  

For the War of 1812, using a scale of about 1:15 with battalions of 3 or 4 eight man companies, I think MacDuff will still work well and I intend to finish polishing them with that in mind. A game like Chrsyler's Farm can probably be handled in a  3-4 hour game and a battle like Lundy's Lane go on well past dark until both sides are as exhausted as the historical armies were.

For my Faraway project, there is a lot of potential for this approach for a campaign. Room for personalities, names of officers if not men, detailed narratives and so on but I'm not sure this is the route I want to go. I am attracted by being able to make double use of some of the troops and I can certainly justify small War of 1812-ish games, but this may also be an opportunity for me to separate them, even if I do replace my existing shaded, chunky 1812 troops with glossy toy soldiers. A common basing system, compatible unit organization and figure style might allow some double use of some figures where needed or useful. There is something to be said for 1 of the projects being set up for fast paced games with bigger armies. (Bigger in theory as opposed to the number of figures deployed).

A Featherstone/Morschauser sort of game with 20-ish man battalions with rules that allow a game of this size to be played to a finish  in 2-3 hours may be what is needed. I'm currently reviewing Morschauser Meets MacDuff, Hearts of Tin and the in between versions of MacDuff  (eg Plattsburg and Rosie's) that I had played with looking for something that might work with individual figures for maximum compatibility. Having 1 element based campaign (Faraway) and 1 figure based one (1812) is an option but not my first choice, not now that I have finally found bases that I like and that work! (check out the pill shaped flexible steel 15mm wide bases used by the Royals in the pictures above and in the last 2 posts.)


Monday, September 12, 2011

Raid on Centerville Pt 1

The situation at the end of Turn 3. 

After some more thought,  I decided that I should try a traditional style MacDuff game after all. After a  quick fix to the rules to remove some attempts to make it something else, I set to this evening. The rules as being used have been uploaded to Google Docs, (see link on the left).

The Faraway defenders consisted of 3 x 8 man independent companies of militia, a militia gun and a troop of irregular cavalry with Colonel Jefferies acting as Brigadier. I threw 2 dice each turn for each unit of potential reinforcements with these arriving if the score was equal to or less than the turn number. General MacDonell would arrive with the first reinforcement. Drawing on the War of 1812 for inspiration, I decided that the 3 infantry companies would be detachments from 3 different battalions rather than a complete battalion. My Faraway cavalry are somewhat limited so I included 1 Troop  of the Director-General's Bodyguard and a 2nd troop of Larsen's Lancers which would combine to form  a Squadron.

Oberhilse committed General Scott and the 1st and 3rd Infantry on turn 1, a battery and the Blue Guards on turn 2 and a squadron of Dragoons, a troop of the Peipur Tigers and one of the Frontier Light Horse on Turn 3.

All units had to pass an orders test to move on table so might be delayed.

General Scott's plan was to send the 3rd Infantry supported by a troop of light horse against Lieutown with everything else going left. Colonel Jefferies plan was to deploy the gun to the south west of Centerville to support Righton with the lancers in support while the York Volunteers pushed on to Lieutown. By then hopefully the first regulars would be arriving.

The 3rd infantry, perhaps unused to working with the rifle armed Voltigeurs which had been attached, struggled to carry out its orders. The rifles sniped at the defenders from Turn 1 but by Turn 5 no assault had gone in.

On the Oberhilse left though, the 1st Infantry pushed ahead despite heavy defensive musket and artillery fire and stormed the Stone House one turn and the Blue house on the next. By Turn 6, Righton was firmly in Oberhilse hands.

Turn 4. B company of the 1st Infantry storms the Stone House.

Finally on turn 6 the Queen's cavalry and artillery began to arrive, followed shortly by the infantry. 

MacDonell and the cavalry arrives just as Jefferies is struck down by a fragment from a howitzer shell. 

Is it a case of too little too late?  As the Redcoats appeared on the edge of Centerville, the 3rd Infantry stormed the General Store. So  far losses to the Bluecoats have been minimal. Can the Queen's soldiers hold Centerville against twice their numbers? Let alone recapture the Hamlets?  

We'll find out tomorrow.  

I'll also give my thoughts on the rules, organization and feel with the Faraway campaign in mind. Suffice for now to say that I have at least remembered why I used to enjoy MacDuff games.